Smith-Morra Gambit
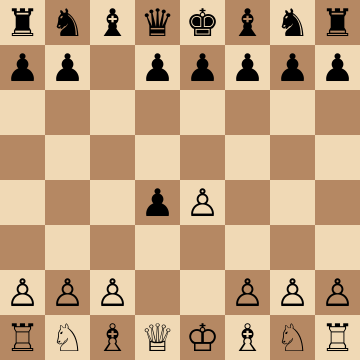
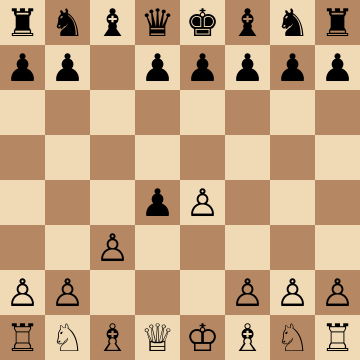
1.e4 c5 2.d4 cxd4 3.c3
The Smith-Morra Gambit (1.e4 c5 2.d4 cxd4 3.c3) pays one pawn to turn the Sicilian into White's game: open c- and d-files, pieces on aggressive squares, and attacking schemes that repeat from game to game. Sicilian players prepare for the Open Sicilian all their lives — the Morra makes that preparation worthless.
Mainline
1.e4 c5 2.d4 cxd4 3.c3 dxc3 4.Nxc3 Nc6 5.Nf3 d6 6.Bc4 e6 7.O-O Nf6 8.Qe2
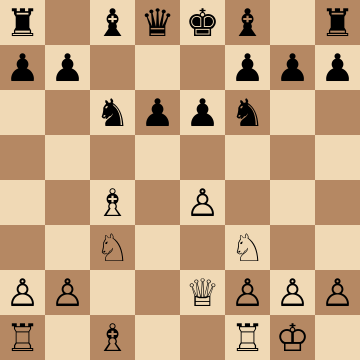
Main Line: Classical Setup with 8.Qe2
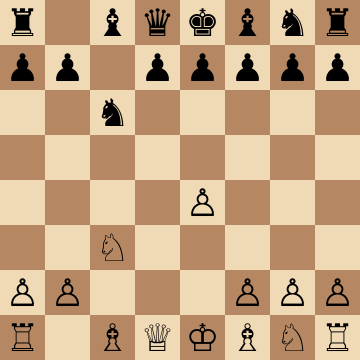
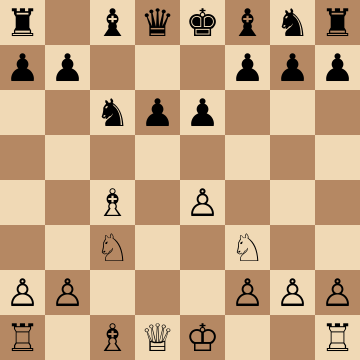
1.e4 c5 2.d4 cxd4 3.c3 dxc3 4.Nxc3 Nc6 5.Nf3 d6 6.Bc4 e6 7.O-O Nf6 8.Qe2 Be7 9.Rd1 e5 10.h3 O-O 11.Be3
Every piece to its assigned seat: knights on c3 and f3, bishop on c4, queen on e2, rook to d1 — and suddenly Black's d6 pawn is a permanent patient. When Black blocks the pressure with 9...e5, White gains the d5 square forever: Be3, Rac1 and Nd5 follow, and the c4 bishop keeps eyeing f7. This is the tabiya to know deeply; the pawn deficit is invisible while every White piece outworks its counterpart.
Siberian Trap: 9...Nd4! and Qh2#
1.e4 c5 2.d4 cxd4 3.c3 dxc3 4.Nxc3 Nc6 5.Nf3 e6 6.Bc4 Qc7 7.O-O Nf6 8.Qe2 Ng4 9.h3 Nd4 10.Nxd4 Qh2#
The one trap every Morra player must know from the DEFENDING side. With the queen on c7 and knight on f6, the careless 8.Qe2? allows 8...Ng4!, and after 9.h3?? Nd4! the threats are unstoppable: 10.Nxd4 permits the shocking 10...Qh2 checkmate, while 10.hxg4 Nxe2+ wins the queen. The antidote is simple move-order discipline — play h3 before Qe2, or meet ...Qc7 with the aggressive Nb5. Respect the Siberian, and it never touches you.
Early ...Nf6 Trap: 6.e5! and Bxf7+
1.e4 c5 2.d4 cxd4 3.c3 dxc3 4.Nxc3 d6 5.Bc4 Nf6 6.e5 dxe5 7.Bxf7+ Kxf7 8.Qxd8
Natural development walks straight into the Morra's oldest tactic. After 4...d6 5.Bc4, the routine 5...Nf6?? loses on the spot: 6.e5! and if 6...dxe5 then 7.Bxf7+! deflects the king, and 8.Qxd8 wins the queen down the freshly opened d-file. This punishment pattern — e5 clearing the d-file, Bxf7+ removing the defender — recurs throughout the gambit whenever Black leaves d8 loose. Half of your club opponents will allow some version of it.
Morra Declined: 3...Nf6 (Alapin Transposition)
1.e4 c5 2.d4 cxd4 3.c3 Nf6 4.e5 Nd5 5.Nf3 Nc6 6.cxd4 d6 7.Bc4 Nb6 8.Bb5 dxe5 9.Nxe5 Bd7
Experienced Sicilian players often decline with 3...Nf6, steering into Alapin waters — and that suits White perfectly. The e5 push gains space, 6.cxd4 restores material equality with a strong center, and the 8.Bb5 pin keeps the initiative. Black declined the gambit precisely to avoid your preparation and landed in another system where you know the plans: O-O, Nc3, and central play against d4-d5 breaks. No refund available.
Morra Declined: 3...d3 Push
1.e4 c5 2.d4 cxd4 3.c3 d3 4.Bxd3 Nc6 5.c4 g6 6.Nc3 Bg7 7.Nf3
Returning the pawn with 3...d3 avoids all the sharp lines — at the price of giving White a dream position for free. Take with the bishop, then play 5.c4: a Maroczy Bind structure where White enjoys extra space, easy development and zero risk. The d3 bishop slides to c2 or e2 as needed, knights come to c3 and f3, and Black spends the middlegame proving the passive setup was worth it. Statistically one of White's best-scoring branches of the entire gambit.
...a6 and ...b5 Expansion: Nd5! Sacrifices
1.e4 c5 2.d4 cxd4 3.c3 dxc3 4.Nxc3 e6 5.Nf3 a6 6.Bc4 b5 7.Bb3 Bb7 8.O-O Nc6 9.Qe2
Black's ...a6 and ...b5 plan looks like it gains time on the c4 bishop, but b3 is exactly where the bishop wants to live — still X-raying e6 and f7. Every tempo Black spends on queenside pawns is a tempo not spent developing the kingside, and that is when the thematic Nd5!! exchange sacrifice appears: exd5 exd5 rips open the e-file against the uncastled king. The course drills these sacrifices until you spot the pattern instantly; they decide more Morra games than any main line.
Key ideas
- Sacrifice the c-pawn for permanent pressure down the half-open c- and d-files.
- Deploy the standard battery — Bc4, Qe2, Rd1 and Rc1 — and let the setup generate threats itself.
- Master the thematic strikes: Nd5 sacrifices, e5 breaks and Bxe6 demolitions decide these games.
- Punish declining attempts: 3...Nf6 and 3...d3 give White a comfortable game with no investment.
Typical plans and structures
White's pieces have assigned seats: knights on c3 and f3, bishop on c4, queen on e2, rooks on c1 and d1 — and from there the plans flow: pressure on c7 and d6, the e5 lever, and the famous Nd5 exchange sacrifices when Black's queen lingers on the c-file. Black's most testing defenses involve precise piece placement that one wrong move order ruins; the course drills both the schemes and the concrete punishments. Even in the endgame, the activity often outweighs the pawn.
Who should play it
Attacking players who face the Sicilian every week and want initiative, clear plans and quick wins instead of an Open Sicilian theory arms race.
Study the Smith-Morra Gambit move by move
The first 3 lines of the interactive course, exactly as a signed-out visitor can play them — each move with the coaching note shown on the board.
Line 1 — the main line
1.e4 We take control of the center. 1...c5 Our opponent chooses the Sicilian Defense. 2.d4 We strike in the center. 2...cxd4 Our opponent captures the pawn. 3.c3 We play the SmithâMorra Gambit. 3...d3 Our opponent gives back the pawn in a very particular way, perhaps hoping to neutralize our initiative. 4.Bxd3 We recapture the pawn, and plan c3 c4 next, to establish a powerful Maroczy or Hedgehog. 4...Nc6 Our opponent develops the knight. 5.c4 We setup a Maroczy bind, this is a very good outcome out of the opening. 5...g6 Preparing to fianchetto the bishop. 6.Nc3 We develop our knight. 6...Bg7 Our opponent fianchettoes their bishop. 7.Nge2 We develop our knight via e2 in order to protect the knight on c3, preventing ...Bxc3 which would have doubled our pawns. 7...Nf6 Developing the knight to the most usual square, and preparing to castle. 8.O-O We castle short. 8...O-O Our opponent castles short. 9.h3 We cover the g4 square so that we can develop Be3 next. 9...d6 This is a standard move, it gives Black a little bit of breathing room, it clears the d7 square for a bishop or knight maneuver ...Nd7 followed by ...Nc5. 10.Be3 We develop the bishop to the best square, now that ...Ng4 is no longer possible. 10...b6 Our opponent clears b7 to develop their bishop. 11.b3 We consolidate our c4 pawn, to make our position rock-solid. 11...Bb7 The bishop develops, and now keeps an eye against the e4 pawn. 12.Qd2 We have a comfortable Maroczy bind, with a small but stable advantage.
Line 2 — the main line
1.e4 We take control of the center. 1...c5 Our opponent chooses the Sicilian Defense. 2.d4 We strike in the center. 2...cxd4 Our opponent captures the pawn. 3.c3 We play the SmithâMorra Gambit. 3...dxc3 Our opponent accepts the pawn sacrifice. 4.Nxc3 We recapture the pawn. 4...e6 Our opponent covers the d5 square to prevent a knight jump, and prepares to develop. 5.Nf3 We develop our knight. 5...a6 The purpose of this move is to cover the possible knight jump to b5. 6.Bc4 We develop our bishop. 6...b5 Our opponent uses their pawn to harass our bishop. 7.Bb3 We keep the bishop on the diagonal. Although blocked, it's our most active option, and it somewhat discourages our opponent from breaking with ... d7 d5 or even pushing . ..d7 d6 to weaken the e6 pawn. 7...Bb7 Our opponent develops the bishop, attacking our pawn on e4, and creating a possible ... b5 b4 threat to win the pawn. 8.O-O We castle short, and don't mind giving up the e4 pawn. 8...b4 Our opponent drives our knight away in order to gain the e4 pawn. 9.Nd5 We sacrifice our knight for activity, this is a typical idea in the Morra. 9...exd5 Our opponent accepts the challenge and takes our knight. 10.exd5 We recapture with the pawn, and have an idea of d5 d6 opening up our bishop again and severely obstructing our opponent's development. 10...Bd6 Our opponent develops the bishop, preventing us from pushing d5 d6. 11.Re1+ We give a check to invite our opponent to lose their castling rights. 11...Kf8 Our opponent moves the king, now the it will be stuck in the middle of the board. 12.Bg5 We develop the bishop with a tempo, since we're attacking the queen. 12...f6 Our opponent blocks the attack, and returns a threat against our bishop. 13.Be3 We reroute our bishop, the whole point is that now our opponent can't develop ...Nf6 so easily. 13...a5 This move may seem odd, but it helps Black by clearing the a6 square to develop the knight. Their position is uncomfortable, so odd moves like this one need to be considered. 14.Nd4 We activate the knight, hoping to jump to f5 or b5 in order to bother the bishop on d6. 14...Be5 Our opponent develops the bishop. 15.Rc1 We activate our rook on the open file. 15...Na6 Our opponent develops their knight. 16.d6! We sacrifice this pawn in order to open the a2 g8 diagonal. 16...g6 Our opponent uses their pawn to cover the f5 square, preventing our knight jump. 17.f4 We harass the bishop, forcing the opponent to make a decision. 17...Bxd4 Our opponent trades pieces hoping to neutralize their problems. 18.Bxd4 We recapture, and have a massive advantage in spite of being a piece down.
Line 3 — punishing a blunder
1.e4 We take control of the center. 1...c5 Our opponent chooses the Sicilian Defense. 2.d4 We strike in the center. 2...cxd4 Our opponent captures the pawn. 3.c3 We play the SmithâMorra Gambit. 3...dxc3 Our opponent accepts the pawn sacrifice. 4.Nxc3 We recapture the pawn. 4...e6 Our opponent covers the d5 square to prevent a knight jump, and prepares to develop. 5.Nf3 We develop our knight. 5...a6 The purpose of this move is to cover the possible knight jump to b5. 6.Bc4 We develop our bishop. 6...b5 Our opponent uses their pawn to harass our bishop. 7.Bb3 We keep the bishop on the diagonal. Although blocked, it's our most active option, and it somewhat discourages our opponent from breaking with ... d7 d5 or even pushing . ..d7 d6 to weaken the e6 pawn. 7...Bb7 Our opponent develops the bishop, attacking our pawn on e4, and creating a possible ... b5 b4 threat to win the pawn. 8.O-O We castle short, and don't mind giving up the e4 pawn. 8...b4 Our opponent drives our knight away in order to gain the e4 pawn. 9.Nd5 We sacrifice our knight for activity, this is a typical idea in the Morra. 9...exd5 Our opponent accepts the challenge and takes our knight. 10.exd5 We recapture with the pawn, and have an idea of d5 d6 opening up our bishop again and severely obstructing our opponent's development. 10...Bc5 Our opponent develops their bishop into a fairly active square. 11.Re1+ We give this check whenever we get a chance, to take away our opponent's castling rights. 11...Kf8 Our opponent moves their king away, they had no choice. 12.Bg5 We develop the bishop with a gain of tempo as we're attacking the queen. 12...Nf6 Developing the knight and blocking the threat. 13.d6 We advance d5 d6 in order to open the a2 g8 diagonal, and create a serious target on the f7 square. 13...Nc6 Our opponent develops the knight, preventing us from playing Ne5-Nxf7. 14.Qc2 We develop the queen with a tempo, as we're attacking the bishop. 14...Bxd6 Our opponent captures our pawn on d6. 15.Qc4 This is a peculiar position, although our opponent is a piece and a pawn up, they can resign due to the simple Qxf7 threat, which forces them to give up a lot of material and continue to be exposed to our checkmate threats.
The free preview ends here — continue with all 12 lines in the interactive course, with instant feedback on every move you play.
Frequently asked questions
Is the Smith-Morra Gambit sound?
It is practically sound: engines give Black narrow paths to equality, but no refutation exists, and specialists like IM Marc Esserman — author of the classic Morra repertoire book — have defeated elite grandmasters with it. At club level its score is outstanding.
What if Black declines the Smith-Morra?
Declining with 3...Nf6 (transposing toward Alapin structures) or 3...d3 avoids the gambit but hands White easy, comfortable development with no material deficit. The course covers the declined lines thoroughly — they are where many Morra players actually score best.
What is the main trap Black falls into against the Morra?
The most common disaster involves the c-file: Black's queen goes to c7 into the Rc1 X-ray, and a Nd5 or Nb5 blow wins material or forces a decisive attack. Whole games are decided by this single recurring pattern — knowing its dozen variations is half the gambit's strength.
Learn the Smith-Morra Gambit with AI feedback
This page pairs the guide above with an interactive ChessMind AI course: a GM-authored repertoire you study move by move on a real board, then practice against a human-like chess AI opponent with instant feedback and spaced-repetition review, so the key positions actually stick. Start learning, jump straight into practice, or browse all opening courses.
New to a concept? Every term is defined in the chess terms glossary.