Beat the Accelerated Dragon
1.e4 c5 2.Nf3 Nc6 3.d4 cxd4 4.Nxd4 g6
The Accelerated Dragon (1.e4 c5 2.Nf3 Nc6 3.d4 cxd4 4.Nxd4 g6) delays ...d6 so Black can play ...d5 in one go — but it allows White the Maroczy Bind with 5.c4. By clamping down on the d5-square with pawns on c4 and e4, White takes away Black's main source of counterplay and keeps a lasting space advantage with very little risk.
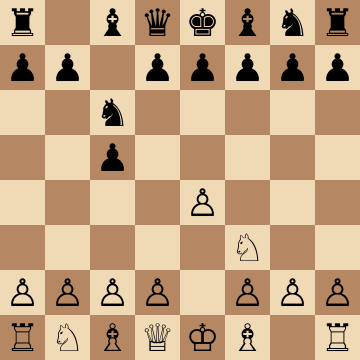
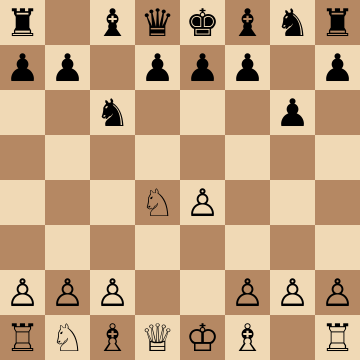
Mainline
1.e4 c5 2.Nf3 Nc6 3.d4 cxd4 4.Nxd4 g6 5.c4 Nf6 6.Nc3 d6 7.Be2 Nxd4 8.Qxd4 Bg7 9.Be3 O-O 10.Qd2
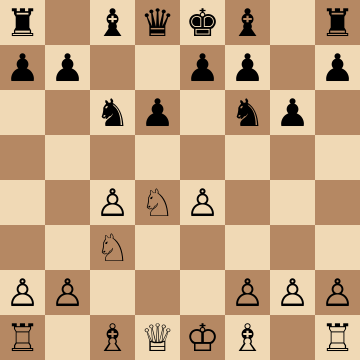
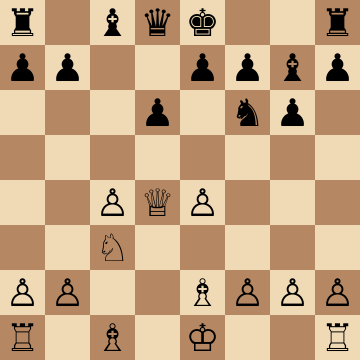
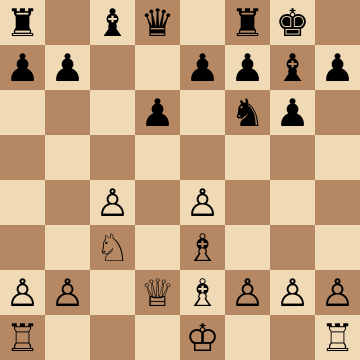
Gurgenidze Main Line with ...Qa5
1.e4 c5 2.Nf3 Nc6 3.d4 cxd4 4.Nxd4 g6 5.c4 Nf6 6.Nc3 d6 7.Be2 Nxd4 8.Qxd4 Bg7 9.Be3 O-O 10.Qd2 Be6 11.Rc1 Qa5 12.f3 Rfc8 13.b3
The central tabiya of the whole course. Black trades a pair of knights, aims the queen at a5 and doubles pressure on the c-file — the standard Gurgenidze recipe. White's answer is a model of restraint: f3 and b3 cover every entry square, the rook sits behind the c4-pawn, and Black runs out of active ideas. From here White improves slowly with Rc2, Rfc1 or a timely Nd5, keeping the space edge deep into the endgame.
Classical Setup without the Knight Trade
1.e4 c5 2.Nf3 Nc6 3.d4 cxd4 4.Nxd4 g6 5.c4 Bg7 6.Be3 Nf6 7.Nc3 O-O 8.Be2 d6 9.O-O Bd7 10.Qd2 Nxd4 11.Bxd4 Bc6 12.f3
When Black delays the trade on d4 and develops with ...Bd7, White simply completes the ideal setup: Be2, O-O, Qd2 and f3. The eventual ...Nxd4 and ...Bc6 regroup is Black's best try — the bishop eyes e4 and prepares ...a5 or ...Nd7 — but 12.f3 blunts it on the spot. White follows with b4 or Rfd1 and keeps the bind; note how every Black break (...b5, ...d5, ...f5) is met a move before it happens.
The 7...Ng4 Trick Refuted
1.e4 c5 2.Nf3 Nc6 3.d4 cxd4 4.Nxd4 g6 5.c4 Bg7 6.Be3 Nf6 7.Nc3 Ng4 8.Qxg4 Nxd4 9.Qd1 Ne6 10.Qd2 d6
Every Maroczy player must know this one cold: 7...Ng4 hits the e3-bishop and hopes for 8.Bxg4?! — but 8.Qxg4! turns the tables. After 8...Nxd4 9.Qd1 the knight must retreat, and White emerges with the bishop pair, extra central control and an untouched structure. Black's compensation never arrives; develop with Be2, Rc1 and O-O and treat it as a favorable version of the main line.
Hyper-Accelerated Move Order: 4.Qxd4!
1.e4 c5 2.Nf3 g6 3.d4 cxd4 4.Qxd4 Nf6 5.e5 Nc6 6.Qa4
Against the hyper-accelerated 2...g6, White has an extra option the normal move order denies: recapturing with the queen. On d4 she cannot be harassed by ...Nc6 without allowing 5.e5, kicking the f6-knight and gaining space with tempo. After 6.Qa4 White keeps the queen active, develops rapidly with Nc3 and Bb5 ideas, and Black is already fighting for equality instead of dictating a Dragon structure.
9.Bg5 Alternative: Provoking ...h6
1.e4 c5 2.Nf3 Nc6 3.d4 cxd4 4.Nxd4 g6 5.c4 Nf6 6.Nc3 d6 7.Be2 Nxd4 8.Qxd4 Bg7 9.Bg5 h6 10.Be3 O-O 11.Qd2
A useful move-order finesse: before settling on e3, the bishop drops by g5 to provoke ...h6. The pawn on h6 is a permanent detail in White's favor — it can become a target in the endgame and gives the queen-bishop battery ideas against the loosened kingside. Play then rejoins normal Gurgenidze channels with Rc1, f3 and b3, but with Black's kingside a shade weaker than it needed to be.
Key ideas
- Meet 4...g6 with 5.c4, fixing a grip on the central light squares before Black can strike with ...d5.
- Trade dark-squared bishops with Be3 and Qd2-Bh6 to soften Black's kingside and neutralize the Dragon bishop.
- Use the extra space to maneuver calmly — Black must stay passive or create weaknesses to free their game.
- Steer clear of the sharp Yugoslav-style theory: the Bind is a scheme you understand, not lines you memorize.
Typical plans and structures
White's structure with pawns on c4 and e4 defines the middlegame: knights come to c3 and d4 (or d5), the rooks support the c- and d-files, and White slowly improves while denying Black the ...d5 and ...b5 breaks. Black usually tries ...a5, ...Nd7-c5 or a timely ...f5; White answers with f3, b3 and patient regrouping. Endgames tend to favor White, whose space advantage persists even after several trades.
Who should play it
Players who like risk-free positional pressure and would rather squeeze the Accelerated Dragon slowly than enter memorized razor-sharp lines.
Study Beat the Accelerated Dragon move by move
The first 3 lines of the interactive course, exactly as a signed-out visitor can play them — each move with the coaching note shown on the board.
Line 1 — the main line
1.e4 We start by taking control of the center. 1...c5 Launching a Sicilian Defense. 2.Nf3 Preparing to open the center with 3.d4. 2...Nc6 This flexible move leaves options open for many Sicilian setups. 3.d4 Starting an open Sicilian. 3...cxd4 Swapping pawns in the center. 4.Nxd4 Recapturing. 4...g6 The start of the Accelerated Dragon! 5.c4 We choose the Maroczy setup, which is solid and very easy to remember. 5...Bg7 Developing the bishop and attacking our knight. 6.Be3 We protect the knight. This is the standard square for the bishop. 6...Nf6 Attacking the e4 pawn. 7.Nc3 We protect our pawn. 7...O-O Short castles is standard in this opening. 8.Be2 Developing the bishop, covering the knight jumps to g4. 8...d6 Clearing the d7 square for the bishop. 9.O-O We castle short as usual. 9...Bd7 Developing, and preparing ... Nxd4 followed by ...Bc6 to activate the bishop a little more. 10.Qd2 We develop our queen to its usual spot. 10...Nxd4 Swapping knights to relieve the space disadvantage. 11.Bxd4 Recapturing. 11...Bc6 Attacking the e4 pawn. 12.f3 Protecting our pawn. 12...a5 Taking some space on the queenside, hoping for ...a4. 13.b3 Getting ahead of ...a4, since now 13. ..a4 is bad due to 14.b4 turning that pawn into a weakness. 13...Nd7 Transferring the knight to c5, and offering a trade of bishops. 14.Be3 We avoid the trade to emphasize our space advantage. We have a pleasant game ahead, with plenty of winning chances but limited opportunities for our opponent to push for the win.
Line 2 — against an inaccuracy
1.e4 We start by taking control of the center. 1...c5 Launching a Sicilian Defense. 2.Nf3 Preparing to open the center with 3.d4. 2...Nc6 This flexible move leaves options open for many Sicilian setups. 3.d4 Starting an open Sicilian. 3...cxd4 Swapping pawns in the center. 4.Nxd4 Recapturing. 4...g6 The start of the Accelerated Dragon! 5.c4 We choose the Maroczy setup, which is solid and very easy to remember. 5...Bg7 Developing the bishop and attacking our knight. 6.Be3 We protect the knight. This is the standard square for the bishop. 6...Nf6 Attacking the e4 pawn. 7.Nc3 We protect our pawn. 7...O-O Short castles is standard in this opening. 8.Be2 Developing the bishop, covering the knight jumps to g4. 8...d6 Clearing the d7 square for the bishop. 9.O-O We castle short as usual. 9...Nxd4 Our opponent trades knights on d4. 10.Bxd4 We take back with the bishop. 10...Be6 Developing the bishop. 11.b3 We reinforce the c4 pawn. 11...Qa5 Our opponent brings out their queen and connects the rooks. 12.f4 We expand on the kingside. 12...Rfc8 Our opponent activates their rook along the c file. 13.Qd3 We develop the queen, completing our setup with pressure on both flanks.
Line 3 — the main line
1.e4 We start by taking control of the center. 1...c5 Launching a Sicilian Defense. 2.Nf3 Preparing to open the center with 3.d4. 2...Nc6 This flexible move leaves options open for many Sicilian setups. 3.d4 Starting an open Sicilian. 3...cxd4 Swapping pawns in the center. 4.Nxd4 Recapturing. 4...g6 The start of the Accelerated Dragon! 5.c4 We choose the Maroczy setup, which is solid and very easy to remember. 5...Bg7 Developing the bishop and attacking our knight. 6.Be3 We protect the knight. This is the standard square for the bishop. 6...Nf6 Attacking the e4 pawn. 7.Nc3 We protect our pawn. 7...O-O Short castles is standard in this opening. 8.Be2 Developing the bishop, covering the knight jumps to g4. 8...d6 Clearing the d7 square for the bishop. 9.O-O We castle short as usual. 9...a6 Controlling the b5 square. 10.f3 Reinforcing e4. 10...Bd7 Our opponent develops the bishop, ready to recapture on c6 if needed. 11.Qd2 We bring out the queen. 11...Rc8 Our opponent activates their rook along the c file. 12.Rac1 We bring out rook to the c file too. 12...Ne5 Our opponent centralizes the knight, putting pressure on c4. 13.b3 We create a solid pawn chain. 13...Re8 Our opponent develops their rook. 14.Rfd1 We complete development while maintaining central control and a space advantage.
The free preview ends here — continue with all 11 lines in the interactive course, with instant feedback on every move you play.
Frequently asked questions
What is the Maroczy Bind against the Accelerated Dragon?
It is the setup where White plays c4 in addition to e4 — 1.e4 c5 2.Nf3 Nc6 3.d4 cxd4 4.Nxd4 g6 5.c4. The two pawns control d5, preventing Black's freeing ...d5 break and leaving Black cramped for the rest of the game.
Is the Maroczy Bind better than the Yugoslav Attack setups?
Against the Accelerated Dragon specifically, yes for most players: because Black has not committed to ...d6, the sharpest Yugoslav Attack ideas lose their punch, while the Bind keeps a stable edge without requiring deep memorization.
How does Black usually fight the Maroczy Bind?
Typical tries are ...Nxd4 followed by ...Bg7 pressure on the long diagonal, the ...a5-a4 queenside plan, or preparing ...b5 or ...f5 breaks. The course shows how to defuse each plan and convert the space advantage into a win.
Learn Beat the Accelerated Dragon with AI feedback
This page pairs the guide above with an interactive ChessMind AI course: a GM-authored repertoire you study move by move on a real board, then practice against a human-like chess AI opponent with instant feedback and spaced-repetition review, so the key positions actually stick. Start learning, jump straight into practice, or browse all opening courses.
New to a concept? Every term is defined in the chess terms glossary.