Beat the Taimanov Sicilian
1.e4 c5 2.Nf3 e6 3.d4 cxd4 4.Nxd4 Nc6 5.Nc3
The Taimanov Sicilian is flexible, resilient and beloved by strong players — so this course attacks it with the modern 7.Qf3 English Attack setup: Be3, Qf3, O-O-O and a kingside pawn storm. Opposite-side castling, clear attacking plans, and a repertoire that makes the flexible Taimanov commit to defense from move seven.
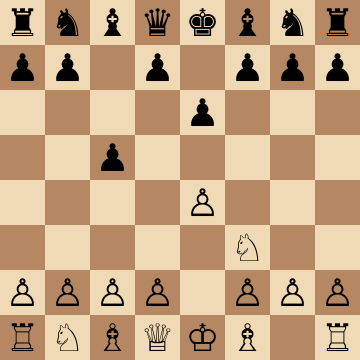
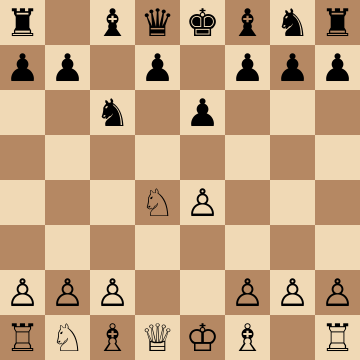
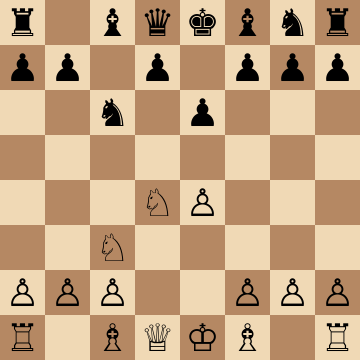
Mainline
1.e4 c5 2.Nf3 e6 3.d4 cxd4 4.Nxd4 Nc6 5.Nc3 Qc7 6.Be3 a6 7.Qf3
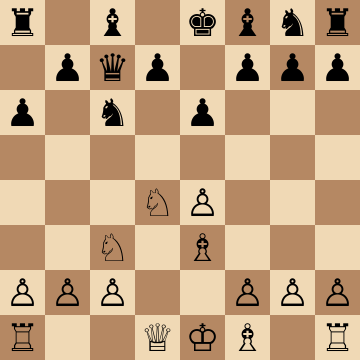
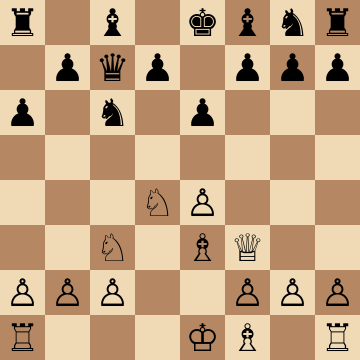
Main Line: 7...Nf6 8.O-O-O Ne5
1.e4 c5 2.Nf3 e6 3.d4 cxd4 4.Nxd4 Nc6 5.Nc3 Qc7 6.Be3 a6 7.Qf3 Nf6 8.O-O-O Ne5 9.Qg3 b5 10.f4 Neg4 11.Bg1
The critical sequence of the whole system. Black hits the f3-queen with 8...Ne5, White sidesteps to g3, and 10.f4 puts the question — the knight must hop again to g4, where 11.Bg1 calmly keeps the bishop. White has gained time with every queen and pawn move, castling is done, and the kingside pawns are already moving. From here h3 evicts the knight and the g- and h-pawns charge with a clear conscience.
Immediate 7...Ne5 Queen Hunt
1.e4 c5 2.Nf3 e6 3.d4 cxd4 4.Nxd4 Nc6 5.Nc3 Qc7 6.Be3 a6 7.Qf3 Ne5 8.Qg3 b5 9.O-O-O b4 10.Nce2
Chasing the queen right away with 7...Ne5 costs Black development that never comes back. On g3 the queen stands actively — it eyes g7 and supports the coming f4 — and after 9.O-O-O b4 10.Nce2 the c3-knight reroutes toward f4 or d4 with gain of coordination. Note the standing threat of f4 hitting e5; Black spends yet another tempo, and White's attack starts effectively two moves ahead of the main lines.
7...b5 8.Nxc6: Structure Switch
1.e4 c5 2.Nf3 e6 3.d4 cxd4 4.Nxd4 Nc6 5.Nc3 Qc7 6.Be3 a6 7.Qf3 b5 8.Nxc6 Qxc6 9.O-O-O Bb7 10.Bd3
When Black rushes ...b5, the exchange 8.Nxc6 gains a tempo on the queen and clarifies the center before the race begins. After 9.O-O-O Bb7 10.Bd3, e4 is defended three times, the d-file is White's, and the standard storm with g4-g5 unfolds against a Black king that still has no safe address. Watch for the thematic Nd5 and Bxb5 sacrifices — with the c6-queen exposed, both land harder than usual here.
7...d6 Scheveningen Setup: 9.g4
1.e4 c5 2.Nf3 e6 3.d4 cxd4 4.Nxd4 Nc6 5.Nc3 Qc7 6.Be3 a6 7.Qf3 d6 8.O-O-O Bd7 9.g4 b5 10.g5 Nge7 11.h4
Transposing toward a Scheveningen with ...d6 does not blunt the setup — it hands White the textbook attack. The g- and h-pawns advance for free since no Black piece contests the kingside, and 10...Nge7 concedes that the f6-square is already poisoned. White continues h5 and g6, or f4 with Qh3 pressure on e6. Black's book counterplay needs the ...b4 lever plus an open c-file; the course move orders grant neither in time.
8...Bb4 Pin: the 10.Bd4 Trap
1.e4 c5 2.Nf3 e6 3.d4 cxd4 4.Nxd4 Nc6 5.Nc3 Qc7 6.Be3 a6 7.Qf3 Nf6 8.O-O-O Bb4 9.Nxc6 Qxc6 10.Bd4
The pinning 8...Bb4 looks like it wins e4, and 10.Bd4! is the move that says otherwise. If Black executes the idea — 10...Bxc3 11.Bxc3 Qxe4 — the punchline 12.Qxe4 Nxe4 13.Bxg7 forks through to the h8-rook, and White wins material out of nowhere. Keep the bishop on d4 in mind as a standing resource in this structure: it defends c3, hits g7 the instant the f6-knight moves, and turns Black's most natural tactic into a losing one.
Key ideas
- Develop with 6.Be3 and 7.Qf3 — the queen supports O-O-O and eyes the kingside in one move.
- Castle long and launch g4-g5 and h4: the attacking scheme repeats in every branch.
- Meet Black's ...b5 counterplay with precise timing — Kb1, Nxb5 sacrifices and e5 breaks are standard tools.
- Deny the Taimanov its flexibility: your setup forces concrete decisions Black would rather postpone.
Typical plans and structures
The scheme unfolds: O-O-O, g4, h4-h5 and g5 pry open Black's kingside wherever the king hides, while Nxc6 or Nb3 decisions shape the center to White's taste. Black's counterattack with ...b5-b4 and ...Bb7 races against White's storm — and the course's move orders are chosen so White's attack lands first. Thematic sacrifices on b5 and e6, the e5 central break, and the endgames arising from queen trades on the c-file all get dedicated coverage.
Who should play it
Aggressive Open Sicilian players who want one coherent attacking system against the Taimanov and enjoy opposite-castling races with a prepared edge.
Study Beat the Taimanov Sicilian move by move
The first 3 lines of the interactive course, exactly as a signed-out visitor can play them — each move with the coaching note shown on the board.
Line 1 — the main line
1.e4 We claim the center. 1...c5 Our opponent opens from the flank. 2.Nf3 We develop the knight. 2...e6 Freeing the dark squared bishop. 3.d4 We strike in the center to open lines. 3...cxd4 Accepting the trade. 4.Nxd4 We recapture, centralizing the knight. 4...Nc6 Developing their knight and pressuring on d4. 5.Nc3 We bring out the queenside knight. 5...Qc7 Our opponent develops their queen, entering the Taimanov Sicilian. 6.Be3 We reinforce the d4 knight with our bishop, accelerating queenside development. 6...a6 Preventing a knight landing on b5 that would put pressure on their queen. 7.Qf3 We bring out the queen, preparing to castle long. 7...Nf6 Bringing the knight into play. 8.O-O-O We castle queenside and activate the rook along the d file. 8...Ne5 Our opponent centralizes their knight, attacking our queen. 9.Qg3 We reposition the queen, clearing the way for the f pawn and pinning their knight. 9...b5 Launching a pawn storm against our king, aiming to threaten our knight with ... b4. 10.f4 We challenge their knight and open the diagonal for our bishop. 10...Neg4 Attacking our bishop. 11.Bg1 We retreat to maintain the bishop pair. 11...h5 Supporting the knight with a pawn push while preparing a path for retreat. 12.e5 Attacking their knight on f6 and gaining space in the center. 12...b4 Intermediate move, counterattacking our knight on c3. 13.Na4 Escaping the threat. 13...Nd5 Centralizing the knight. 14.h3 Attacking their knight to reduce pressure on e5. 14...Nh6 Pulling back while preparing to fight for control of f5. 15.f5 We strike with a pawn break to create pressure on e6. 15...Bb7 Placing their bishop on the long diagonal. 16.Bd3 Activating the bishop and reinforcing f5.
Line 2 — punishing a blunder
1.e4 We claim the center. 1...c5 Our opponent opens from the flank. 2.Nf3 We develop the knight. 2...e6 Freeing the dark squared bishop. 3.d4 We strike in the center to open lines. 3...cxd4 Accepting the trade. 4.Nxd4 We recapture, centralizing the knight. 4...Nc6 Developing their knight and pressuring on d4. 5.Nc3 We bring out the queenside knight. 5...Qc7 Our opponent develops their queen, entering the Taimanov Sicilian. 6.Be3 We reinforce the d4 knight with our bishop, accelerating queenside development. 6...a6 Preventing a knight landing on b5 that would put pressure on their queen. 7.Qf3 We bring out the queen, preparing to castle long. 7...Nf6 Bringing the knight into play. 8.O-O-O We castle queenside and activate the rook along the d file. 8...Ne5 Our opponent centralizes their knight, attacking our queen. 9.Qg3 We reposition the queen, clearing the way for the f pawn and pinning their knight. 9...d6 Preparing to develop the light squared bishop. 10.f4 We push the f pawn to pressure their knight and gain space. 10...Neg4 Our opponent jumps in with the knight, targeting our bishop. 11.Bg1 We pull the bishop back momentarily, aiming to drive their knight away with h2 h3. 11...h5 Our opponent pushes the h pawn. 12.h3 We push their knight back, fully disrupting their setup and taking the initiative with a space edge.
Line 3 — punishing a blunder
1.e4 We claim the center. 1...c5 Our opponent opens from the flank. 2.Nf3 We develop the knight. 2...e6 Freeing the dark squared bishop. 3.d4 We strike in the center to open lines. 3...cxd4 Accepting the trade. 4.Nxd4 We recapture, centralizing the knight. 4...Nc6 Developing their knight and pressuring on d4. 5.Nc3 We bring out the queenside knight. 5...Qc7 Our opponent develops their queen, entering the Taimanov Sicilian. 6.Be3 We reinforce the d4 knight with our bishop, accelerating queenside development. 6...a6 Preventing a knight landing on b5 that would put pressure on their queen. 7.Qf3 We bring out the queen, preparing to castle long. 7...Nf6 Bringing the knight into play. 8.O-O-O We castle queenside and activate the rook along the d file. 8...Ne5 Our opponent centralizes their knight, attacking our queen. 9.Qg3 We reposition the queen, clearing the way for the f pawn and pinning their knight. 9...d6 Preparing to develop the light squared bishop. 10.f4 We push the f pawn to pressure their knight and gain space. 10...Nc4 Black moves the knight to c4, attacking our bishop. 11.Bxc4 We capture their knight. 11...Qxc4 Our opponent takes back with the queen. 12.e5 We strike in the center with a pawn break, putting pressure on their knight. 12...dxe5 Black trades on e5. 13.fxe5 We take back with the pawn. 13...Nd5 Centralizing their knight with pressureon c3 and e3. 14.Nxd5 We trade knights in the center. 14...exd5 Our opponent recaptures with the pawn. 15.Kb1 We have a winning lead in activity, while our opponent still can't castle and has only developed the queen.
The free preview ends here — continue with all 10 lines in the interactive course, with instant feedback on every move you play.
Frequently asked questions
What is the point of 7.Qf3 against the Taimanov?
The queen move prepares O-O-O immediately, keeps g4-g5 options flowing, and discourages Black's standard freeing tricks — while avoiding the well-mapped 7.Qd2 main roads. It is a modern favorite precisely because Taimanov players see far less of it.
Is the English Attack setup effective against the Taimanov?
Yes — the Be3 with long-castling scheme is White's most ambitious anti-Taimanov strategy, posing direct attacking questions the flexible ...Qc7 and ...a6 moves do nothing to answer. The opposite-side castling guarantees the double-edged, winner-takes-all middlegames attacking players want.
How does White handle Black's queenside counterattack?
With prophylaxis and tempo counting: the well-timed Kb1, meeting ...b4 with Nce2 or the thematic Nxb5 sacrifice, and never pausing the kingside storm without reason. The course drills exactly these race mechanics — the difference between winning attacks and losing ones.
Learn Beat the Taimanov Sicilian with AI feedback
This page pairs the guide above with an interactive ChessMind AI course: a GM-authored repertoire you study move by move on a real board, then practice against a human-like chess AI opponent with instant feedback and spaced-repetition review, so the key positions actually stick. Start learning, jump straight into practice, or browse all opening courses.
New to a concept? Every term is defined in the chess terms glossary.