Beat the Scotch
1.e4 e5 2.Nf3 Nc6 3.d4 exd4
The Scotch (1.e4 e5 2.Nf3 Nc6 3.d4) trades the slow Italian maneuvering for an immediate central strike — and club players increasingly use it to dodge deep 3.Bb5 theory. This course gives Black a complete, confident answer to both the Scotch Game and the Scotch Gambit, aiming for full equality and active winning chances.
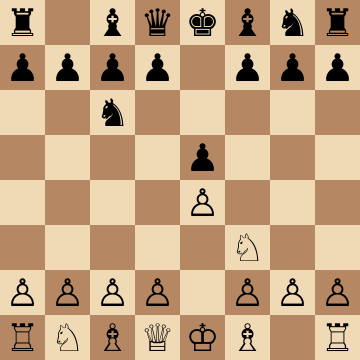
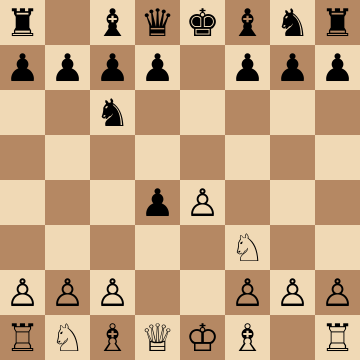
Mainline
1.e4 e5 2.Nf3 Nc6 3.d4 exd4 4.Nxd4 Nf6 5.Nxc6 bxc6 6.e5 Qe7 7.Qe2 Nd5
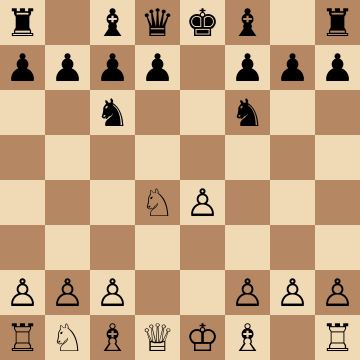
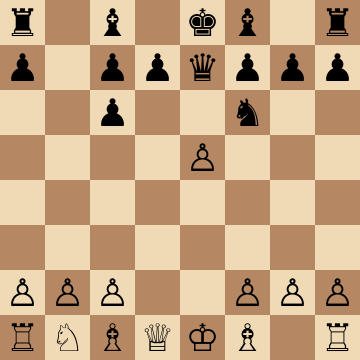
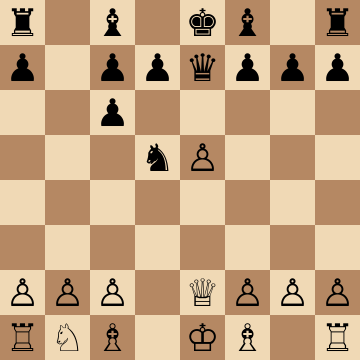
Mieses Main Line: 8.c4 Ba6
1.e4 e5 2.Nf3 Nc6 3.d4 exd4 4.Nxd4 Nf6 5.Nxc6 bxc6 6.e5 Qe7 7.Qe2 Nd5 8.c4 Ba6 9.b3 g6 10.f4 Bg7
The pin 8...Ba6 is the soul of Black's counterplay: the c4-pawn cannot capture on d5 because the e2-queen falls, so the knight sits centralized while White's queenside ties itself in knots with 9.b3. Black fianchettoes, castles short, and hammers the overextended e5-pawn with ...f6 or ...d6. White's position looks imposing and plays terribly — one slow move and the a6-bishop plus the half-open b-file decide.
Solid 8...Nb6 with ...a5-a4
1.e4 e5 2.Nf3 Nc6 3.d4 exd4 4.Nxd4 Nf6 5.Nxc6 bxc6 6.e5 Qe7 7.Qe2 Nd5 8.c4 Nb6 9.Nd2 Qe6 10.b3 a5 11.Bb2 a4
For players who prefer clarity over the sharp pin lines: retreat the knight to b6, hit e5 with 9...Qe6, and start the signature ...a5-a4 lever against White's queenside pawns. Every exchange favors Black here — the doubled c-pawns are more than offset by pressure on the a- and b-files and the fragile e5-pawn. The ...d6 break completes the plan; time it after development, not before.
Scotch Four Knights: 5.Nc3 Bb4
1.e4 e5 2.Nf3 Nc6 3.d4 exd4 4.Nxd4 Nf6 5.Nc3 Bb4 6.Nxc6 bxc6 7.Bd3 d5 8.exd5 cxd5 9.O-O O-O 10.Bg5 c6
Many Scotch players avoid the main lines with 5.Nc3, and Black should be delighted: 5...Bb4 followed by the immediate 7...d5 break equalizes on the spot. After 9...O-O 10.Bg5 c6 Black's center is rock solid, the b4-bishop keeps c3 pinned, and typical plans — ...h6 and ...Be7, or ...Bd6 with ...h6 first — leave Black with the freer game. Nothing to fear and plenty to play for against careless handling.
Scotch Gambit: 4.Bc4 Nf6 5.e5 d5
1.e4 e5 2.Nf3 Nc6 3.d4 exd4 4.Bc4 Nf6 5.e5 d5 6.Bb5 Ne4 7.Nxd4 Bc5 8.Be3 Bd7 9.Bxc6 bxc6 10.O-O O-O
Against the trappy 4.Bc4, discipline beats greed: 4...Nf6 and the central counterstrike 5...d5 return the pawn on Black's terms. The e4-knight becomes a monster, and after 9...bxc6 10.O-O O-O Black has finished development with a fine game — no miniature, no ambush. White's gambit ideas are covered in full from the other side in the dedicated Scotch Gambit course, which makes this line doubly worth knowing.
Study the Scotch Gambit course
Goring Gambit Declined: 4.c3 d5!
1.e4 e5 2.Nf3 Nc6 3.d4 exd4 4.c3 d5 5.exd5 Qxd5 6.cxd4 Bg4 7.Be2 Bb4+ 8.Nc3 Bxf3 9.Bxf3 Qc4
Never accept a gambit when declining refutes it more elegantly: 4...d5! hands the pawn straight back and liquidates White's attacking dreams. The precise sequence 6...Bg4 7...Bb4+ and 9...Qc4! forces simplifications into an equal-at-worst position where White's isolated d-pawn is the only long-term feature on the board. Club gambiteers rely on opponents grabbing pawns — this recipe leaves them with nothing but a weakness to defend.
Key ideas
- Meet 4.Nxd4 with the principled 4...Nf6, hitting e4 before White consolidates the center.
- Know the 5.Nxc6 bxc6 6.e5 forcing line cold — the famous 6...Qe7 pin turns the tables.
- Use the doubled c-pawns constructively: they control d5 and open the b-file for your rook.
- Handle the Scotch Gambit (4.Bc4) with a precise, prepared antidote instead of natural moves.
Typical plans and structures
In the main line after 6...Qe7 7.Qe2 Nd5, Black harasses the overextended e5-pawn, follows with ...a5 or ...Nb6 and the ...d6 break, and reaches middlegames where the b-file pressure and central levers give real play. Against the Four Knights Scotch (5.Nc3), classical development with ...Bb4 keeps the balance comfortably. The course also covers the trappy Scotch Gambit and Goring Gambit move orders, where Black's preparation routinely wins material outright.
Who should play it
1.e4 e5 players who keep running into the Scotch and want a single, reliable repertoire chapter that removes the surprise value forever.
Study Beat the Scotch move by move
The first 3 lines of the interactive course, exactly as a signed-out visitor can play them — each move with the coaching note shown on the board.
Line 1 — the main line
1.e4 Our opponent takes the center. 1...e5 We launch the double king's pawn defense. 2.Nf3 Our opponent attacks our e5 pawn. 2...Nc6 We protect our pawn. 3.d4 The central battle begins! Our opponent still has a choice between playing the Scotch Gambit, and the Scotch Opening. We'll cover both in this course. 3...exd4 We trade in the center, the only good response. 4.Nxd4 Our opponent recaptures the pawn, we are officially playing the Scotch Game! 4...Bc5 We take control of the a7 g1 diagonal, an ambitious approach. The alternative 4...Nf6 is good too, but allows some drawish responses we would rather avoid. 5.Be3 The best response, fighting for the diagonal. 5...Qf6 We continue playing actively, we threaten the knight on d4, and increase the pressure on the f2 pawn. 6.c3 The only viable move, supporting the knight. 6...Nge7 We develop our knight supporting a potential ...d7 d5 central break. 7.Bc4 Our opponent develops to an active square, and prevents us from breaking with . ..d7 d5. 7...O-O We castle short, the most likely approach in this opening. 8.O-O Our opponent castles short as well, the right approach. 8...Bb6 We move our bishop to a protected square, getting out of a potential discovered attack, before continuing with ...d7 d6. 9.Na3 Our opponent continues to develop, there wasn't an option for this knight, since developing via d2 would have hung a pawn on d4. 9...d6 We clear the path for our bishop on c8 to develop after all. 10.Nac2 Rerouting the knight to a better square, reinforcing the control of d4. 10...Qg6 We want to develop our bishop and this move prepares ... Bh3 while gaining a tempo attacking the e4 pawn. 11.Nxc6 Our opponent simplifies the game, in part, to prepare for the ...Bh3 threat. 11...Nxc6 We recapture the knight, obviously we wouldn't want to double our pawns voluntarily with ...bxc6. 12.Bxb6 Swapping bishops is unavoidable as both bishop are already in the most useful diagonal they have available. 12...axb6 We recapture toward the center, the doubled pawns on b7, b6 are not a real weakness, and now the rook on a8 gains a tiny bit of activity. 13.f3 Our opponent protects the e4 pawn and prepares to play Qd2 if we played ...Bh3 after all. 13...Be6 Since the idea ...Bh3 has been mostly neutralized, we complete our development offering a bishop trade instead. We have a balanced game with winning chances for both.
Line 2 — the main line
1.e4 Our opponent takes the center. 1...e5 We launch the double king's pawn defense. 2.Nf3 Our opponent attacks our e5 pawn. 2...Nc6 We protect our pawn. 3.d4 The central battle begins! Our opponent still has a choice between playing the Scotch Gambit, and the Scotch Opening. We'll cover both in this course. 3...exd4 We trade in the center, the only good response. 4.Nxd4 Our opponent recaptures the pawn, we are officially playing the Scotch Game! 4...Bc5 We take control of the a7 g1 diagonal, an ambitious approach. The alternative 4...Nf6 is good too, but allows some drawish responses we would rather avoid. 5.Be3 The best response, fighting for the diagonal. 5...Qf6 We continue playing actively, we threaten the knight on d4, and increase the pressure on the f2 pawn. 6.c3 The only viable move, supporting the knight. 6...Nge7 We develop our knight supporting a potential ...d7 d5 central break. 7.Bc4 Our opponent develops to an active square, and prevents us from breaking with . ..d7 d5. 7...O-O We castle short, the most likely approach in this opening. 8.O-O Our opponent castles short as well, the right approach. 8...Bb6 We move our bishop to a protected square, getting out of a potential discovered attack, before continuing with ...d7 d6. 9.Nxc6 Our opponent trades knights without first completing development. 9...Qxc6 We recapture with the queen to create a double threat of ...Qxc4 winning a piece and ...Bxe3 doubling pawns. 10.Bxb6 Our opponent trades the bishops before we have a chance to take ... Bxe3 damaging the pawn structure. 10...Qxc4 We take the other bishop first, threatening to win the pawn on e4 next. 11.Bd4 Our opponent removes the bishop and protects the pawn on e4 all in one move. 11...d5 We don't miss our chance to break in the center, while clearing the path for our bishop to develop. 12.exd5 Our opponent trades central pawns. 12...Qxd5 We recapture and use the chance to place our queen in a more natural square. 13.Nd2 Developing the knight to the best square available. 13...b6 We plan to complete development with ...Bb7. 14.Re1 Activating the rook on the e file. 14...Bb7 We complete development, temporarily threatening ...Qxg2#. The position is balanced.
Line 3 — the main line
1.e4 Our opponent takes the center. 1...e5 We launch the double king's pawn defense. 2.Nf3 Our opponent attacks our e5 pawn. 2...Nc6 We protect our pawn. 3.d4 The central battle begins! Our opponent still has a choice between playing the Scotch Gambit, and the Scotch Opening. We'll cover both in this course. 3...exd4 We trade in the center, the only good response. 4.Nxd4 Our opponent recaptures the pawn, we are officially playing the Scotch Game! 4...Bc5 We take control of the a7 g1 diagonal, an ambitious approach. The alternative 4...Nf6 is good too, but allows some drawish responses we would rather avoid. 5.Be3 The best response, fighting for the diagonal. 5...Qf6 We continue playing actively, we threaten the knight on d4, and increase the pressure on the f2 pawn. 6.c3 The only viable move, supporting the knight. 6...Nge7 We develop our knight supporting a potential ...d7 d5 central break. 7.g3 Our opponent plans to develop the bishop via g2, where it could help reinforce White's center, for example, by preventing a ...d7 d5 break. 7...d5 We don't miss our chance to break in the center before our opponent has a chance to prevent it with Bg2. 8.Bg2 Protecting the pawn on e4 and continuing development. 8...dxe4 We trade central pawns. 9.Nd2 Our opponent prefers to recapture the pawn with the knight, to fork our queen and bishop. 9...Bxd4 We trade our bishop before it becomes a target to the Nxe4 fork. 10.cxd4 Our opponent recaptures the piece. 10...Bf5 We develop our bishop and get ready to trade pieces once our opponent recaptures the pawn. 11.Nxe4 Regaining the pawn before it's too late. 11...Bxe4 We trade pieces, since our focus is going to be the isolated queen pawn on d4. 12.Bxe4 Recapturing the piece. 12...O-O-O We castle long, which is a bit unusual in the Scotch, but makes sense here. We have a comfortable game, a safe king, and a vulnerable d4 pawn we can attack.
The free preview ends here — continue with all 19 lines in the interactive course, with instant feedback on every move you play.
Frequently asked questions
Is the Scotch dangerous for Black?
Only when it arrives as a surprise: objectively the Scotch promises White no advantage against accurate play, which is why it spent a century in hibernation before Kasparov revived it as a practical weapon. With this course's preparation, Black should welcome it.
What is the point of 6...Qe7 in the Scotch main line?
After 5.Nxc6 bxc6 6.e5, the queen move pins the e-pawn against White's king and forces 7.Qe2, blocking White's own bishop. Black then gains time hitting e5, showing that White's space-gaining advance created a weakness rather than an asset.
How does Black meet the Goring Gambit?
Against 3.d4 exd4 4.c3, Black can accept and defend accurately or decline with the clean 4...d5, reaching a comfortable position with zero risk. The course recommends the practical path and covers the tactics that punish White's overpressing attempts.
Learn Beat the Scotch with AI feedback
This page pairs the guide above with an interactive ChessMind AI course: a GM-authored repertoire you study move by move on a real board, then practice against a human-like chess AI opponent with instant feedback and spaced-repetition review, so the key positions actually stick. Start learning, jump straight into practice, or browse all opening courses.
New to a concept? Every term is defined in the chess terms glossary.