Scotch Gambit
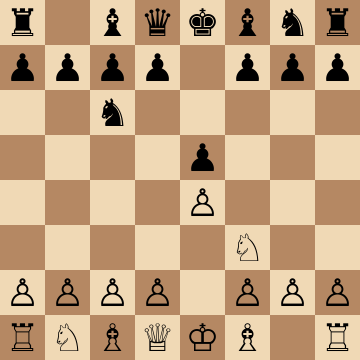
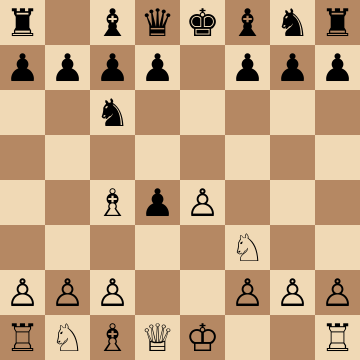
1.e4 e5 2.Nf3 Nc6 3.d4 exd4 4.Bc4
The Scotch Gambit (1.e4 e5 2.Nf3 Nc6 3.d4 exd4 4.Bc4) offers the d-pawn for the fastest possible development and immediate pressure on f7. It is a classic weapon with modern teeth: attacking chances galore, forcing lines that reward the prepared, and traps that end games in fifteen moves.
Mainline
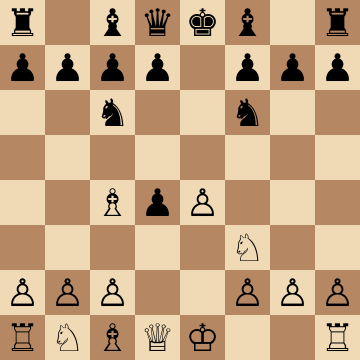
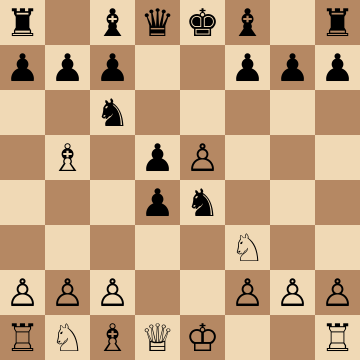
1.e4 e5 2.Nf3 Nc6 3.d4 exd4 4.Bc4 Nf6 5.e5 d5 6.Bb5 Ne4 7.Nxd4
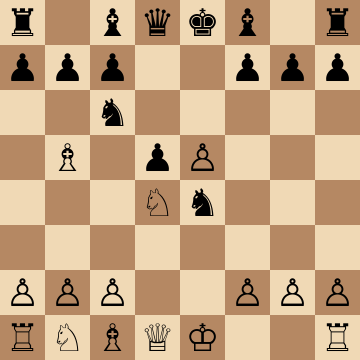
Main Line: 5.e5 d5 6.Bb5
1.e4 e5 2.Nf3 Nc6 3.d4 exd4 4.Bc4 Nf6 5.e5 d5 6.Bb5 Ne4 7.Nxd4 Bd7 8.Bxc6 bxc6 9.O-O Bc5 10.f3 Ng5 11.f4 Ne4
The critical test of the gambit: Black counters in the center with 5...d5, and White pins with 6.Bb5 before regaining the pawn on d4. The middlegame revolves around the e4 knight — 10.f3 and 11.f4 chase it while gaining kingside space, and Black's doubled c-pawns give White the better long-term structure. Knowing this sequence to move eleven means you play quickly while your opponent burns clock on problems you have already solved.
4...Bc5 5.c3: Giuoco Transposition
1.e4 e5 2.Nf3 Nc6 3.d4 exd4 4.Bc4 Bc5 5.c3 Nf6 6.cxd4 Bb4+ 7.Nc3 Nxe4 8.O-O Bxc3 9.d5
Developing the bishop first steers play into the classical Giuoco main lines — and straight into White's preparation. The famous 9.d5! sacrifices a second pawn to open every line: after the forced sequences White regains material with rooks flooding the center while Black's king scrambles for safety. This is 150-year-old attacking theory that still wins games today, because the defense requires precision most opponents do not have.
Double Gambit: 4...Bb4+ 5.c3
1.e4 e5 2.Nf3 Nc6 3.d4 exd4 4.Bc4 Bb4+ 5.c3 dxc3 6.O-O cxb2 7.Bxb2
When Black checks on b4 and keeps eating pawns, White simply castles and lets the position explode: 6.O-O cxb2 7.Bxb2 reaches a Danish-style attack with an extra tempo, both bishops raking the kingside, and Black two moves from castling. The compensation is overwhelming in practical play — Qb3, Nd5 and e5 breaks generate threats faster than Black can develop. Greed is rarely punished this efficiently anywhere else in the open games.
Quiet 4...d6 Defense
1.e4 e5 2.Nf3 Nc6 3.d4 exd4 4.Bc4 d6 5.Nxd4 Nf6 6.Nc3 Be7 7.O-O O-O
Cautious opponents decline the adventure with 4...d6, letting White recapture on d4 with a pleasant, risk-free edge: a classical center, the more active bishop, and easy piece play. Treat it like an improved Scotch — Re1, Bf4 or b3 setups, and pressure against the slightly passive d6 pawn. No brilliancies required here; White simply keeps the space advantage and outplays Black from a better version of a normal position.
Trap Line: 4...Ne5? 5.Nxe5
1.e4 e5 2.Nf3 Nc6 3.d4 exd4 4.Bc4 Ne5 5.Nxe5 Qg5 6.Bxf7+ Ke7 7.Qxd4
A trap you will actually see at the board: 4...Ne5? attacks the c4 bishop and appears to win material after 5.Nxe5 Qg5, forking knight and g2. The refutation is 6.Bxf7+! — the king must step to e7, and 7.Qxd4 defends everything while centralizing with decisive threats against the stranded king. Black's position collapses within a few moves. Learn the sequence once and this common club-level try becomes a gift.
Key ideas
- Develop with 4.Bc4 and hit f7 — Black must already play precisely to stay safe.
- Meet 4...Bc5 with the c3 gambit lines, opening files while Black's king sits in the center.
- Against 4...Nf6, use the e5 push and Bb5 pin to keep the initiative rolling.
- Transpose into the Italian's best attacking lines when it suits you — flexibility is built in.
Typical plans and structures
The gambit's currency is time: rooks reach e1 and d1 quickly, the c4-bishop and Nf3-g5 ideas keep f7 under permanent watch, and Black's attempts to consolidate the extra pawn walk into pins and forks catalogued for over a century. In the 4...Nf6 main line, 5.e5 d5 6.Bb5 leads to forcing sequences where White regains material with a persistent initiative. The course arms you with the critical continuations so the position after move ten is one you know and your opponent doesn't.
Who should play it
e4-e5 players who want open, attacking positions with clear development schemes — and a repertoire where preparation converts directly into quick wins.
Study the Scotch Gambit move by move
The first 3 lines of the interactive course, exactly as a signed-out visitor can play them — each move with the coaching note shown on the board.
Line 1 — the main line
1.e4 We take control of the center. 1...e5 Our opponent fights for the center as well. 2.Nf3 We activate our knight, attacking e5. 2...Nc6 Our opponent develops and defends the pawn on e5. 3.d4 We launch a Scotch Gambit! We open the center quickly to create imbalance. 3...exd4 Black captures the central pawn. 4.Bc4 We do not recapture and instead surprise our opponent by developing the bishop. 4...Nf6 they develop and attack the central pawn. 5.e5 We gain space and attack the knight. 5...d5 They counterattack our bishop to claim space in the center. 6.Bb5 We move our bishop to safety and create a pin. 6...Ne4 Their knight jumps to a central square, this is the ideal square. 7.Nxd4 We recapture the central pawn and create pressure on c6. 7...Bd7 They develop and defend the knight on c6. 8.Bxc6 We give up our bishop pair to damage our opponent's pawn structure. 8...bxc6 Since the pawns are getting doubled anyway, our opponent recaptures with pawn to avoid giving up the bishop pair. 9.O-O We castle short, a standard choice in this variation. 9...Bc5 They develop their bishop to the most active diagonal, and put some X-ray pressure on our king. 10.f3 We will expand a little bit while gaining some tempos. 10...Ng5 The knight jumps back to safety. 11.f4 This was the point of the previous move, we expand further with tempo. 11...Ne4 The knight returns to the central square. 12.Be3 We develop and neutralize the pressure from the pin. 12...Bb6 They move their bishop to a more stable square, and threaten ...c6 c5. 13.Nd2 We develop, offering to trade our opponent's central knight. 13...Nxd2 Our opponent had nothing better than to accept the trade. 14.Qxd2 We have a comfortable position. Our pieces are well developed and we have good prospects on the kingside.
Line 2 — the main line
1.e4 We take control of the center. 1...e5 Our opponent fights for the center as well. 2.Nf3 We activate our knight, attacking e5. 2...Nc6 Our opponent develops and defends the pawn on e5. 3.d4 We launch a Scotch Gambit! We open the center quickly to create imbalance. 3...exd4 Black captures the central pawn. 4.Bc4 We do not recapture and instead surprise our opponent by developing the bishop. 4...Nf6 they develop and attack the central pawn. 5.e5 We gain space and attack the knight. 5...d5 They counterattack our bishop to claim space in the center. 6.Bb5 We move our bishop to safety and create a pin. 6...Ne4 Their knight jumps to a central square, this is the ideal square. 7.Nxd4 We recapture the central pawn and create pressure on c6. 7...Bc5 They develop the bishop to the most active diagonal, creating pressure against our knight and the f2 pawn. 8.Be3 We develop our bishop neutralizing the pressure on the diagonal. 8...O-O Our opponent castles and sacrifices a pawn for activity. They could have played ...Bd7 too, but that transposes to another line. 9.Nxc6 We swap knights to relieve the central tension and clarify the position. 9...bxc6 Our opponent recaptures. 10.Bxc5 We swap bishops, the only move. 10...Nxc5 Our opponent must capture this bishop since the rook was threatened. 11.Bxc6 We take the pawn and temporarily take the lead in material. 11...Rb8 Our opponent activates their rook, threatening ...Rxb2 next. 12.Qxd5 We take another pawn and offer a queen trade. 12...Qe7 Our opponent avoids the queen trade for now, and has many promising continuations like ...Rd8, ...Rxb2 and ...Ba6. 13.O-O We MUST castle before our opponent plays ...Ba6 keeping the king in the center. 13...Rxb2 Our opponent recaptures one pawn, hoping to regain the other pawn with ...Rxc2 or ...Rd8 next. 14.Nc3 We complete our development, giving up the other extra pawn. 14...Rxc2 Our opponent recaptures the second pawn, equalizing the material again. 15.Qd4 We have a roughly equal game, our opponent has a lot of activity, but we have a better pawn structure.
Line 3 — the main line
1.e4 We take control of the center. 1...e5 Our opponent fights for the center as well. 2.Nf3 We activate our knight, attacking e5. 2...Nc6 Our opponent develops and defends the pawn on e5. 3.d4 We launch a Scotch Gambit! We open the center quickly to create imbalance. 3...exd4 Black captures the central pawn. 4.Bc4 We do not recapture and instead surprise our opponent by developing the bishop. 4...Nf6 they develop and attack the central pawn. 5.e5 We gain space and attack the knight. 5...d5 They counterattack our bishop to claim space in the center. 6.Bb5 We move our bishop to safety and create a pin. 6...Nd7 The knight escapes to a more defensive square. 7.O-O We castle short as usual, we are preparing Re1 and possibly e5 e6. 7...Be7 Our opponent develops and prepares to castle short. 8.Bxc6 We give up our bishop pair to double the pawns. 8...bxc6 Our opponent recaptures. 9.Nxd4 We finally recapture the central pawn, attacking the c6 pawn. 9...Nb8 This odd-looking move is actually the best, it protects the c6 pawn and clears the path for the bishop to protect the e6 and f5 squares. 10.Nc3 We develop our knight and proactively put some pressure on the d5 pawn (to discourage an expansion with ...c6 c5). 10...O-O Our opponent castles short. 11.Qf3 We develop our queen and may consider a knight jump with Nf5 next. 11...a5 Our opponent takes some space on the queenside, and may consider even ...Ra6 to protect the pawn and release the knight from its defensive role. 12.Re1 We improve the rook and defend our central pawn. 12...Ra6 Our opponent protects the c6 pawn. 13.Nf5 We jump with our knight, and make it hard for Black to preserve their bishop pair. 13...Bxf5 Our opponent gives up the bishop pair to eliminate our strong knight. 14.Qxf5 We recapture the piece. The game is roughly equal, although we have a slightly preferable pawn structure.
The free preview ends here — continue with all 15 lines in the interactive course, with instant feedback on every move you play.
Frequently asked questions
Is the Scotch Gambit sound?
Yes — unlike many romantic gambits, the Scotch Gambit is theoretically respectable: White regains the pawn in most main lines while keeping the initiative. It is a gambit of time rather than lasting material, which is why it has never gone out of practical fashion.
What is the difference between the Scotch Game and the Scotch Gambit?
After 3.d4 exd4, the Scotch Game recaptures at once with 4.Nxd4, while the Scotch Gambit plays 4.Bc4, leaving the pawn to develop with maximum speed. The gambit leads to sharper, more forcing play — including possible transpositions to Italian Game attacking lines.
How should Black defend against the Scotch Gambit?
The main defenses are 4...Nf6, hitting e4 immediately, and 4...Bc5, developing classically. Both require accurate follow-up: one natural-but-wrong move drops Black into well-known traps, which is exactly the practical edge this course is designed to exploit.
Learn the Scotch Gambit with AI feedback
This page pairs the guide above with an interactive ChessMind AI course: a GM-authored repertoire you study move by move on a real board, then practice against a human-like chess AI opponent with instant feedback and spaced-repetition review, so the key positions actually stick. Start learning, jump straight into practice, or browse all opening courses.
New to a concept? Every term is defined in the chess terms glossary.