Fried Liver Attack
1.e4 e5 2.Nf3 Nc6 3.Bc4 Nf6 4.Ng5
The Fried Liver Attack (4.Ng5 against the Two Knights, sacrificing on f7) drags Black's king to the middle of the board on move six — and keeps it there. One of chess's most famous attacking weapons, feared at every level below master and fun at every level, period.
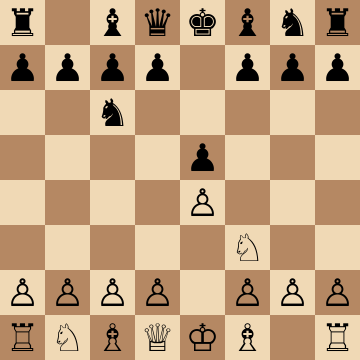
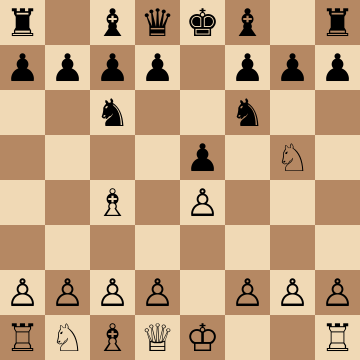
Mainline
1.e4 e5 2.Nf3 Nc6 3.Bc4 Nf6 4.Ng5 d5 5.exd5 Nxd5 6.Nxf7 Kxf7 7.Qf3+ Ke6 8.Nc3
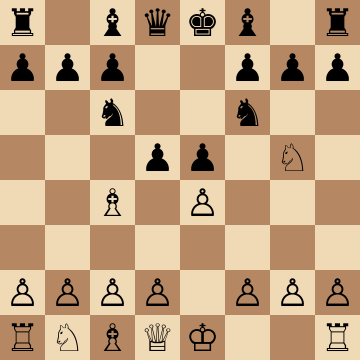
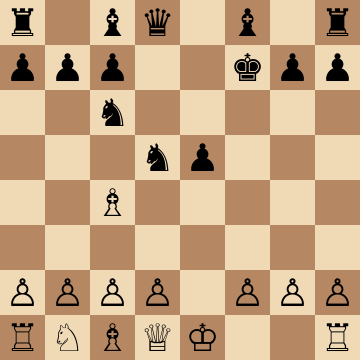
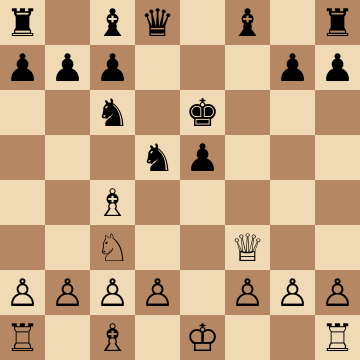
Main Line Sacrifice: 6.Nxf7 Kxf7 7.Qf3+
1.e4 e5 2.Nf3 Nc6 3.Bc4 Nf6 4.Ng5 d5 5.exd5 Nxd5 6.Nxf7 Kxf7 7.Qf3+ Ke6 8.Nc3 Ncb4 9.Qe4 c6 10.a3 Na6 11.d4
The full sacrifice in its main form: the king is dragged to e6, where it must babysit the pinned d5-knight. Black's best defense 8...Ncb4 aims at c2 and reinforces d5, but 9.Qe4 keeps everything under control, and after 10.a3 and 11.d4 White's entire army enters the game while Black's queenside sleeps. Learn the plans, not just moves — Bf4 or Bg5, O-O-O or O-O, and the central files do the rest. Practically, defending this over the board is close to impossible.
Polerio Defense (5...Na5)
1.e4 e5 2.Nf3 Nc6 3.Bc4 Nf6 4.Ng5 d5 5.exd5 Na5 6.Bb5+ c6 7.dxc6 bxc6 8.Be2 h6 9.Nf3 e4 10.Ne5 Bd6 11.d4 exd3 12.Nxd3
The theoretically correct way to dodge the sacrifice: Black gives a pawn for activity rather than let the knight land on f7. White should know the modern recipe — 8.Be2!, keeping the bishop, then the precise en passant sequence 11.d4 exd3 12.Nxd3, returning the piece flow to normal while staying a clean pawn up. Black's compensation is real but temporary; trade a pair of minor pieces, finish development, and the extra pawn starts to talk.
Traxler Counterattack (4...Bc5!?)
1.e4 e5 2.Nf3 Nc6 3.Bc4 Nf6 4.Ng5 Bc5 5.Bxf7+ Ke7 6.Bd5
Black ignores the f7 threat entirely and invites 5.Nxf7?! Bxf2+! with insane complications. Decline the invitation: 5.Bxf7+! takes the pawn with check, and after 5...Ke7 the retreat 6.Bd5 keeps the bishop on its best diagonal, guards e4, and denies Black every standard Traxler tactic. White remains a safe pawn up with the better structure while Black's king has lost castling for nothing. Simple chess beats a prepared trap every time.
Ulvestad Variation (5...b5)
1.e4 e5 2.Nf3 Nc6 3.Bc4 Nf6 4.Ng5 d5 5.exd5 b5 6.Bf1 Nd4 7.c3 Nxd5 8.Ne4 Qh4 9.Ng3
A wild attempt to deflect the bishop, and the answer is one of the strangest strong moves in opening theory: 6.Bf1!, retreating all the way home to keep b5 under fire and sidestep every trick. When the dust settles after 7.c3 and 8.Ne4!, Black's knights are loose and the b5-pawn is weak — grabbing with 8...Qh4 gets pushed back by 9.Ng3. Whoever knows this line wins it: unprepared, White collapses; prepared, White consolidates an extra pawn.
Fritz Variation (5...Nd4)
1.e4 e5 2.Nf3 Nc6 3.Bc4 Nf6 4.Ng5 d5 5.exd5 Nd4 6.c3 b5 7.Bf1 Nxd5 8.cxd4 Qxg5 9.Bxb5+ Kd8
The Fritz jumps the knight to d4 first and transposes to Ulvestad-like chaos after 6.c3 b5 7.Bf1. Here White can even grab the piece: 8.cxd4 Qxg5 9.Bxb5+ forces the king to d8, and with d4 and O-O coming, White's development plus Black's homeless king outweigh the pawn deficit. The critical takeaway is the pair of retreat resources, Bf1 and the c3 push — remember both and neither the Fritz nor the Ulvestad can ambush you.
Lolli Attack (6.d4!)
1.e4 e5 2.Nf3 Nc6 3.Bc4 Nf6 4.Ng5 d5 5.exd5 Nxd5 6.d4 exd4 7.O-O Be7 8.Nxf7 Kxf7 9.Qf3+ Ke6 10.Nc3 dxc3 11.Re1+
Even stronger than the immediate sacrifice, according to theory: 6.d4! opens the center first, so that when the knight does land on f7, the rook check on e1 arrives with devastating effect. If Black grabs everything with 10...dxc3, then 11.Re1+ begins a forced sequence where every White piece joins the hunt and the king perishes in the center. This is the version masters fear — the same Fried Liver themes with an extra open file thrown in for free.
Key ideas
- Strike f7 with 4.Ng5 — the one natural developing move Black allows it against 3...Nf6.
- After 5...Nxd5, sacrifice with 6.Nxf7!: the king walks to e6 and every White piece joins the hunt.
- Master the attacking geometry: Qf3+, Nc3, O-O and d4 arrive before Black untangles.
- Know the safer sidelines too — when Black avoids 5...Nxd5, White keeps a pleasant initiative anyway.
Typical plans and structures
In the main sacrifice, White plays Qf3+, Nc3 and d4 with rooks flooding the center files while Black's king shelters awkwardly around e6/e7 — the course drills the precise attacking sequences and the endings where White regains material with interest. Against the correct 5...Na5 (the Polerio/main defense avoiding the sac), White plays the modern d3 and Bd3 setups keeping structure and initiative. Either way, Black must know sharp theory just to survive the opening.
How to reach the Fried Liver Attack
The Fried Liver arises from the Two Knights Defense of the Italian Game: 1.e4 e5 2.Nf3 Nc6 3.Bc4 Nf6 4.Ng5. If Black defends f7 with 4...d5, White plays 5.exd5, and after the natural but risky 5...Nxd5 the sacrifice 6.Nxf7 is on. Black can sidestep at every step: 3...Bc5 avoids the Two Knights altogether, 4...Bc5 is the Traxler Counterattack, and after 5.exd5 the moves 5...Na5 (Polerio), 5...b5 (Ulvestad) and 5...Nd4 (Fritz) all decline the knight capture. White can also prefer the Lolli Attack 6.d4 to the immediate sacrifice.
Pros and cons of the Fried Liver Attack
Pros
- Forcing and concrete from move four: White knows the plan and the tactics, Black must find only-moves with the king on e6.
- Scores enormously below master level, where the defensive technique is rarely known.
- The positions after 6.Nxf7 are fun to play and teach attacking calculation better than any other opening.
- Even when Black declines with 5...Na5, White keeps an initiative and an extra pawn for a while.
Cons
- Objectively balanced at best: with exact defense Black survives the attack and keeps the extra piece.
- A prepared opponent plays 5...Na5 or the Traxler 4...Bc5, and the Fried Liver never happens.
- The Traxler leads to positions where White is the one under attack and must know the refutation.
- Relying on it stunts positional development; strong players eventually need the quiet 4.d3 Italian too.
How to play against the Fried Liver Attack
Black's safest course is never to allow it. After 4.Ng5 d5 5.exd5, play 5...Na5, the Polerio Defense, giving up a pawn for a lead in development and a safe king, and follow with ...h6, ...e4 and ...Bd6; every strong player answers the Fried Liver this way. The Traxler 4...Bc5 turns the tables with a counter-sacrifice on f2 and is a real weapon if you know it. If you do take on d5 with the knight and allow 6.Nxf7, defend with 7...Ke6 and the line 8.Nc3 Ncb4, keep the extra piece, and aim to trade queens; the engine says Black is fine, but one inaccuracy loses. The one thing never to do is play 3...Nf6 without a prepared answer to 4.Ng5.
Plans for both sides
White's plan
Sacrifice on f7, check on f3, and bring every piece against the king on e6: Nc3, O-O, Re1 and d4 in some order, with the queen and rooks arriving down the e- and f-files. Do not grab material; keep the king in the center and prevent ...Kd7 and ...Kc8. Against the Polerio, take the pawn, play c3 and d4, and use the extra pawn and the lead in development.
Black's plan
If you allow the sacrifice, centralize with ...Ncb4 and ...c6, trade queens as soon as possible, and run the king to the queenside. If you decline with 5...Na5, play ...h6 to kick the knight, ...e4 to gain time on the f3-knight, and develop with ...Bd6 and ...O-O, using the lead in development and the open lines for a kingside attack of your own.
Who should play it
Attacking players — and anyone who wants 1.e4 e5 games decided by initiative and calculation rather than long positional grinds.
History of the Fried Liver Attack
The sacrifice was analyzed by Giulio Cesare Polerio in the 1590s, and its name, from the Italian fegatello, refers to a dish of liver cooked on a skewer, a picture of the black king roasting in the center. Polerio also found the 5...Na5 defense that carries his name. The line was a staple of nineteenth-century attacking play, and the Traxler Counterattack, analyzed by the Czech priest Karel Traxler in 1890, gave Black a way to fight fire with fire. It has rarely appeared at master level since, but it is one of the most played attacks in scholastic and online chess and a rite of passage for every 1.e4 player.
Study the Fried Liver Attack move by move
The first 3 lines of the interactive course, exactly as a signed-out visitor can play them — each move with the coaching note shown on the board.
Line 1 — the main line
1.e4 We claim the center. 1...e5 Our opponent mirrors us. 2.Nf3 We bring out the knight, targeting e5. 2...Nc6 Our opponent defends the pawn. 3.Bc4 We develop the bishop, aiming at f7. 3...Nf6 Our opponent activates their knight, attacking e4. 4.Ng5 We enter the Fried Liver Attack, coordinating bishop and knight against f7! 4...d5 Our opponent gives up a pawn to block the diagonal. 5.exd5 We capture on d5. 5...Na5 Targeting our bishop. 6.Bb5+ We reposition the bishop with check. 6...c6 Our opponent blocks with the pawn, counterattacking the bishop. 7.dxc6 We capture on c6. 7...bxc6 Our opponent takes back with the pawn. 8.Bd3 We pull the bishop back to d3, controlling e4. 8...Nd5 Our opponent centralizes the knight, with a discovered attack on g5. 9.Nf3 We retreat the knight, pressuring e5. 9...Bd6 Our opponent develops the bishop to protect the pawn and prepare to castle. 10.O-O We castle. 10...O-O Our opponent castles too. 11.Re1 We activate the rook along the e file, increasing pressure on e5 and clearing f1 for the bishop. 11...f5 Sacrificing the e5 pawn for initiative on the kingside. 12.Nxe5 We accept the sacrifice, as allowing ... e5 e4 would be a mistake. 12...Qf6 Activating the queen with tempo on our knight. 13.Nf3 We retreat the knight. 13...g5 Our opponent expands on the kingside, planning to attack the knight with ...g5 g4. 14.c4 We target their knight. 14...Nf4 Our opponent repositions the knight, threatening the bishop. 15.Bf1 We pull the bishop back to f1, reinforcing the kingside and freeing the d pawn. 15...g4 Our opponent attacks the knight. 16.d4 We take space in the center, sacrificing the knight for counterplay with enough pawns and open lines as compensation.
Line 2 — against an inaccuracy
1.e4 We claim the center. 1...e5 Our opponent mirrors us. 2.Nf3 We bring out the knight, targeting e5. 2...Nc6 Our opponent defends the pawn. 3.Bc4 We develop the bishop, aiming at f7. 3...Nf6 Our opponent activates their knight, attacking e4. 4.Ng5 We enter the Fried Liver Attack, coordinating bishop and knight against f7! 4...d5 Our opponent gives up a pawn to block the diagonal. 5.exd5 We capture on d5. 5...Na5 Targeting our bishop. 6.Bb5+ We reposition the bishop with check. 6...c6 Our opponent blocks with the pawn, counterattacking the bishop. 7.dxc6 We capture on c6. 7...bxc6 Our opponent takes back with the pawn. 8.Bd3 We pull the bishop back to d3, controlling e4. 8...Nd5 Our opponent centralizes the knight, with a discovered attack on g5. 9.Nf3 We retreat the knight, pressuring e5. 9...Bd6 Our opponent develops the bishop to protect the pawn and prepare to castle. 10.O-O We castle. 10...Nf4 Our opponent repositions the knight, pressuring our bishop. 11.Re1 We activate the rook, targeting the e5 pawn. 11...Nxd3 Our opponent captures on d3. 12.cxd3 We take back with the pawn. 12...O-O Our opponent castles. 13.Nc3 We develop the knight, since capturing on e5 would open lines for our opponent's attack. 13...Re8 Our opponent brings their rook to the e file. 14.Ne4 We centralize the knight, parrying our opponent's threats while preparing to complete development with a queenside fianchetto.
Line 3 — against an inaccuracy
1.e4 We claim the center. 1...e5 Our opponent mirrors us. 2.Nf3 We bring out the knight, targeting e5. 2...Nc6 Our opponent defends the pawn. 3.Bc4 We develop the bishop, aiming at f7. 3...Nf6 Our opponent activates their knight, attacking e4. 4.Ng5 We enter the Fried Liver Attack, coordinating bishop and knight against f7! 4...d5 Our opponent gives up a pawn to block the diagonal. 5.exd5 We capture on d5. 5...Na5 Targeting our bishop. 6.Bb5+ We reposition the bishop with check. 6...c6 Our opponent blocks with the pawn, counterattacking the bishop. 7.dxc6 We capture on c6. 7...bxc6 Our opponent takes back with the pawn. 8.Bd3 We pull the bishop back to d3, controlling e4. 8...Ng4 Our opponent jumps in with the knight, uncovering an attack on g5. 9.Ne4 We retreat the knight. 9...f5 Our opponent pushes the f pawn, targeting the knight and gaining space. 10.Be2 We retreat the bishop, counterattacking their knight. 10...h5 Our opponent launches the h pawn to defend the knight. 11.h3 We continue to attack the knight. 11...fxe4 Our opponent captures on e4. 12.hxg4 We take on g4. 12...Bc5 Developing the bishop and aiming at f2. 13.b4 We sacrifice a pawn to reduce the pressure on f2. 13...Qd4 Our opponent activates the queen, threatening checkmate. 14.bxc5 We capture their bishop, sacrificing our rook on f1 to trap their queen and gain the initiative.
The free preview ends here — continue with all 12 lines in the interactive course, with instant feedback on every move you play.
Frequently asked questions
Is the Fried Liver Attack sound?
The knight sacrifice itself is objectively strong — engines confirm White keeps at least full compensation with a raging attack, and practical results are devastating. Black's real defense is avoiding it with 5...Na5 instead of 5...Nxd5, which the course covers thoroughly.
What if Black plays the Traxler counterattack?
The wild 4...Bc5!? invites madness. The course gives a clear, reliable path through the complications — the lines where preparation matters most, since one wrong move loses for either side.
Why is it called the Fried Liver?
The name comes from the Italian 'fegatello' — a liver skewered like Black's f7-pawn and king. The attack was analyzed as far back as the 1600s by Polerio and remains one of the oldest still-dangerous weapons in chess.
How do you defend against the Fried Liver Attack?
Do not allow it: after 4.Ng5 d5 5.exd5, play 5...Na5, the Polerio Defense, sacrificing a pawn for a safe king and fast development. If you have already played 5...Nxd5 and been hit by 6.Nxf7, defend with 7...Ke6, centralize with ...Ncb4 and ...c6, and trade queens when you can.
Is the Fried Liver good for beginners?
It is excellent for learning attacking calculation and wins many games below club level, but every Black player eventually learns 5...Na5, after which the sacrifice never appears. Learn it, enjoy it, and learn the quiet 4.d3 Italian alongside it.
Learn the Fried Liver Attack with AI feedback
This page pairs the guide above with an interactive ChessMind AI course: a GM-authored repertoire you study move by move on a real board, then practice against a human-like chess AI opponent with instant feedback and spaced-repetition review, so the key positions actually stick. Start learning, jump straight into practice, or browse all opening courses.
New to a concept? Every term is defined in the chess terms glossary.