Beat the Lowenthal Sicilian
1.e4 c5 2.Nf3 Nc6 3.d4 cxd4 4.Nxd4 e5 5.Nb5 a6 6.Nd6+ Bxd6 7.Qxd6 Qe7
The Lowenthal Sicilian (1.e4 c5 2.Nf3 Nc6 3.d4 cxd4 4.Nxd4 e5 5.Nb5 a6) is the rarest of the ...e5 Sicilians — Black gives up the dark-squared bishop with 6.Nd6+ Bxd6 7.Qxd6 for quick development and tricks. Objectively dubious, but full of venom: this course gives you the precise sequence that converts theory's promised advantage into a real one.
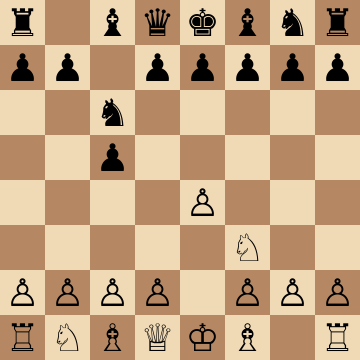
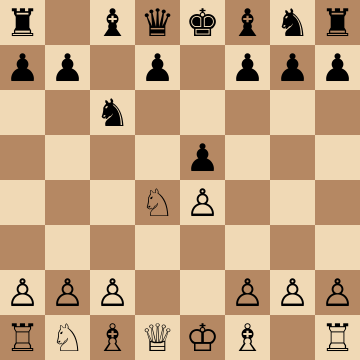
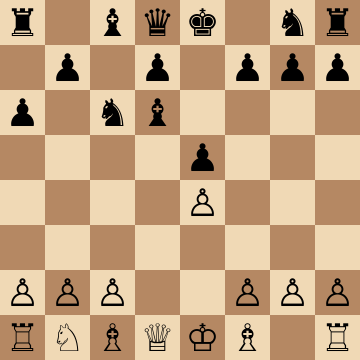
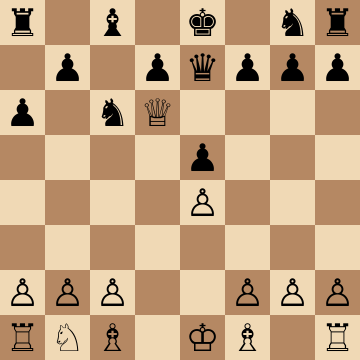
Mainline
1.e4 c5 2.Nf3 Nc6 3.d4 cxd4 4.Nxd4 e5 5.Nb5 a6 6.Nd6+ Bxd6 7.Qxd6 Qe7
Main Line: 7...Qf6 8.Qd1 Qg6
1.e4 c5 2.Nf3 Nc6 3.d4 cxd4 4.Nxd4 e5 5.Nb5 a6 6.Nd6+ Bxd6 7.Qxd6 Qf6 8.Qd1 Qg6 9.Nc3 Nge7
The backbone of the repertoire. After collecting the dark-squared bishop, the queen retreats all the way to d1 — the key finesse, avoiding tricks on the c1-h6 diagonal and keeping d-file options. Black's 8...Qg6 hits e4 and g2 with maximal activity, but 9.Nc3 calmly defends. From here White's plan is permanent: control d5, occupy the dark squares Black weakened, and let the bishop pair decide the late middlegame.
Space-Gaining Attack with 10.h4!
1.e4 c5 2.Nf3 Nc6 3.d4 cxd4 4.Nxd4 e5 5.Nb5 a6 6.Nd6+ Bxd6 7.Qxd6 Qf6 8.Qd1 Qg6 9.Nc3 Nge7 10.h4 h5 11.Bg5
Once Black commits the queen to g6, the h-pawn becomes a weapon: 10.h4! threatens h5, hitting the queen and prying open the kingside. Black is practically forced into 10...h5, after which 11.Bg5 develops with the threat of Bxe7 and fixes h5 as a long-term target. Notice the pattern — every Black piece that defended the dark squares is gone or tied down, and White has gained two tempi of development from the queen chase.
Queen Trade Attempt: 7...Qe7
1.e4 c5 2.Nf3 Nc6 3.d4 cxd4 4.Nxd4 e5 5.Nb5 a6 6.Nd6+ Bxd6 7.Qxd6 Qe7 8.Qxe7+ Ngxe7 9.Nc3 d5 10.exd5 Nxd5
Black's most solid try offers the queen trade at once, banking on quick development to blur the missing bishop. Take it: 8.Qxe7+ Ngxe7 9.Nc3 leaves White with the bishop pair against a position full of dark-square holes, and even the freeing 9...d5 10.exd5 Nxd5 doesn't equalize — Nxd5 and Bd3 next keep a stable, riskless pull. This is the endgame-grinder's dream version of the Lowenthal.
Kalashnikov Transposition (5...d6)
1.e4 c5 2.Nf3 Nc6 3.d4 cxd4 4.Nxd4 e5 5.Nb5 d6 6.N1c3 a6 7.Na3 b5 8.Nd5
Many players who venture 4...e5 intend 5...d6, keeping the bishop and steering into the Kalashnikov instead. The knight tour Nb5-a3 and then to d5 (or c2-e3) is the standard answer: White plants a piece on the hole Black created and plays against the backward d6-pawn. The plans are different enough from the pure Lowenthal that they deserve their own treatment — covered move by move in the dedicated Kalashnikov course.
Study the Attacking the Kalashnikov Sicilian course
Sveshnikov Transposition (5...Nf6)
1.e4 c5 2.Nf3 Nc6 3.d4 cxd4 4.Nxd4 e5 5.Nb5 Nf6 6.N1c3 d6 7.Bg5 a6 8.Na3 b5 9.Nd5
With 5...Nf6 and 6...d6 Black reaches the Sveshnikov proper — a far more respectable relative of the Lowenthal. White's critical setup is 7.Bg5 and 9.Nd5: the fight revolves around the d5-outpost and Black's f5-break. Don't improvise here; the Sveshnikov is heavy theory, and the move orders matter. The dedicated counter-Sveshnikov course maps the whole complex from White's side.
Study the Beat the Sveshnikov Sicilian course
Key ideas
- Grab the bishop pair with 6.Nd6+ — a permanent, structural advantage Black can never undo.
- Know the exact queen moves: after 7...Qf6, the accurate 8.Qd1 retreat keeps everything defended.
- Weather Black's brief initiative — a few precise moves and the activity evaporates, the assets remain.
- Convert in the long game: dark-square control and the bishop pair grind the Lowenthal down.
Typical plans and structures
Black follows up with ...Qg6 or ...Nge7, hitting e4 and hoping for quick piece play; White consolidates with Nc3, h4 or f3 depending on the line, completes development, and only then advances. The middlegame plan is thematic: restrain ...d5, plant pieces on the weak dark squares (d6 above all), and open the position when the bishop pair profits most. The course drills the handful of only-moves in the opening phase — the entire challenge of facing the Lowenthal well.
Who should play it
1.e4 Open Sicilian players who want every branch of the ...e5 complex covered with a concrete path to the advantage, including the rare ones.
Study Beat the Lowenthal Sicilian move by move
The first 3 lines of the interactive course, exactly as a signed-out visitor can play them — each move with the coaching note shown on the board.
Line 1
1.e4 We take control of the center Tomamos control del centro. 1...c5 Our opponent launches the Sicilian Defense Nuestro oponente lanza la Defensa Siciliana. 2.Nf3 We develop our knight to strike in the center with d4 Desarrollamos nuestro caballo para atacar en el centro con d4. 2...Nc6 Our opponent brings the knight into play to reinforce central control Nuestro oponente trae el caballo al juego para reforzar el control central. 3.d4 We strike with a central pawn break to gain space and activate our pieces Atacamos con un avance de peón central para ganar espacio y activar nuestras piezas. 3...cxd4 Trading our central pawn Intercambiando nuestro peón central. 4.Nxd4 We recapture and offer a knight trade to simplify the position and maintain central presence Recapturamos y ofrecemos un intercambio de caballos para simplificar la posición y mantener presencia central. 4...e5 Our opponent targets our knight to gain tempos, increase center control, and activate their queen and bishop Nuestro oponente ataca nuestro caballo para ganar tiempo, aumentar el control central y activar su dama y alfil. 5.Nb5 We reposition our knight to the queenside aiming to control and occupy the weak d6 square Reposicionamos nuestro caballo al flanco de dama apuntando a controlar y ocupar la casilla débil d6. 5...a6 Our opponent challenges the knight, allowing it to jump into d6 Nuestro oponente desafÃa el caballo, permitiéndole saltar a d6. 6.Nd6+ We check their king to force a trade and gain the valuable bishop pair advantage Damos jaque a su rey para forzar un intercambio y ganar la valiosa ventaja de la pareja de alfiles. 6...Bxd6 Our opponent chooses to take the knight with their bishop rather than moving the king Nuestro oponente elige capturar el caballo con su alfil en lugar de mover el rey. 7.Qxd6 We recapture with our queen, and even if it looks dangerous, it is safe on d6 Recapturamos con nuestra dama, y aunque parece peligroso, está segura en d6. 7...Qf6 Our opponent brings out their queen to offer a trade and reduce tension Nuestro oponente saca su dama para ofrecer un intercambio y reducir la tensión. 8.Qd1 We retreat our queen to its starting square to keep strong attacking chances alive. 8...Qg6 Our opponent repositions their queen to put pressure on our e4 pawn. 9.Nc3 We develop our knight to defend the pawn and increase control over the d5 square. 9...d5 Our opponent sacrifices a pawn to challenge e4 and destabilize our position. 10.Nxd5 We take the pawn with our knight, creating a fork threat on c7. 10...Qxe4+ Our opponent takes our pawn with check to regain material and join forces with their knight. 11.Be3 We develop our bishop to block the check and strengthen control over the dark squares. 11...Nd4 Our opponent jumps with their knight to threaten a fork by capturing on c2 with check. 12.Nc7+ We strike with our knight to fork their king and rook. 12...Ke7 Our opponent steps out of check, restoring their knight's threat to capture on c2. 13.Qd3 We bring out our queen to offer a trade, intentionally allowing our opponent to fork. 13...Nxc2+ Our opponent captures the pawn with check, forcing our king to move. 14.Kd2 We step with the king into the center, which looks dangerous but is safe in this case. 14...Qxd3+ Our opponent trades queens to relieve pressure and simplify the position. 15.Bxd3 We recapture with our bishop, connecting our rooks and keeping strong piece activity across the board.
Line 2
1.e4 We take control of the center Tomamos control del centro. 1...c5 Our opponent launches the Sicilian Defense Nuestro oponente lanza la Defensa Siciliana. 2.Nf3 We develop our knight to strike in the center with d4 Desarrollamos nuestro caballo para atacar en el centro con d4. 2...Nc6 Our opponent brings the knight into play to reinforce central control Nuestro oponente trae el caballo al juego para reforzar el control central. 3.d4 We strike with a central pawn break to gain space and activate our pieces Atacamos con un avance de peón central para ganar espacio y activar nuestras piezas. 3...cxd4 Trading our central pawn Intercambiando nuestro peón central. 4.Nxd4 We recapture and offer a knight trade to simplify the position and maintain central presence Recapturamos y ofrecemos un intercambio de caballos para simplificar la posición y mantener presencia central. 4...e5 Our opponent targets our knight to gain tempos, increase center control, and activate their queen and bishop Nuestro oponente ataca nuestro caballo para ganar tiempo, aumentar el control central y activar su dama y alfil. 5.Nb5 We reposition our knight to the queenside aiming to control and occupy the weak d6 square Reposicionamos nuestro caballo al flanco de dama apuntando a controlar y ocupar la casilla débil d6. 5...a6 Our opponent challenges the knight, allowing it to jump into d6 Nuestro oponente desafÃa el caballo, permitiéndole saltar a d6. 6.Nd6+ We check their king to force a trade and gain the valuable bishop pair advantage Damos jaque a su rey para forzar un intercambio y ganar la valiosa ventaja de la pareja de alfiles. 6...Bxd6 Our opponent chooses to take the knight with their bishop rather than moving the king Nuestro oponente elige capturar el caballo con su alfil en lugar de mover el rey. 7.Qxd6 We recapture with our queen, and even if it looks dangerous, it is safe on d6 Recapturamos con nuestra dama, y aunque parece peligroso, está segura en d6. 7...Qf6 Our opponent brings out their queen to offer a trade and reduce tension Nuestro oponente saca su dama para ofrecer un intercambio y reducir la tensión. 8.Qd1 We retreat our queen to its starting square to keep strong attacking chances alive. 8...Qg6 Our opponent repositions their queen to put pressure on our e4 pawn. 9.Nc3 We develop our knight to defend the pawn and increase control over the d5 square. 9...Nf6 Our opponent develops the knight to pressure e4 and prepare a â¦d5 pawn break. 10.Qd6 We bring our queen to the center to stop their plan, prevent castling, and prepare to trade queens. 10...Ng4 Our opponent advances the knight to exchange queens and relieve the pressure. 11.Qxg6 We trade queens to damage their pawn structure and simplify the position. 11...hxg6 Our opponent recaptures with the h pawn to open the file for their rook. 12.Be2 We develop our bishop to attack their knight. 12...d6 Our opponent pushes a pawn to let the bishop defend the knight. 13.f3 We strike with a pawn to pressure their knight again and disrupt their setup. 13...Nf6 Our opponent retreats the knight instead of capturing on h2, which would walk into a pin. 14.Be3 We develop our bishop to finish development and prepare long castling, with a better pawn structure.
Line 3
1.e4 We take control of the center Tomamos control del centro. 1...c5 Our opponent launches the Sicilian Defense Nuestro oponente lanza la Defensa Siciliana. 2.Nf3 We develop our knight to strike in the center with d4 Desarrollamos nuestro caballo para atacar en el centro con d4. 2...Nc6 Our opponent brings the knight into play to reinforce central control Nuestro oponente trae el caballo al juego para reforzar el control central. 3.d4 We strike with a central pawn break to gain space and activate our pieces Atacamos con un avance de peón central para ganar espacio y activar nuestras piezas. 3...cxd4 Trading our central pawn Intercambiando nuestro peón central. 4.Nxd4 We recapture and offer a knight trade to simplify the position and maintain central presence Recapturamos y ofrecemos un intercambio de caballos para simplificar la posición y mantener presencia central. 4...e5 Our opponent targets our knight to gain tempos, increase center control, and activate their queen and bishop Nuestro oponente ataca nuestro caballo para ganar tiempo, aumentar el control central y activar su dama y alfil. 5.Nb5 We reposition our knight to the queenside aiming to control and occupy the weak d6 square Reposicionamos nuestro caballo al flanco de dama apuntando a controlar y ocupar la casilla débil d6. 5...a6 Our opponent challenges the knight, allowing it to jump into d6 Nuestro oponente desafÃa el caballo, permitiéndole saltar a d6. 6.Nd6+ We check their king to force a trade and gain the valuable bishop pair advantage Damos jaque a su rey para forzar un intercambio y ganar la valiosa ventaja de la pareja de alfiles. 6...Bxd6 Our opponent chooses to take the knight with their bishop rather than moving the king Nuestro oponente elige capturar el caballo con su alfil en lugar de mover el rey. 7.Qxd6 We recapture with our queen, and even if it looks dangerous, it is safe on d6 Recapturamos con nuestra dama, y aunque parece peligroso, está segura en d6. 7...Qf6 Our opponent brings out their queen to offer a trade and reduce tension Nuestro oponente saca su dama para ofrecer un intercambio y reducir la tensión. 8.Qd1 We retreat our queen to its starting square to keep strong attacking chances alive. 8...Qg6 Our opponent repositions their queen to put pressure on our e4 pawn. 9.Nc3 We develop our knight to defend the pawn and increase control over the d5 square. 9...Nge7 Our opponent brings out the knight to support â¦d5 and prepare for kingside castling. 10.Be3 We develop our bishop to reinforce d4 and dominate the queenside dark squares. 10...d5 Our opponent sacrifices a pawn in the center to open lines for their light squared bishop. 11.exd5 We capture with a pawn to gain material and attack their knight. 11...Nb4 Our opponent repositions the knight to counterattack by threatening a fork with â¦Nxc2. 12.Bd3 We bring out our bishop to block the threat while striking the queen. 12...Nxd3+ Our opponent captures with the knight to eliminate our bishop pair advantage. 13.Qxd3 We take with the queen to propose a queen trade, easing pressure and simplifying the position. 13...Qxd3 Our opponent accepts the trade, hoping to exploit weaknesses caused by our doubled pawns. 14.cxd3 We take with our pawn, reinforcing control over central squares. 14...Bf5 Our opponent develops the bishop to attack d3 and get ready for castling. 15.Bb6 We place our bishop on a strong outpost, accepting pressure on d3 and keeping the piece activity advantage.
The free preview ends here — continue with all 10 lines in the interactive course, with instant feedback on every move you play.
Frequently asked questions
What is the difference between the Lowenthal and the Kalashnikov?
Both start 4...e5 5.Nb5, but the Kalashnikov defends with the solid 5...d6, while the Lowenthal plays the immediate 5...a6, inviting 6.Nd6+ Bxd6 7.Qxd6 — a genuine pawn-structure-versus-bishop-pair trade that defines the whole variation.
Why does Black voluntarily give up the bishop in the Lowenthal?
For time: after 7.Qxd6 Qf6, White's queen must retreat and Black develops with tempo, hoping to seize the initiative before the bishop pair matters. With precise play White keeps everything under control — which is exactly what this course delivers.
Is the Lowenthal Sicilian actually bad?
Modern theory judges it dubious with best play — but 'best play' is a narrow path, and one natural-looking inaccuracy hands Black full compensation. That is the trap of rare openings: the punishment must be memorized, not improvised.
Learn Beat the Lowenthal Sicilian with AI feedback
This page pairs the guide above with an interactive ChessMind AI course: a GM-authored repertoire you study move by move on a real board, then practice against a human-like chess AI opponent with instant feedback and spaced-repetition review, so the key positions actually stick. Start learning, jump straight into practice, or browse all opening courses.
New to a concept? Every term is defined in the chess terms glossary.