The Rossolimo
1.e4 c5 2.Nf3 Nc6 3.Bb5 g6
The Rossolimo (1.e4 c5 2.Nf3 Nc6 3.Bb5) is the most respected Anti-Sicilian in chess — a favorite of Magnus Carlsen and Fabiano Caruana at the very highest level. White develops with threats, often trades on c6 to inflict lasting structural damage, and fights for an edge with ideas instead of memorized forcing lines.
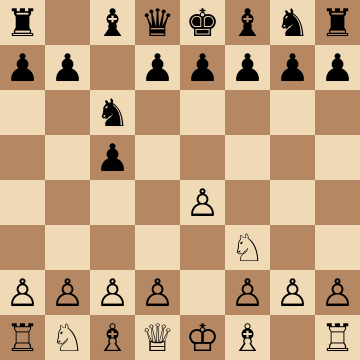
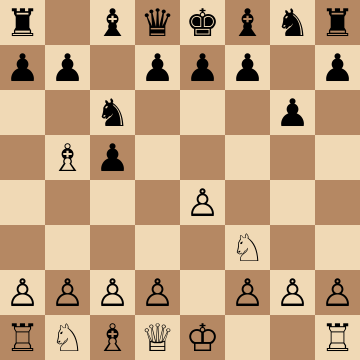
Mainline
1.e4 c5 2.Nf3 Nc6 3.Bb5 g6 4.Bxc6 dxc6 5.d3 Bg7 6.h3 Nf6 7.Nc3
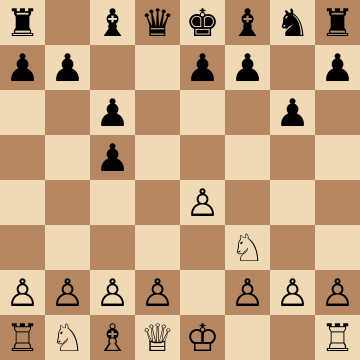
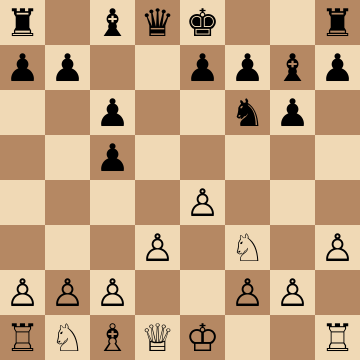
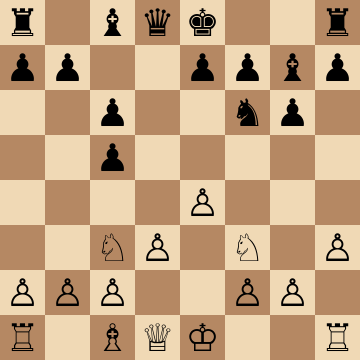
Main Line 3...g6: 4.Bxc6 dxc6 5.d3
1.e4 c5 2.Nf3 Nc6 3.Bb5 g6 4.Bxc6 dxc6 5.d3 Bg7 6.h3 Nf6 7.Nc3 O-O 8.Be3 b6 9.Qd2 e5 10.Bh6
The structural heart of the Rossolimo. White gives up the bishop pair to double Black's c-pawns, then plays against them forever: h3 restrains ...Bg4, Be3 and Qd2 prepare Bh6 to trade Black's best piece, and the healthy kingside majority stands ready for e5 and f4 in the endgame. Carlsen has won this exact position many times. Black's two bishops need open lines that the structure never quite provides — that is the whole bet, and it pays.
3...g6 with 4...bxc6: Central Break 10.e5
1.e4 c5 2.Nf3 Nc6 3.Bb5 g6 4.Bxc6 bxc6 5.O-O Bg7 6.Re1 Nh6 7.c3 O-O 8.d4 cxd4 9.cxd4 d5 10.e5
Recapturing toward the center with 4...bxc6 keeps Black's structure compact, so White switches plans: c3 and d4 build the big center that the doubled pawns can no longer challenge properly. After 9...d5 10.e5 White has a favorable French-style chain with the g7 bishop biting on granite and a free hand on the kingside — Bf4, Nbd2, Qd2 and h4-h5 ideas all come naturally. The space advantage is stable and the plans are yours to choose.
3...e6 Variation: 4.O-O Nge7
1.e4 c5 2.Nf3 Nc6 3.Bb5 e6 4.O-O Nge7 5.Re1 a6 6.Bf1 d5 7.exd5 Nxd5 8.d4
Black's flexible ...e6 and ...Nge7 setup avoids the doubled pawns, so White changes gears: castle fast, tuck the bishop back to f1 with Re1 covering e4, and strike in the center the moment Black commits. After 6...d5 7.exd5 Nxd5 8.d4 the game opens while White's pieces are the better placed — the f1 bishop rejoins via g3-Bg2 or a quick c4, and Black's slightly awkward e7 knight is the lasting theme. Simple chess, played a tempo ahead.
3...d6 Variation: Ruy Lopez Style
1.e4 c5 2.Nf3 Nc6 3.Bb5 d6 4.O-O Bd7 5.Re1 Nf6 6.c3 a6 7.Ba4 b5 8.Bc2 e5 9.h3 Be7 10.d4
With 3...d6 Black steers toward a Sicilian-Ruy hybrid, and White should embrace the comparison: c3, Ba4-c2, h3 and d4 give a full Spanish center where the extra ...c5 move actually weakens d5. The maneuvering battle is familiar from a thousand Lopez games — Nbd2-f1-g3, pressure on e5, a well-timed d5 or dxe5. Rossolimo players get these positions with the theory workload of an entire Ruy Lopez repertoire compressed into one setup.
3...Nd4: Trading the Defender
1.e4 c5 2.Nf3 Nc6 3.Bb5 Nd4 4.Nxd4 cxd4 5.O-O a6 6.Bd3 g6 7.c3 dxc3 8.Nxc3
The immediate 3...Nd4 asks White to resolve the tension at once. Do it favorably: 4.Nxd4 cxd4 leaves Black's d4 pawn overextended, and after 5.O-O and 6.Bd3 White undermines it with c3. Whether Black exchanges on c3 or defends the pawn, White ends up with faster development and open central lines — the b1 knight arrives on c3 with tempo, and d4 or f4 breaks follow. A line where knowing one clean plan beats Black's hoped-for confusion.
Castling First: 4.O-O and Re1
1.e4 c5 2.Nf3 Nc6 3.Bb5 g6 4.O-O Bg7 5.Re1 e5 6.Bxc6 dxc6 7.d3 Ne7 8.Nbd2 O-O 9.Nc4
The modern move order preferred at the top: castle before committing to Bxc6, and only take on c6 once ...e5 fixes the structure. Now the d3-Nbd2-c4 maneuver hits e5 and a5-squares, a4 gains queenside space, and Be3 with Qd2 completes the bind. Black's pawn on e5 blocks the g7 bishop permanently — the same bad-bishop story as the main line, with extra flexibility for White along the way. This is the setup Carlsen and Caruana trust in must-win games.
Key ideas
- Develop the bishop actively to b5 and castle quickly — a lead in development by move four.
- Trade on c6 at the right moment, saddling Black with doubled pawns for the whole game.
- Play against the crippled majority: Black's queenside pawns cannot create a passed pawn.
- Combine with the Moscow Attack (vs 2...d6) for a complete, coherent 3.Bb5 repertoire.
Typical plans and structures
In the main line with 3...g6 4.Bxc6 dxc6, White's structure-based plan is timeless: blockade with d3 and Nc3 or c3-d4 later, castle, then advance the healthy kingside majority with e5 and f4 while Black's doubled c-pawns watch. Piece play revolves around the e5-square and the half-open d-file. Against 3...e6 and 3...d6, White adapts with quick O-O, Re1 and c3 schemes — same philosophy, concrete details covered line by line in the course.
Who should play it
Players who want a world-class weapon against 2...Nc6 Sicilians that rewards understanding and keeps White pressing with minimal theoretical risk.
Study the Rossolimo move by move
The first 3 lines of the interactive course, exactly as a signed-out visitor can play them — each move with the coaching note shown on the board.
Line 1
1.e4 We take control of the center and open lines for the queen and bishop. 1...c5 Our opponent chooses the Sicilian Defense, contesting the center from the flank. 2.Nf3 We develop our knight toward the center and prepare to support a future d4 push. 2...Nc6 Our opponent brings out the knight to increase control over d4 and support ...e5. 3.Bb5 We enter the Rossolimo Attack, aiming to double their pawns and reduce counterplay. 3...g6 Our opponent prepares to fianchetto the bishop and control the long diagonal. 4.Bxc6 We capture the knight to damage their pawn structure and reinforce our control of central space. 4...bxc6 Our opponent accepts doubled pawns in exchange for the bishop pair. 5.O-O We castle early for safety and prepare to control the center quickly. 5...Bg7 Our opponent fianchettoes the bishop. 6.Re1 We place the rook on the central file to support e4. 6...Nh6 Our opponent develops the knight cautiously, aiming to maneuver it after â¦f6. 7.c3 We want to play d4 but need to prepare it with this move first. 7...O-O Our opponent brings the king to safety and prepares to finish development. 8.d4 We strike in the center, gaining space and challenging their setup. 8...cxd4 Our opponent captures to get rid of their doubled pawns. 9.cxd4 We recapture to maintain strong central control and develop our knight to its natural square. 9...d5 Our opponent pushes to challenge and destabilize our pawn structure in the center. 10.e5 We advance to gain space and limit their minor pieces. 10...f6 Our opponent tries to break our center and open the f file for their rook. 11.h3 We stop their bishop and knight from using g4, cutting off their attacking chances. 11...fxe5 Our opponent aims to weaken our pawn structure and central control by forcing trades and breaks. 12.dxe5 We recapture with our pawn to hold space and limit the fianchettoed bishop's activity. 12...c5 Our opponent expands on the queenside, and may keep pushing if we don't prevent it. 13.b4 We sacrifice our pawn to break their coordination and provoke weaknesses. 13...cxb4 Our opponent accepts the sacrifice, grabbing material but weakening their grip on the center. 14.a3 We continue sacrificing material to activate our pieces, especially the bishop along the a3âf8 diagonal. 14...bxa3 Our opponent keeps grabbing material, falling behind in development and piece coordination. 15.Nc3 We develop our knight with tempo, targeting their central pawn and taking over the initiative. 15...Nf7 Our opponent maneuvers their knight, increasing pressure on our central pawn on e5. 16.Bxa3 We capture their pawn to complete development and stop them from defending d5 with â¦e6.
Line 2
1.e4 We take control of the center and open lines for the queen and bishop. 1...c5 Our opponent chooses the Sicilian Defense, contesting the center from the flank. 2.Nf3 We develop our knight toward the center and prepare to support a future d4 push. 2...Nc6 Our opponent brings out the knight to increase control over d4 and support ...e5. 3.Bb5 We enter the Rossolimo Attack, aiming to double their pawns and reduce counterplay. 3...g6 Our opponent prepares to fianchetto the bishop and control the long diagonal. 4.Bxc6 We capture the knight to damage their pawn structure and reinforce our control of central space. 4...bxc6 Our opponent accepts doubled pawns in exchange for the bishop pair. 5.O-O We castle early for safety and prepare to control the center quickly. 5...Bg7 Our opponent fianchettoes the bishop. 6.Re1 We place the rook on the central file to support e4. 6...Nh6 Our opponent develops the knight cautiously, aiming to maneuver it after â¦f6. 7.c3 We want to play d4 but need to prepare it with this move first. 7...O-O Our opponent brings the king to safety and prepares to finish development. 8.d4 We strike in the center, gaining space and challenging their setup. 8...cxd4 Our opponent captures to get rid of their doubled pawns. 9.cxd4 We recapture to maintain strong central control and develop our knight to its natural square. 9...d5 Our opponent pushes to challenge and destabilize our pawn structure in the center. 10.e5 We advance to gain space and limit their minor pieces. 10...f6 Our opponent tries to break our center and open the f file for their rook. 11.h3 We stop their bishop and knight from using g4, cutting off their attacking chances. 11...fxe5 Our opponent aims to weaken our pawn structure and central control by forcing trades and breaks. 12.dxe5 We recapture with our pawn to hold space and limit the fianchettoed bishop's activity. 12...c5 Our opponent expands on the queenside, and may keep pushing if we don't prevent it. 13.b4 We sacrifice our pawn to break their coordination and provoke weaknesses. 13...c4 Our opponent pushes to create a passed pawn and gain space on the queenside. 14.Be3 We develop our bishop to control the dark squares and restrict the advance of their pawns. 14...e6 Our opponent pushes to consolidate their pawn chain and block our e5 pawn. 15.Nc3 We bring out our knight to support the plan of stopping their passed pawns' advance. 15...a6 Our opponent pushes a pawn to block our knight and pawn from accessing the b5 square. 16.Bc5 We activate our bishop to exploit weak dark squares and target their rook. 16...Re8 Our opponent repositions their rook to avoid the attack and reinforce the e6 pawn. 17.Nd4 We bring our knight to the center, completely blocking their pawns and exploiting weak squares with strong piece activity.
Line 3
1.e4 We take control of the center and open lines for the queen and bishop. 1...c5 Our opponent chooses the Sicilian Defense, contesting the center from the flank. 2.Nf3 We develop our knight toward the center and prepare to support a future d4 push. 2...Nc6 Our opponent brings out the knight to increase control over d4 and support ...e5. 3.Bb5 We enter the Rossolimo Attack, aiming to double their pawns and reduce counterplay. 3...g6 Our opponent prepares to fianchetto the bishop and control the long diagonal. 4.Bxc6 We capture the knight to damage their pawn structure and reinforce our control of central space. 4...bxc6 Our opponent accepts doubled pawns in exchange for the bishop pair. 5.O-O We castle early for safety and prepare to control the center quickly. 5...Bg7 Our opponent fianchettoes the bishop. 6.Re1 We place the rook on the central file to support e4. 6...Nh6 Our opponent develops the knight cautiously, aiming to maneuver it after â¦f6. 7.c3 We want to play d4 but need to prepare it with this move first. 7...O-O Our opponent brings the king to safety and prepares to finish development. 8.d4 We strike in the center, gaining space and challenging their setup. 8...cxd4 Our opponent captures to get rid of their doubled pawns. 9.cxd4 We recapture to maintain strong central control and develop our knight to its natural square. 9...d5 Our opponent pushes to challenge and destabilize our pawn structure in the center. 10.e5 We advance to gain space and limit their minor pieces. 10...f6 Our opponent tries to break our center and open the f file for their rook. 11.exf6 We trade pawns to open the file for our rook and release pressure on the center. 11...exf6 Our opponent takes with the pawn, keeping their h6 knight protected and stopping Ne5. 12.Nbd2 We develop our knight, preparing to reposition it toward the queenside. 12...Re8 Our opponent invites a rook trade, aiming to counter our strong hold on the e file. 13.Nb3 We prepare to jump into the c5 outpost while clearing a path for bishop development. 13...Bf5 Our opponent develops their bishop to control e4 and prepare to connect the rooks. 14.Bd2 We maneuver our bishop to control the queenside, securing positional advantage from their weak pawn structure.
The free preview ends here — continue with all 18 lines in the interactive course, with instant feedback on every move you play.
Frequently asked questions
Why do top grandmasters prefer the Rossolimo to the Open Sicilian?
Efficiency and control: the Open Sicilian invites Black's preparation onto the sharpest terrain, while the Rossolimo poses durable structural questions with far less memorization. When Carlsen and Caruana repeatedly choose 3.Bb5 in world championship cycles, the message about its quality is clear.
What is the point of giving up the bishop pair with Bxc6?
White converts a temporary asset (the bishop) into a permanent one (Black's doubled, crippled queenside majority). Black's pawns cannot produce a passed pawn, while White's kingside majority can — an endgame edge that shapes the entire middlegame.
Which Black setup is most critical against the Rossolimo?
The fianchetto with 3...g6 is the main line and the sternest test, keeping the long diagonal for the g7-bishop as compensation for the structure. The course makes it the centerpiece, alongside full coverage of 3...e6 and 3...d6.
Learn the Rossolimo with AI feedback
This page pairs the guide above with an interactive ChessMind AI course: a GM-authored repertoire you study move by move on a real board, then practice against a human-like chess AI opponent with instant feedback and spaced-repetition review, so the key positions actually stick. Start learning, jump straight into practice, or browse all opening courses.
New to a concept? Every term is defined in the chess terms glossary.