Old Benoni
1.d4 c5 2.d5 d6
The Old Benoni (1.d4 c5) asks White a question on move one and skips virtually all mainstream 1.d4 theory in the process. Black gets genuine Benoni structures — the closed center, the queenside space plans, the dark-square strategy — without wading through the razor-sharp main lines of the Modern Benoni.
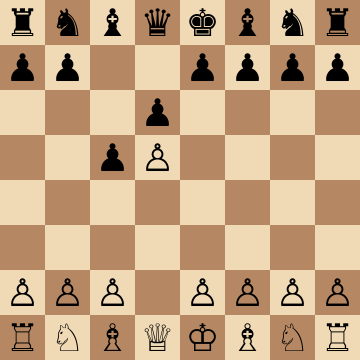
Mainline
1.d4 c5 2.d5 d6 3.Nc3 g6 4.e4 Bg7 5.Nf3 Nf6
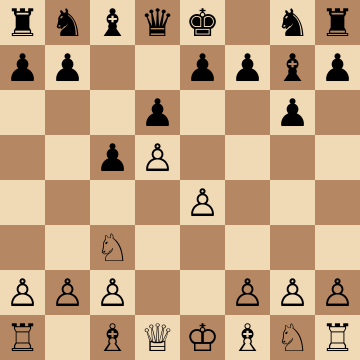
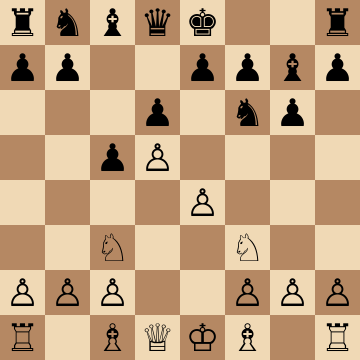
Czech Benoni Structure (3.e4 d6)
1.d4 c5 2.d5 e5 3.e4 d6 4.Nc3 Be7 5.Nf3
The defining Old Benoni structure: Black locks the centre with ...e5 and plays a King's Indian-style game a tempo up on the usual move order. Both sides manoeuvre behind the pawn chain — White aims for c4, b4 and the queenside break, Black for ...Ne7-g6 and ...f5 on the other wing.
Old Benoni: Schmid Setup with ...g6
1.d4 c5 2.d5 d6 3.Nc3 g6 4.e4 Bg7 5.Nf3 Nf6
Black skips ...e5 and fianchettoes instead, keeping the option of ...e6 to strike at the d5-pawn later. The result is a flexible Benoni-King's Indian hybrid that transposes into several respectable systems, which makes it a practical repertoire choice for players who dislike memorising forcing lines.
Old Benoni: 2...Nf6 Transposition
1.d4 c5 2.d5 Nf6 3.Nc3 e6 4.e4 exd5 5.exd5
By inserting ...Nf6 first Black invites a transposition into the Modern Benoni while sidestepping some of White's sharpest anti-Benoni move orders. Recognising which structure you have landed in — and which pawn break belongs to it — is the whole skill here, and it is why the two Benoni courses are best studied together.
Study the The Modern Benoni course
Old Benoni: e4 and f4 Space Grab
1.d4 c5 2.d5 e5 3.e4 d6 4.Nc3 Be7 5.f4
White refuses to manoeuvre and goes straight for the kingside break. After ...exf4 the position opens in White's favour, so Black usually keeps the tension with ...Nf6 and ...O-O and answers on the queenside. Handling the moment of maximum tension correctly is the difference between a good Czech Benoni and a bad one.
Old Benoni: ...Ne7-g6 Regroup
1.d4 c5 2.d5 e5 3.e4 d6 4.Nc3 Ne7 5.Nf3 Ng6
The characteristic Czech Benoni manoeuvre. The knight avoids f6, where it would block the ...f5 break, and heads for g6 to support both ...f5 and ...Nf4. Slow, ugly-looking and completely sound: closed positions are decided by whose pieces reach their best squares first, not by tempo counts.
Old Benoni: Queenside Clamp with ...a6
1.d4 c5 2.d5 e5 3.e4 d6 4.Nc3 a6 5.a4 Be7
Black prepares ...b5 immediately and White stops it with a4, at the cost of weakening b4 permanently. This is the strategic heart of the Old Benoni: whoever gets their pawn break in first on their own wing usually dictates the rest of the game, and every tempo spent preventing the other side's break is a tempo not spent on your own.
Key ideas
- Commit to ...c5 immediately and drag White out of every prepared 1.d4 system by move two.
- Close the center with ...e5 and play the classic Czech-Benoni maneuvering game you know better.
- Execute the thematic breaks — ...f5 on the kingside or ...b5 on the queenside — at your moment.
- Master piece regrouping in closed positions: knight routes and the good-bishop trade decide these games.
Typical plans and structures
In the closed structure with pawns on c5, d6 and e5 versus d5 and e4, Black maneuvers behind the lines: ...Be7-g5 to trade the bad bishop, knights to g6 or a6-c7, then the committal break — ...f5 for kingside play or ...a6 and ...b5 for the queenside. White's extra space needs accurate handling to mean anything; one hasty pawn advance and Black's counterplay strikes first. The course teaches the regrouping patterns and break timing that turn these quiet positions into full points.
Who should play it
Patient counterattackers who prefer understanding maneuvering structures over memorizing forced lines, and want an offbeat but sound surprise against 1.d4.
Study the Old Benoni move by move
The first 3 lines of the interactive course, exactly as a signed-out visitor can play them — each move with the coaching note shown on the board.
Line 1 — the main line
1.d4 Our opponent takes the center. 1...c5 We create imbalance immediately. We are basically inviting our opponent to advance, resulting in a Benoni-like position. 2.d5 Our opponent takes some space in the center, as we expected. 2...d6 We play a standard move, protecting the c5 pawn, and consolidating our center. 3.c4 Our opponent goes for a standard setup. Only downside is it invites Black to break with ...b7 b5 sooner or later. 3...g6 We prepare to fianchetto our bishop. 4.Nc3 Our opponent develops the knight to the best square, eyeing the b5 square to make it hard for us to break with ...b7 b5. 4...Bg7 We fianchetto our bishop. 5.e4 Our opponent completes their center, by far the most popular continuation. 5...e6 We break in the center right away, creating some tension and clearing the e7 square to develop our knight. 6.Nf3 The knight develops to the best square. 6...exd5 We trade pawns right away, forcing our opponent to show their hand. Do they want to recapture symmetrically or asymmetrically? 7.cxd5 Our opponent chooses an Asymmetric Benoni structure! They will want to play with their pawn majority, and hope to break with e4 e5 someday. 7...a6 We want to push ...b7 b5 to expand our queenside pawn majority. 8.a4 Our opponent doesn't allow the expansion so easily. 8...Bg4 We want to trade our light squared bishop, which is our worst piece in the Asymmetric Benoni structure. 9.Be2 Developing the bishop, there are no better squares since other diagonals are blocked anyway. 9...Bxf3 We are happy to trade our not-so-useful bishop for the knight on f3, which was supporting a future e4 e5 break. 10.Bxf3 Our opponent recaptures the piece. 10...Nd7 We develop our knight eyeing the e5 square. 11.O-O Our opponent castles short, the only viable option since castling long would expose White to a deadly attack after ...b7 b5. 11...Ne7 We develop our other knight to e7, keeping the long diagonal open, and keeping the option to break with ...f7 f5 as well. 12.Bf4 This is a good square for the bishop, attacking the d6 pawn and keeping an eye on the critical e5 square. 12...Ne5 We activate our knight and protect the pawn. 13.Be2 Our opponent removes the bishop, since we have a little less space, and trading minor pieces is slightly favorable to us. The bishop on e2 does a good job preventing the ...b7 b5 break as well. 13...O-O We castle short as expected, and now have a choice to break with ...f7 f5 or prepare a queenside expansion with ...b7 b5.
Line 2 — against an inaccuracy
1.d4 Our opponent takes the center. 1...c5 We create imbalance immediately. We are basically inviting our opponent to advance, resulting in a Benoni-like position. 2.d5 Our opponent takes some space in the center, as we expected. 2...d6 We play a standard move, protecting the c5 pawn, and consolidating our center. 3.c4 Our opponent goes for a standard setup. Only downside is it invites Black to break with ...b7 b5 sooner or later. 3...g6 We prepare to fianchetto our bishop. 4.Nc3 Our opponent develops the knight to the best square, eyeing the b5 square to make it hard for us to break with ...b7 b5. 4...Bg7 We fianchetto our bishop. 5.e4 Our opponent completes their center, by far the most popular continuation. 5...e6 We break in the center right away, creating some tension and clearing the e7 square to develop our knight. 6.Nf3 The knight develops to the best square. 6...exd5 We trade pawns right away, forcing our opponent to show their hand. Do they want to recapture symmetrically or asymmetrically? 7.exd5 Our opponent chooses a Symmetric Benoni structure, their main goal will be to use their space advantage to squeeze us. 7...Bg4 We have less space, so we are happy to get some minor pieces off the board. 8.Be2 Our opponent neutralizes the pin and prepares to castle. 8...Ne7 We develop our knight via e7 to keep the diagonal open, and have the option to jump to f5. 9.O-O Our opponent castles short. 9...O-O We castle short as well. 10.h3 Inviting us to trade, this is slightly inaccurate, as we want to trade on f3 anyway to gain the d4 square. 10...Bxf3 We have to trade on f3, retreating to h5 traps our bishop. 11.Bxf3 Recapturing the piece. 11...Nd7 We develop our other knight, and are ready to jump to e5. 12.Re1 Our opponent plays on the only open file. 12...Ne5 We take a strong central square for our knight. 13.Be2 Since space advantage is our opponent's only weapon, they are not eager to allow more piece trades. 13...Nf5 We have a very active position, all our minor pieces are in good squares, and it's difficult for White to expand (with f2 f4 and g2 g4) without risking overextension.
Line 3 — against an inaccuracy
1.d4 Our opponent takes the center. 1...c5 We create imbalance immediately. We are basically inviting our opponent to advance, resulting in a Benoni-like position. 2.d5 Our opponent takes some space in the center, as we expected. 2...d6 We play a standard move, protecting the c5 pawn, and consolidating our center. 3.c4 Our opponent goes for a standard setup. Only downside is it invites Black to break with ...b7 b5 sooner or later. 3...g6 We prepare to fianchetto our bishop. 4.Nc3 Our opponent develops the knight to the best square, eyeing the b5 square to make it hard for us to break with ...b7 b5. 4...Bg7 We fianchetto our bishop. 5.e4 Our opponent completes their center, by far the most popular continuation. 5...e6 We break in the center right away, creating some tension and clearing the e7 square to develop our knight. 6.Bd3 This is a typical preparation to play a Symmetric Benoni, guarding the f5 square to prevent our bishop from developing. 6...exd5 We clarify the central tension, we need to know how our opponent plans to recapture. 7.exd5 Our opponent goes for a Symmetric Benoni, they hope to squeeze us with their space edge. 7...Ne7 We develop this way to be able to play ...Bf5 in the future (without doubling pawns). 8.Nge2?! Our opponent continues with their standard setup. 8...Nd7 We develop our knight, with an idea of jumping ...Ne5 and potentially trading on d3. 9.O-O Our opponent castles short. 9...O-O We castle short as well. 10.Bf4 Developing the bishop to a natural square, putting some pressure on d6. 10...Ne5 We bring our knight to the center, our opponent can't avoid the trade of a minor piece. 11.b3 Protecting the pawn on c4 means our opponent may remove the bishop next move to avoid the trade. 11...a6 We play this to threaten a ...b7 b5 break, which could be quite effective if our opponent's bishop moved away from d3. 12.a4 A typical response, which is very effective at preventing the ...b7 b5 break. The b4 square may look like a weakness, but it's hard to exploit in practice. 12...Bf5 We develop our bishop to f5, as we have been planning. 13.Bxf5 Our opponent couldn't really avoid this trade. 13...Nxf5 We have a comfortable game, as we have already traded one minor piece and our remaining pieces are all very well placed.
The free preview ends here — continue with all 14 lines in the interactive course, with instant feedback on every move you play.
Frequently asked questions
Is the Old Benoni a good practical opening?
Yes — its theory is a fraction of the Modern Benoni's, the closed structures reward the player who knows the plans, and White's 'refutation attempts' mostly transpose to positions Black chose deliberately. It is a classic case of trading objective sharpness for practical comfort.
What is the difference between the Old Benoni and the Czech Benoni?
They overlap heavily: the Czech Benoni structure (pawns on c5, d6, e5) is the Old Benoni's most common destination, reached here without an early ...Nf6. The closed center and maneuvering plans are the same — which is exactly why the opening is so learnable.
How should Black handle White's space advantage in the Old Benoni?
By using the closed center as a shield: with the position locked, space matters less than piece placement and break timing. Black regroups unhurried, trades the passive dark-squared bishop when possible, and strikes with ...f5 or ...b5 when the pieces stand ready.
Learn the Old Benoni with AI feedback
This page pairs the guide above with an interactive ChessMind AI course: a GM-authored repertoire you study move by move on a real board, then practice against a human-like chess AI opponent with instant feedback and spaced-repetition review, so the key positions actually stick. Start learning, jump straight into practice, or browse all opening courses.
New to a concept? Every term is defined in the chess terms glossary.