Beat the Owen Defense
1.e4 b6 2.d4 Bb7 3.Bd3 e6
The Owen Defense (1.e4 b6) hands White the full center for a flank fianchetto — and this course makes sure that bargain never pays off. With the accurate 3.Bd3 setup, White defends e4 prophylactically, develops harmoniously, and squeezes the b7-bishop into a spectator role from the very first moves.
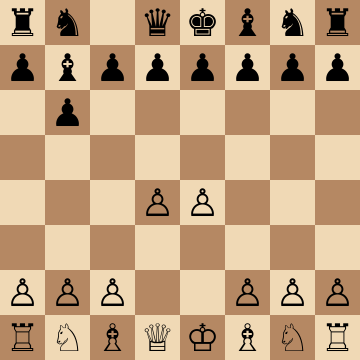
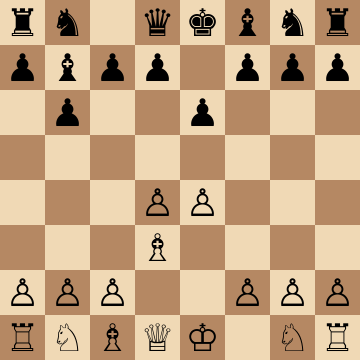
Mainline
1.e4 b6 2.d4 Bb7 3.Bd3 e6 4.Nf3 c5 5.c3
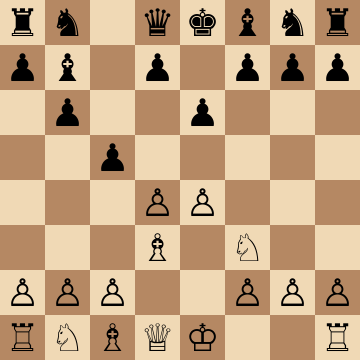
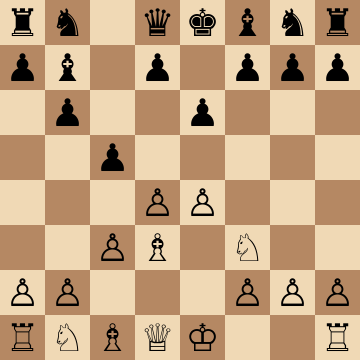
Main Line: 3.Bd3 e6 4.Nf3 c5 5.c3
1.e4 b6 2.d4 Bb7 3.Bd3 e6 4.Nf3 c5 5.c3 Nf6 6.Qe2 Be7 7.O-O O-O
The backbone of the repertoire. 3.Bd3 defends e4 in advance, so Black's whole opening idea — pressure on the long diagonal — hits a wall. When ...c5 comes, 5.c3 keeps the d4-e4 duo intact, and Qe2 plus O-O completes a setup with no weaknesses whatsoever. From here White chooses the moment for e5, gaining space and shutting the b7 bishop out of the game. Black has no counterpart to this plan; every Owen player knows the feeling of watching that bishop bite granite.
Greco Trap: 3...f5?? 4.exf5!
1.e4 b6 2.d4 Bb7 3.Bd3 f5 4.exf5 Bxg2 5.Qh5+ g6 6.fxg6 Nf6 7.gxh7+ Nxh5 8.Bg6#
One of the oldest recorded miniatures in chess — and Owen players still walk into it. After 3...f5? 4.exf5 Bxg2, the g2 pawn is poisoned: 5.Qh5+ g6 6.fxg6 and the attack plays itself, finishing with the stunning 7.gxh7+ Nxh5 8.Bg6 checkmate, the queen sacrificed and the bishop delivering mate on move eight. Even Black's better tries after 5...g6 leave White a pawn up with a crushing attack. Know the sequence cold; it is free wins for life.
...Bb4+ Simplification: 6...Bb4+ 7.Bd2
1.e4 b6 2.d4 Bb7 3.Bd3 e6 4.Nf3 c5 5.c3 cxd4 6.cxd4 Bb4+ 7.Bd2 Bxd2+ 8.Nbxd2
Trading pieces is Black's standard recipe for easing a cramped game, and the check on b4 is the usual vehicle. Meet it with 7.Bd2 and recapture with the knight: White keeps the full pawn center, gains the c-file, and the remaining pieces are all better than their counterparts — compare the f3 knight with the b7 bishop staring at e4's granite. Play Rc1, O-O and e5 next, and grind the position where only White has plans.
Hippo Setup: Space Squeeze with a4
1.e4 b6 2.d4 Bb7 3.Bd3 g6 4.Nf3 Bg7 5.c3 e6 6.O-O Ne7 7.Re1 d6 8.Nbd2 Nd7 9.a4
Many Owen players morph into the Hippopotamus — every pawn on the third rank, knights on e7 and d7 — daring White to overextend. Don't. The winning recipe is patience: complete development, then advance a4-a5 to pry open the queenside where Black's setup is least flexible. Black's position has no active plan at all, so each small gain is permanent. When ...c5 or ...d5 finally comes, the well-placed d2 knight and central pawns are ready to punish it.
Central Clamp: 7.e5 and the Bad Bishop
1.e4 b6 2.d4 Bb7 3.Bd3 e6 4.Nf3 c5 5.c3 Nc6 6.O-O Nf6 7.e5 Nd5 8.dxc5 Bxc5 9.a3
Here is the strategic payoff of the whole system in one line: the moment Black's knight commits to f6, e5 clamps down with tempo. The b7 bishop is now permanently staring at its own pawn chain's shadow, while White gains kingside space for free. With a3 and b4 White expands, and pieces flow toward the kingside — Re1, Nbd2-e4 or Bg5. The engine calls it a modest edge; in practice Black's position plays itself into passivity.
3...Nf6 4.Qe2: Prophylaxis First
1.e4 b6 2.d4 Bb7 3.Bd3 Nf6 4.Qe2 e6 5.Nf3 c5 6.c3 Be7 7.O-O
When Black attacks e4 immediately with 3...Nf6, resist the urge to push or defend awkwardly — 4.Qe2 overprotects the pawn and keeps every option open. The queen sits perfectly on e2: it supports a later e5, connects with the d3 bishop against h7, and discourages ...Bb4 pins since there is no knight on c3 to pin. Development continues as in the main line, and Black's early knight sortie has achieved exactly nothing.
Key ideas
- Take the whole center with e4 and d4 — the Owen concedes it, so occupy it properly.
- Play 3.Bd3: the bishop shields e4 against the b7-battery and eyes Black's kingside.
- Blunt the fianchetto with c3 and well-timed d5 or e5 advances that close the long diagonal.
- Convert space into attack: with Black's pieces passive, the kingside falls to a standard buildup.
Typical plans and structures
White develops with Nf3, O-O, and meets ...c5 with c3, keeping the pawn duo intact; Nbd2, Re1 and Qe2 complete a setup with zero weaknesses. The strategic crux is the long diagonal: advancing d5 or e5 at the right moment entombs the b7-bishop, after which White attacks on the kingside with Ng5, Qh5 ideas or a slow f4-f5 expansion. Black's usual tries — ...Bb4 pins, an early ...f5 — each have a prepared antidote in the course.
Who should play it
1.e4 players who want ready-made, punishing recipes against offbeat defenses instead of improvising against openings they see twice a year.
Study Beat the Owen Defense move by move
The first 3 lines of the interactive course, exactly as a signed-out visitor can play them — each move with the coaching note shown on the board.
Line 1 — the main line
1.e4 We take control of the center. 1...b6 Our opponent launches the Owen defense! 2.d4 We complete our perfect center. Now we'll see how our opponent plans to fight back. 2...Bb7 Attacking our pawn on e4. 3.Bd3 We protect our pawn and prepare to establish an ideal setup (with Nf3 and Qe2 next). 3...e6 The best move order, preparing ...c7 c5 or ...d7 d5. 4.Nf3 We develop our knight. 4...c5 Our opponent challenges our center in the most accurate way, we don't have time to close with d4 d5. 5.c3 We plan to recapture with pawn if our opponent trades in the center. 5...Nf6 Attacking our central pawn. 6.Qe2 We protect the pawn and achieve our ideal piece setup. 6...Be7 Developing and planning to castle next. 7.O-O We castle. 7...d5 Fighting for the center, our opponent creates a French structure. 8.e5 We close the center to keep our space advantage. 8...Nfd7 Rerouting the knight. 9.a3!? We prepare a b2 b4 advance. 9...Nc6 Developing and putting pressure on the d4 pawn. 10.b4 We have a standard [French Type I] structure, with a lasting advantage for White due to the extra space.
Line 2 — the main line
1.e4 We take control of the center. 1...b6 Our opponent launches the Owen defense! 2.d4 We complete our perfect center. Now we'll see how our opponent plans to fight back. 2...Bb7 Attacking our pawn on e4. 3.Bd3 We protect our pawn and prepare to establish an ideal setup (with Nf3 and Qe2 next). 3...e6 The best move order, preparing ...c7 c5 or ...d7 d5. 4.Nf3 We develop our knight. 4...Nf6 Attacking our central pawn. 5.Qe2 Protecting our pawn and placing our queen on the ideal square. 5...d5 Fighting for the center with a French-like setup. 6.e5 We close the center and plan for a kingside initiative. 6...Nfd7 Rerouting the knight. 7.Ng5 We jump with our knight, threatening Qh5, and preparing f2 f4 to consolidate our center. 7...Qe7 Overprotecting the f7 pawn before any big threats are made. 8.f4 We consolidate our center. 8...c5 Challenging the base of our pawn chain. 9.c3 We protect the base of the chain. 9...cxd4 Trading pawns. 10.cxd4 We recapture. 10...Nc6 Attacking the base of the chain. 11.Nf3 We protect our base, and have a comfortable [French Type I] structure.
Line 3 — against an inaccuracy
1.e4 We take control of the center. 1...b6 Our opponent launches the Owen defense! 2.d4 We complete our perfect center. Now we'll see how our opponent plans to fight back. 2...Bb7 Attacking our pawn on e4. 3.Bd3 We protect our pawn and prepare to establish an ideal setup (with Nf3 and Qe2 next). 3...e6 The best move order, preparing ...c7 c5 or ...d7 d5. 4.Nf3 We develop our knight. 4...Nf6 Attacking our central pawn. 5.Qe2 Protecting our pawn and placing our queen on the ideal square. 5...d5 Fighting for the center with a French-like setup. 6.e5 We close the center and plan for a kingside initiative. 6...Ne4 Our opponent places the knight on a strong central square. 7.O-O We secure our king before opening up the center. 7...c5 Challenging our pawn chain. 8.c4 We fight back on the center, and begin to undermine the knight on e4. 8...cxd4 Trading pawns is the best alternative. 9.cxd5 We trade pawns leaving the knight on e4 unprotected. 9...exd5 Our opponent recaptures but is left with a vulnerable isolani on d5. 10.Nxd4 We recapture and may play Nc3 swapping the knight on e4 next. We have a very comfortable game.
The free preview ends here — continue with all 13 lines in the interactive course, with instant feedback on every move you play.
Frequently asked questions
Is the Owen Defense a bad opening?
It is objectively second-rate — White gets a stable central advantage by force — but 'second-rate' still wins games against unprepared opponents. Owen players know their tricky setups deeply; this course levels that field in an afternoon.
Why is 3.Bd3 the recommended setup against the Owen?
The whole point of ...b6 and ...Bb7 is pressure on e4. 3.Bd3 over-protects that exact square, keeps c4 free for a pawn or knight later, and points the bishop at h7 — so White neutralizes Black's only idea while developing the attack.
How does White handle the ...Bb4 pin tricks in the Owen?
Lines with ...e6 and ...Bb4 (often after ...f5 lunges) aim to destabilize White's center tactically. The course's move order with c3 preparation defuses the pin cheaply, and covers the notorious trap lines where White's queen and rook get forked — forewarned is forearmed.
Learn Beat the Owen Defense with AI feedback
This page pairs the guide above with an interactive ChessMind AI course: a GM-authored repertoire you study move by move on a real board, then practice against a human-like chess AI opponent with instant feedback and spaced-repetition review, so the key positions actually stick. Start learning, jump straight into practice, or browse all opening courses.
New to a concept? Every term is defined in the chess terms glossary.