The Modern Benoni
1.d4 Nf6 2.c4 c5 3.d5 e6
The Modern Benoni (1.d4 Nf6 2.c4 c5 3.d5 e6) creates the most dynamic structural imbalance available against 1.d4: Black concedes central space for a queenside pawn majority, the half-open e-file and the raking g7-bishop. It is the fighting choice — Mikhail Tal used it to conjure attacks from nothing.
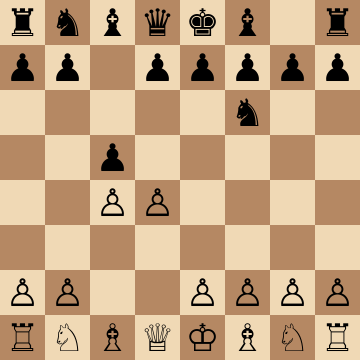
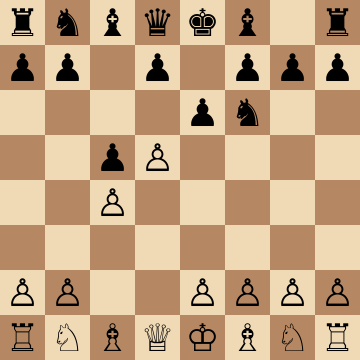
Mainline
1.d4 Nf6 2.c4 c5 3.d5 e6 4.Nc3 exd5 5.cxd5 d6 6.e4 g6 7.Nf3 Bg7 8.Be2 O-O 9.O-O Re8
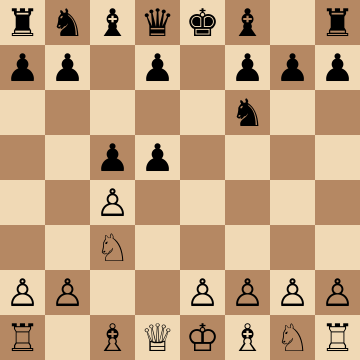
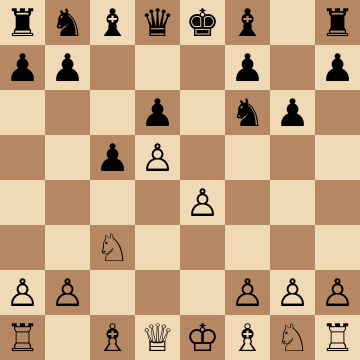
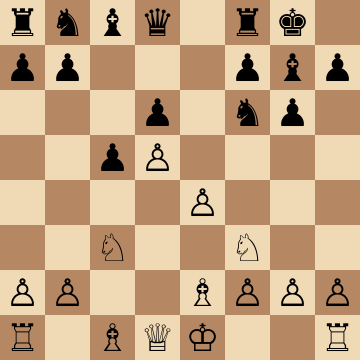
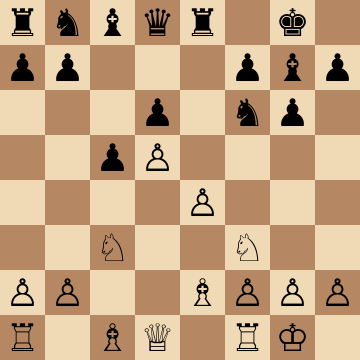
Modern Benoni: Classical Main Line (7.Nf3)
1.d4 Nf6 2.c4 c5 3.d5 e6 4.Nc3 exd5 5.cxd5 d6 6.e4 g6 7.Nf3 Bg7 8.Be2 O-O 9.O-O Re8
The main road. White develops quietly and Black completes the standard Benoni setup: the g7-bishop rakes the long diagonal, the rook eyes e4 down the half-open file, and ...Na6-c7 with ...b5 is coming. Almost every Benoni idea you will ever need is already on the board in this position.
Modern Benoni: Taimanov Attack (8.Bb5+)
1.d4 Nf6 2.c4 c5 3.d5 e6 4.Nc3 exd5 5.cxd5 d6 6.e4 g6 7.f4 Bg7 8.Bb5+
The most feared line in the whole variation. White plays f4 and inserts the check on b5 to provoke a concession before Black can castle — after ...Nfd7 the knight is passive, after ...Bd7 the bishop blocks the defence. Black must know this cold, because a single careless move order loses on the spot.
Modern Benoni: Four Pawns with Nf3
1.d4 Nf6 2.c4 c5 3.d5 e6 4.Nc3 exd5 5.cxd5 d6 6.e4 g6 7.f4 Bg7 8.Nf3 O-O 9.Be2
White takes maximum space and plans e5 at the right moment. Black's counterplay is the standard Benoni recipe applied with more urgency: ...Re8 hitting e4, ...Na6-c7 and the ...b5 lever, plus tactical shots on the a7-g1 diagonal whenever White's centre overreaches.
Modern Benoni: Fianchetto Variation (7.g3)
1.d4 Nf6 2.c4 c5 3.d5 e6 4.Nc3 exd5 5.cxd5 d6 6.Nf3 g6 7.g3 Bg7 8.Bg2 O-O 9.O-O
The positional test, and statistically White's most reliable. By meeting the g7-bishop with its counterpart on g2, White defuses the diagonal that fuels every Black plan. Black switches to the queenside majority and the ...b5 break, accepting a slower game where understanding matters more than sharpness.
Modern Benoni: Knight's Tour Variation
1.d4 Nf6 2.c4 c5 3.d5 e6 4.Nc3 exd5 5.cxd5 d6 6.e4 g6 7.Nge2 Bg7 8.Ng3 O-O 9.Be2
White routes the knight to g3 instead of f3, keeping the f-pawn free to advance and covering e4 and f5. It is slower than the Taimanov but far less forcing, so Black gets the pawn breaks in — the trade-off is that White's kingside build-up with f4 and Be3 arrives without any tactical accidents.
Snake Benoni (5...Bd6)
1.d4 Nf6 2.c4 c5 3.d5 e6 4.Nc3 exd5 5.cxd5 Bd6
A genuine surprise weapon: the bishop goes to d6 to reroute via c7 to a5 or b8, avoiding the main-line battles altogether. Objectively White keeps an edge with quiet play, but at club level almost nobody has seen it, and the resulting positions are pure Benoni in spirit — space against activity.
Key ideas
- Trade your ...e6 pawn for White's c4-pawn and inherit a rolling queenside majority.
- Activate the Benoni bishop on g7 — its pressure on the long diagonal fuels every Black plan.
- Expand with ...a6 and ...b5 while pressuring e4 down the half-open e-file with ...Re8.
- Play for the full point in every game: the imbalance guarantees winning chances for both sides.
Typical plans and structures
Black's play writes itself: ...Re8 and ...Nbd7 or ...Na6-c7 support the ...b5 break, the g7-bishop and ...Ng4 tricks generate kingside tactics, and the c5-c4 clamp or ...c4 with ...Nc5 fixes targets. White's critical tries — the pawn storms with f4 or the modern h3 and Bd3 setups — demand accuracy, and the course focuses its deepest preparation exactly there. Endgames with the queenside majority rolling are a recurring Benoni happy ending.
Who should play it
Dynamic players who accept structural risk for piece activity and want a defense to 1.d4 that fights for the win from move three.
Study the Modern Benoni move by move
The first 3 lines of the interactive course, exactly as a signed-out visitor can play them — each move with the coaching note shown on the board.
Line 1 — the main line
1.d4 White takes the center. 1...Nf6 We develop our knight in response. 2.c4 Our opponent grabs space on the queenside. 2...e6 We open a line for our bishop. 3.Nf3 White brings out their knight. 3...c5 We launch the Benoni Defense! 4.d5 Our opponent gains space on the center. 4...exd5 We trade to fix their structure and open the e file. 5.cxd5 Our opponent recaptures with a pawn. 5...d6 We stop their advance and free our light squared bishop. 6.Nc3 Our opponent develops the queenside knight. 6...g6 We prepare to fianchetto along the long diagonal. 7.e4 Our opponent pushes for full center control with their pawns. 7...a6 We hint at b5 to expand on the queenside. 8.a4 White stops b5. 8...Bg4 We activate the 'bad' bishop with a pin. 9.Be2 White breaks the pin. 9...Bxf3 We exchange our bishop. 10.Bxf3 Our opponent recaptures with their bishop. 10...Bg7 We complete the fianchetto and prepare to castle. 11.O-O Our opponent castles to protect their king. 11...O-O We castle as well. 12.Bf4 Our opponent targets the d6 pawn with their bishop. 12...Qe7 We develop the queen. 13.Re1 Our opponent prepares to push e5. 13...Nbd7 We stop that push with our knight. 14.Qd2 Our opponent develops their queen, connecting the rooks. 14...Rfe8 We activate the rook on the open file. 15.a5 Our opponent fixes our queenside majority. 15...Rab8 We activate the rook to open the b file with a pawn break and create pressure on the queenside.
Line 2 — the main line
1.d4 White takes the center. 1...Nf6 We develop our knight in response. 2.c4 Our opponent grabs space on the queenside. 2...e6 We open a line for our bishop. 3.Nf3 White brings out their knight. 3...c5 We launch the Benoni Defense! 4.d5 Our opponent gains space on the center. 4...exd5 We trade to fix their structure and open the e file. 5.cxd5 Our opponent recaptures with a pawn. 5...d6 We stop their advance and free our light squared bishop. 6.Nc3 Our opponent develops the queenside knight. 6...g6 We prepare to fianchetto along the long diagonal. 7.Bf4 Our opponent develops their bishop to target d6. 7...Bg7 We complete the fianchetto and prepare to castle kingside. 8.Qa4+ Our opponent checks our king to disrupt our setup, forcing us to block with the bishop. 8...Bd7 We attack their queen to gain tempo and stop Bxd6, which would win a pawn. 9.Qb3 Our opponent retreats their queen to target b7, which we left undefended after â¦Bd7. 9...b5 We sacrifice the pawn to open files for our pieces, or push further if they don't take. 10.Nxb5 Our opponent takes the pawn with their knight, which opens the b file for future rook activity. 10...Bxb5 We capture their knight to remove a key defender and force their queen into the open. 11.Qxb5+ Our opponent takes back with their queen, giving a check. 11...Nbd7 We bring the knight out to block the check and free the rook on a8. 12.Bxd6 Our opponent takes another pawn, gaining material and preventing us from castling. 12...Ne4 We jump in with our knight to attack their bishop, allowing us to castle soon. 13.Be5 Our opponent offers a bishop trade, aiming to simplify the position and exploit their material lead. 13...O-O We castle to protect the king and bishop, also bringing our rook toward open lines. 14.Bxg7 Our opponent captures on g7, removing our fianchettoed bishop but weakening their dark squares. 14...Rb8 We threaten their queen before recapturing, gaining tempos and dominating the b file. 15.Qd3 Our opponent pulls back the queen to threaten our knight, momentarily winning a piece. 15...Kxg7 We take the bishop, even though our king looks unsafe, it is actually protected. 16.Qxe4 Our opponent captures the knight, gaining material but exposing their king. 16...Qa5+ We activate our queen to deliver check and exploit weaknesses along the a5 e1 diagonal. 17.Nd2 Our opponent defends with their knight but suffers a lasting pin that limits its activity. 17...Rxb2 We take a pawn to dominate the 7th rank with our rook and increase pressure on their knight. 18.Rd1 Our opponent protects with their rook, trying to hold onto their material lead. 18...Nf6 We activate our knight toward the center, gaining a tempo on their queen. 19.Qc4 Our opponent repositions their queen to a safer square, aiming to protect a2 and stop our c5 pawn. 19...Rfb8 We double our rooks on the b file, preparing Rxa2 and Rbb2 to balance material and secure a strong attack.
Line 3 — against an inaccuracy
1.d4 White takes the center. 1...Nf6 We develop our knight in response. 2.c4 Our opponent grabs space on the queenside. 2...e6 We open a line for our bishop. 3.Nf3 White brings out their knight. 3...c5 We launch the Benoni Defense! 4.d5 Our opponent gains space on the center. 4...exd5 We trade to fix their structure and open the e file. 5.cxd5 Our opponent recaptures with a pawn. 5...d6 We stop their advance and free our light squared bishop. 6.Nc3 Our opponent develops the queenside knight. 6...g6 We prepare to fianchetto along the long diagonal. 7.Bf4 Our opponent develops their bishop to target d6. 7...Bg7 We complete the fianchetto and prepare to castle kingside. 8.e3 Our opponent frees their light squared bishop by pushing a pawn. 8...O-O We complete castling and bring the rook closer to the e file. 9.h3 Our opponent makes room to retreat their bishop to h2 if we attack it with â¦Nh5. 9...Na6 We develop our knight to the side in order to reroute it via c7. 10.Be2 Our opponent develops the bishop safely to prepare for castling. 10...Nc7 We maneuver with our knight with the plan of supporting â¦b5. 11.O-O Our opponent castles kingside to safeguard their king. 11...a6 We reinforce â¦b5 with a pawn, threatening to expand on the queenside in the next move. 12.a4 Our opponent delays our queenside push by taking control of the key square with a pawn. 12...Rb8 We bring our rook into play to support â¦b5, which now cannot be stopped. 13.e4 Our opponent expands in the center with a second pawn to claim more space. 13...Re8 We activate the rook to target their pawn and keep constant pressure on it. 14.Nd2 Our opponent retreats the knight to defend the pawn and plans to reroute it to c4. 14...b5 We push the b pawn to complete our plan, gaining space and strong queenside pressure.
The free preview ends here — continue with all 11 lines in the interactive course, with instant feedback on every move you play.
Frequently asked questions
Is the Modern Benoni sound?
It is theoretically respectable but demands precision: White's space and central majority are real, and a passive Benoni is a bad Benoni. Played actively — with the plans this course drills — it has served attacking legends from Tal to Topalov to Gashimov.
What is White's most dangerous setup against the Modern Benoni?
The critical tests are the Flick-Knife (Taimanov) Attack with f4 and Bb5+ and the modern h3-Bd3 system. Both try to punish Black before the queenside majority matters — which is why a serious Benoni repertoire is built around meeting exactly these lines.
How is the Modern Benoni different from the Old Benoni?
The Modern Benoni inserts ...Nf6 and ...e6 before committing, exchanging on d5 to create the classic majority structure with maximum piece activity. The Old Benoni (1.d4 c5) commits immediately, often leading to closed positions with far less theory for both sides.
Learn the Modern Benoni with AI feedback
This page pairs the guide above with an interactive ChessMind AI course: a GM-authored repertoire you study move by move on a real board, then practice against a human-like chess AI opponent with instant feedback and spaced-repetition review, so the key positions actually stick. Start learning, jump straight into practice, or browse all opening courses.
New to a concept? Every term is defined in the chess terms glossary.