Beat The Pirc
1.e4 d6 2.d4 Nf6 3.Nc3
Against the Pirc Defense, this course chooses the Austrian Attack (4.f4) — the most aggressive answer available. White builds a massive pawn front, backs it with natural development, and rolls forward: the Pirc invites White to take the center, so take all of it and attack.
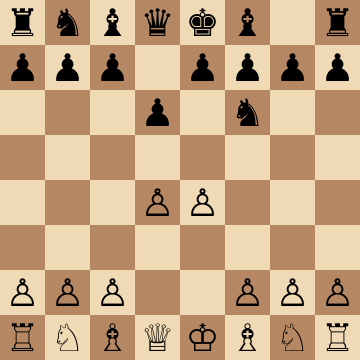
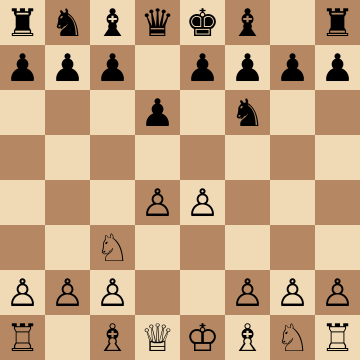
Mainline
1.e4 d6 2.d4 Nf6 3.Nc3 g6 4.f4 Bg7 5.Nf3 O-O 6.Bd3
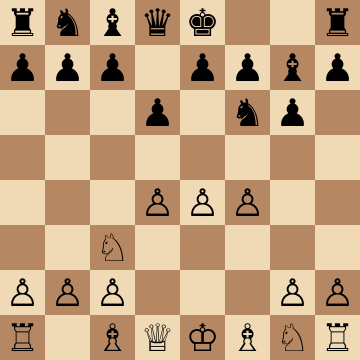
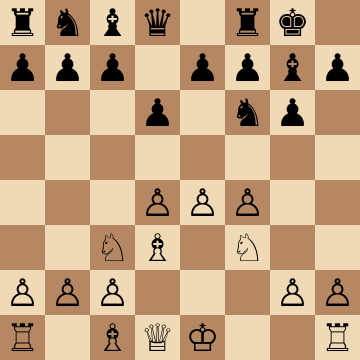
Main Line: 6...Nc6 7.e5
1.e4 d6 2.d4 Nf6 3.Nc3 g6 4.f4 Bg7 5.Nf3 O-O 6.Bd3 Nc6 7.e5 dxe5 8.fxe5 Nd5 9.Nxd5 Qxd5 10.Qe2
Black's most combative setup, met by the most principled reply: 7.e5 seizes ground at once. After the forced sequence through 9...Qxd5, White consolidates with 10.Qe2, keeps the strong e5 wedge, and prepares c3, Be4 tricks and kingside castling. Black's queen on d5 looks active but soon runs out of squares, and the e5 pawn cramps the g7 bishop — the piece the entire Pirc is built around.
Sharp 5...c5 with 6.Bb5+
1.e4 d6 2.d4 Nf6 3.Nc3 g6 4.f4 Bg7 5.Nf3 c5 6.Bb5+ Bd7 7.e5 Ng4 8.e6 fxe6 9.Ng5
The immediate ...c5 strike is the Austrian's most theoretical battleground, and 6.Bb5+ followed by the hammer blows 7.e5 and 8.e6! is White's best answer. The wedge on e6 and the knight leap to g5 create direct threats against the shattered king position before Black finishes developing. These lines are forcing and well mapped — the course walks through the critical continuations so you arrive knowing what your opponent must find.
6...Na6 and the d5 Clamp
1.e4 d6 2.d4 Nf6 3.Nc3 g6 4.f4 Bg7 5.Nf3 O-O 6.Bd3 Na6 7.O-O c5 8.d5 Nc7 9.Qe1
The flexible 6...Na6 aims the knight at c7 to support ...b5 or ...e6 breaks. White's clearest response is the ambitious 8.d5 clamp: the center is fixed, the a6 knight bites on granite, and 9.Qe1 begins the standard attacking lift to h4. From there the plan writes itself — f5, Bh6, Ng5 and a direct assault on g6, while Black's queenside counterplay is still two or three moves from existing.
6...Bg4 Pin: 7.h3 and f5
1.e4 d6 2.d4 Nf6 3.Nc3 g6 4.f4 Bg7 5.Nf3 O-O 6.Bd3 Bg4 7.h3 Bxf3 8.Qxf3 Nc6 9.Be3 e5 10.dxe5 dxe5 11.f5
Pinning the knight is Black's positional try — trade the bishop, then hit d4 with ...Nc6 and ...e5. White should be happy: 7.h3 forces the trade on f3, gaining the bishop pair, and after the central exchange 11.f5! fixes g6 as a permanent target. Follow up with g4-g5, Qg3 and h4; with no light-squared bishop, Black's kingside defense depends entirely on pieces that are being pushed backward.
Modern Defense Move Order (1...g6)
1.e4 g6 2.d4 Bg7 3.Nc3 d6 4.f4 Nf6 5.Nf3 O-O 6.Bd3
Modern Defense players reach the same battlefield one move later — and the Austrian setup works identically: pawns to d4, e4 and f4, knights to c3 and f3, bishop to d3. Be alert to the move-order nuances the course flags: if Black delays ...Nf6 in favor of ...c6 and ...b5, White should still complete development before pushing e5, since a premature advance gives the g7 bishop exactly the open diagonal it wants.
Key ideas
- Claim maximum space with e4, d4 and f4 — the Pirc's provocation strategy meets its punishment.
- Follow with Nf3, Bd3 and e5 or f5 advances that arrive before Black's counterplay exists.
- Meet the thematic ...c5 break with confident central decisions you have already studied.
- Attack the fianchetto king directly: f5, Qe1-h4 and piece sacrifices on the kingside are standard equipment.
Typical plans and structures
After 5...O-O 6.Bd3, White's plans fork by Black's reply: against ...Nc6 or ...Na6, the space-gaining e5 advance with O-O and Qe1-h4 builds a direct attack; against the immediate ...c5 strike, White chooses between the solid dxc5 structures and the ambitious d5 clamp. The f4-f5 break is the recurring hammer — opening the f-file or fixing g6 as a target. The course maps Black's four main setups and gives one clear, aggressive scheme against each.
Who should play it
Space-loving attackers who want the sharpest respectable weapon against the Pirc and are happy to play committal, forcing middlegames.
Study Beat The Pirc move by move
The first 3 lines of the interactive course, exactly as a signed-out visitor can play them — each move with the coaching note shown on the board.
Line 1 — the main line
1.e4 We take control of the center. 1...d6 Our opponent launches the Pirc defense! 2.d4 We gain space and activate our pieces with a strong pawn push. 2...Nf6 Our opponent develops a knight, challenging our pawn and preparing kingside play. 3.Nc3 We develop the knight, supporting e4 and preparing to contest the center. 3...g6 Our opponent sets up a fianchetto, aiming to control the long diagonal. 4.f4 We push the pawn to gain space on the kingside and prepare a pawn storm. 4...Bg7 Our opponent completes the fianchetto, preparing to castle. 5.Nf3 We activate our knight towards the center to support future pawn breaks. 5...O-O Our opponent castles to secure their king behind the fianchetto. 6.Bd3 We develop our bishop, reinforcing our pawn and preparing kingside castling. 6...Na6 Our opponent brings out their knight towards the queenside to support ...c7 c5 and jump to b4. 7.O-O We castle, safeguarding our king and bringing our rook into play. 7...c5 Our opponent pushes a pawn break to challenge our center and open the diagonal for their fianchettoed bishop. 8.d5 We advance the pawn to gain space in the center and restrict their pieces. 8...Bg4 Our opponent develops the bishop to pin our knight and challenge our grip on dark squares. 9.a3 We block b4 with a pawn push to prevent their knight from jumping in and attacking our bishop. 9...Nc7 Our opponent retreats the knight to support an upcoming queenside pawn storm. 10.h3 We put pressure on their bishop, forcing a decision to capture our knight or pull back. 10...Bd7 Our opponent retreats the bishop as part of their plan to push pawns on the queenside. 11.Be3 We bring out our bishop to control dark squares and finish development. 11...b5 Our opponent launches the pawn storm on the queenside to gain space and restrict our pieces. 12.Qd2 We move the queen to line up with our bishop and connect our rooks. 12...c4 Our opponent forces our bishop back with a pawn push, gaining space and a tempo. 13.Be2 We reposition our bishop to escape the attack and prepare a central counterstrike. 13...a5 Our opponent pushes another pawn on the queenside, continuing their plan and threatening to play ...b4. 14.e5 We strike in the center with a pawn break, gaining space and forcing their knight to retreat.
Line 2 — against an inaccuracy
1.e4 We take control of the center. 1...d6 Our opponent launches the Pirc defense! 2.d4 We gain space and activate our pieces with a strong pawn push. 2...Nf6 Our opponent develops a knight, challenging our pawn and preparing kingside play. 3.Nc3 We develop the knight, supporting e4 and preparing to contest the center. 3...g6 Our opponent sets up a fianchetto, aiming to control the long diagonal. 4.f4 We push the pawn to gain space on the kingside and prepare a pawn storm. 4...Bg7 Our opponent completes the fianchetto, preparing to castle. 5.Nf3 We activate our knight towards the center to support future pawn breaks. 5...O-O Our opponent castles to secure their king behind the fianchetto. 6.Bd3 We develop our bishop, reinforcing our pawn and preparing kingside castling. 6...Na6 Our opponent brings out their knight towards the queenside to support ...c7 c5 and jump to b4. 7.O-O We castle, safeguarding our king and bringing our rook into play. 7...c5 Our opponent pushes a pawn break to challenge our center and open the diagonal for their fianchettoed bishop. 8.d5 We advance the pawn to gain space in the center and restrict their pieces. 8...Rb8 Our opponent activates their rook on the b file to support potential queenside expansions. 9.Kh1 We reposition the king to the corner, avoiding dangers from the dark squared diagonal. 9...Bg4 Our opponent develops their bishop to pin our knight and clear c8 for their queen. 10.f5 We strike with a pawn break to weaken their structure and activate our dark squared bishop. 10...Qc8 Our opponent activates their queen to support the c pawn and increase pressure on f5. 11.Bg5 We bring out our bishop to complete development and increase control over key dark squares. 11...c4 Our opponent pushes their pawn to attack our bishop and prepare c5 for their knight. 12.Be2 We move the bishop back to escape danger and unpin our knight. 12...Nc5 Our opponent brings their knight toward the center, aiming to pressure our e4 pawn. 13.Nd4 We centralize our knight to open lines for the rook and propose a bishop trade. 13...Bxe2 Our opponent exchanges bishops, having no reasonable way to avoid the trade. 14.Qxe2 We take with the queen, securing e4 and gaining lasting activity and space advantage.
Line 3 — against an inaccuracy
1.e4 We take control of the center. 1...d6 Our opponent launches the Pirc defense! 2.d4 We gain space and activate our pieces with a strong pawn push. 2...Nf6 Our opponent develops a knight, challenging our pawn and preparing kingside play. 3.Nc3 We develop the knight, supporting e4 and preparing to contest the center. 3...g6 Our opponent sets up a fianchetto, aiming to control the long diagonal. 4.f4 We push the pawn to gain space on the kingside and prepare a pawn storm. 4...Bg7 Our opponent completes the fianchetto, preparing to castle. 5.Nf3 We activate our knight towards the center to support future pawn breaks. 5...O-O Our opponent castles to secure their king behind the fianchetto. 6.Bd3 We develop our bishop, reinforcing our pawn and preparing kingside castling. 6...Nc6 Our opponent brings out a knight, encouraging our pawns to push and planning future counterplay. 7.e5 We advance a pawn, attacking their knight while expanding in the center. 7...dxe5 Our opponent trades pawns to open the center and let the queen support a knight on d5. 8.fxe5 We recapture with the f pawn to hold the center and open the file for our rook. 8...Nd5 Our opponent moves the attacked knight to d5, where it is supported by the queen. 9.Nxd5 We trade knights in the center to force their queen onto a more vulnerable square. 9...Qxd5 Our opponent recaptures the knight, now threatening to take the pawn on d4. 10.c3 We advance to support d4, keeping our pawn structure strong and connected. 10...Bg4 Our opponent develops their bishop to pin our knight and connect their rooks. 11.Qe2 We reposition our queen to coordinate with the bishop and put pressure on their queen. 11...Rad8 Our opponent develops their rook to increase control along the d file. 12.Be4 We activate our bishop to attack their queen and force it to retreat. 12...Qd7 Our opponent pulls back the queen while maintaining connections with their pieces on c6 and g4. 13.h3 We attack their bishop to break the pin and relieve pressure on our knight. 13...Be6 Our opponent retreats their bishop to control d5, avoiding the loss of the bishop pair. 14.O-O We castle to protect our king and activate the rook toward the center. 14...f6 Our opponent strikes the center with a pawn break to release their pieces from restriction. 15.Re1 We reposition our rook to support the e5 pawn and avoid potential trades on the f file. 15...Bf7 Our opponent retreats the bishop to avoid dangers from staying on the e file. 16.Bf4 We place the bishop to strengthen e5, establishing a lasting spatial and central advantage.
The free preview ends here — continue with all 13 lines in the interactive course, with instant feedback on every move you play.
Frequently asked questions
What is the Austrian Attack against the Pirc?
It is the setup 1.e4 d6 2.d4 Nf6 3.Nc3 g6 4.f4 — White's broadest pawn front against the Pirc. The name honors its Viennese origins, and it has been the main aggressive weapon against the Pirc for over half a century.
Is the big pawn center in the Austrian Attack overextended?
That is the Pirc player's hope — and with sloppy play it can come true. Handled correctly, the center is simply crushing: the course's whole purpose is knowing the three or four critical moments where White must choose the right advance or capture.
How does White meet the ...c5 break in the Austrian Attack?
The critical line runs 5...c5 (or 5...O-O 6.Bd3 Nc6 setups preparing it), when White picks between dxc5, d5, and e5 depending on the exact position. The course gives a definite recommendation with full explanations in each branch — this is the heart of Austrian Attack theory.
Learn Beat The Pirc with AI feedback
This page pairs the guide above with an interactive ChessMind AI course: a GM-authored repertoire you study move by move on a real board, then practice against a human-like chess AI opponent with instant feedback and spaced-repetition review, so the key positions actually stick. Start learning, jump straight into practice, or browse all opening courses.
New to a concept? Every term is defined in the chess terms glossary.