Nimzo-Indian Defense
1.d4 Nf6 2.c4 e6 3.Nc3 Bb4
The Nimzo-Indian Defense (1.d4 Nf6 2.c4 e6 3.Nc3 Bb4) is widely considered Black's best answer to 1.d4 — so strong that many White players avoid 3.Nc3 entirely just to dodge it. The pin on c3 fights for e4 with pieces, and Black chooses between structural targets and dynamic play in every line.
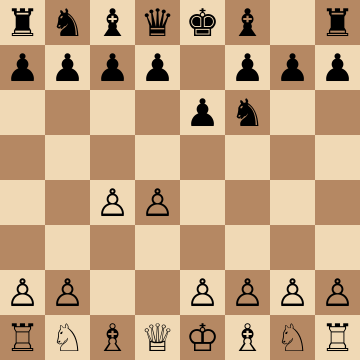
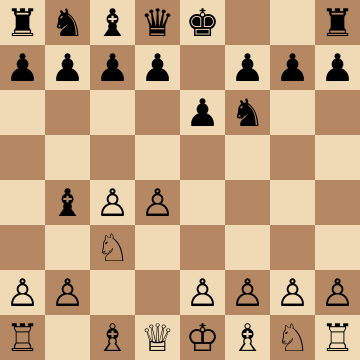
Mainline
1.d4 Nf6 2.c4 e6 3.Nc3 Bb4 4.e3 O-O 5.Bd3 d5 6.Nf3 c5 7.O-O
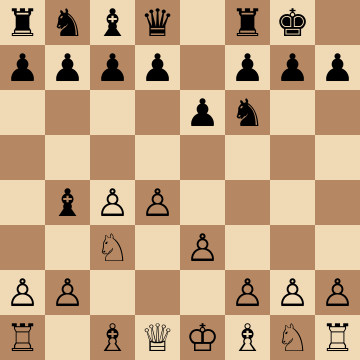
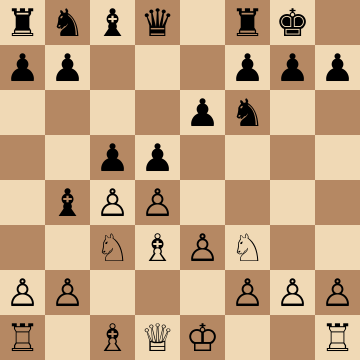
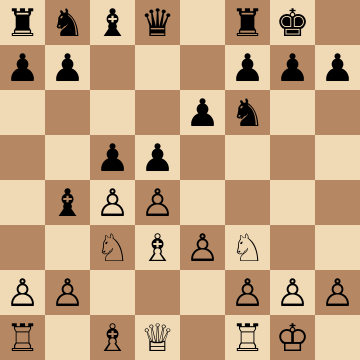
Rubinstein Main Line (4.e3)
1.d4 Nf6 2.c4 e6 3.Nc3 Bb4 4.e3 O-O 5.Bd3 d5 6.Nf3 c5 7.O-O Nc6 8.a3 Bxc3 9.bxc3 dxc4 10.Bxc4 Qc7
White's most classical approach gets the most classical answer: ...d5 and ...c5 stake out the center before conceding the bishop. After 9...dxc4 10.Bxc4 Qc7 (the Karpov treatment) Black's plan is crystal clear — ...e5 next, hitting the hanging center and freeing the c8-bishop. White's doubled c-pawns mean any endgame favors Black structurally, so White must generate piece activity fast; if it doesn't come, Black slowly takes over.
Classical Variation (4.Qc2)
1.d4 Nf6 2.c4 e6 3.Nc3 Bb4 4.Qc2 O-O 5.a3 Bxc3+ 6.Qxc3 b6 7.Bg5 Bb7 8.f3 h6 9.Bh4 d5
The point of 4.Qc2 is to recapture on c3 with the queen and avoid doubled pawns — so Black switches gears and plays against time. With ...b6 and ...Bb7 the long diagonal becomes Black's, and the well-timed 9...d5! strikes while White's kingside is still asleep. If White grabs space with e4, ...dxe4 and ...Nbd7-c5 hit back at the loose center. Black's lead in development is permanent compensation for the bishop pair.
Samisch Variation (4.a3)
1.d4 Nf6 2.c4 e6 3.Nc3 Bb4 4.a3 Bxc3+ 5.bxc3 c5 6.e3 Nc6 7.Bd3 O-O 8.Ne2 b6 9.e4 Ne8
White demands the bishop immediately and accepts wrecked pawns for the pair and a big center. The classical antidote is a blockading masterpiece: ...c5, ...Nc6, ...b6 with ...Ba6 to trade the good bishop, and the prophylactic 9...Ne8 preparing ...f5 while sidestepping e5. The c4-pawn becomes a lifelong invalid — ...Na5 and ...Qc7 will besiege it. If White's kingside attack doesn't land, the structure decides the game for Black.
Kasparov Variation (4.Nf3 with g3)
1.d4 Nf6 2.c4 e6 3.Nc3 Bb4 4.Nf3 c5 5.g3 cxd4 6.Nxd4 O-O 7.Bg2 d5 8.cxd5 Nxd5
A flexible modern system: White fianchettoes and keeps the structure fluid. Black's cleanest equalizer is direct central action — 4...c5, take on d4, castle, and break with 7...d5 before the g2-bishop finds targets. After 8...Nxd5 the tactics along the long diagonal all work for Black (...Nxc3 and ...Bxc3 tricks hang over White's queenside), and trades tend to leave Black with the freer game and zero structural worries.
Leningrad Variation (4.Bg5)
1.d4 Nf6 2.c4 e6 3.Nc3 Bb4 4.Bg5 h6 5.Bh4 c5 6.d5 d6 7.e3 Bxc3+ 8.bxc3 e5
The pin on f6 announces aggressive intentions, and Black answers with a full structural transformation: ...c5, ...d6 and ...e5 lock the center into a Hübner-like wall where White's bishop pair stares at granite. The h4-bishop is the key problem piece — Black will play ...g5 and ...Nh5 or ...Qe7 and ...Nbd7 at the right moment to blunt or trap it. Dark-square control, not material, is what this line is about; the doubled c-pawns give Black a permanent endgame edge.
Kmoch Variation (4.f3)
1.d4 Nf6 2.c4 e6 3.Nc3 Bb4 4.f3 d5 5.a3 Bxc3+ 6.bxc3 c5 7.cxd5 Nxd5 8.dxc5 Qa5
White's 4.f3 fights for e4 by brute force, so Black strikes in the center before the point e4 ever arrives: 4...d5! After the forcing sequence through 8.dxc5, the cool 8...Qa5 hits c3 and c5 simultaneously and regains the pawn with an excellent game — White's king, meanwhile, has lost its best shelter to f3. Precision matters for a few moves here, which is exactly why prepared Nimzo players score so well against this ambitious try.
Key ideas
- Pin the c3-knight and control e4 — the strategic battle of the whole opening in one move.
- Trade on c3 at the right moment and besiege White's doubled c-pawns for the rest of the game.
- Keep the flexible center: ...d5, ...c5 or ...b6 setups adapt to whatever White chooses.
- Rely on a defense trusted by every world champion since the opening's invention.
Typical plans and structures
Against 4.e3, Black develops with ...O-O, ...d5 and ...c5 into rich, balanced middlegames; against 4.Qc2, main lines see Black concede the bishop pair for healthy structure and rapid play; against 4.f3 and other sharp tries, ...d5 counterstrikes are ready. The recurring assets — pressure on c4 and e4, the ...b6 and ...Ba6 plan against doubled pawns, dark-square blockades — give Black active plans in every branch. The course organizes the repertoire around these structures so the theory stays manageable.
How to reach the Nimzo-Indian Defense
The Nimzo-Indian is 1.d4 Nf6 2.c4 e6 3.Nc3 Bb4, pinning the knight that would support e4. White's fourth move names the system: 4.e3 is the Rubinstein, the most common, 4.Qc2 the Classical, avoiding doubled pawns at the cost of a tempo, 4.a3 the Sämisch, forcing the trade at once, 4.Nf3 with g3 the Kasparov or Romanishin approach, 4.Bg5 the Leningrad and 4.f3 the Kmoch. White avoids the opening entirely with 3.Nf3, when Black chooses the Queen's Indian 3...b6 or the Bogo-Indian 3...Bb4+, or with 3.g3, the Catalan.
Pros and cons of the Nimzo-Indian Defense
Pros
- Widely considered Black's best reply to 1.d4: sound, flexible, and rich in winning chances.
- Fights for e4 with pieces, keeps the pawn structure flexible, and often leaves White with doubled c-pawns to play against.
- Suits every style: the Rubinstein lines are positional, the Sämisch and Kmoch sharp, the Classical a battle of plans.
- The knowledge transfers: Nimzo structures teach the bishop-pair versus structure trade-off that runs through all of chess.
Cons
- Black usually gives up the bishop pair, and if White's structure stays healthy the two bishops tell in the long run.
- White can sidestep it with 3.Nf3, so a Nimzo player also needs the Queen's Indian or Bogo-Indian.
- The Classical 4.Qc2 lines require precise knowledge; White's extra center and bishops can be dangerous.
- In some lines Black's position is solid but passive and the winning chances are modest.
How to play against the Nimzo-Indian Defense
White's choices are about the bishop pair. The Classical 4.Qc2 keeps the structure intact, accepts a tempo loss, and aims to use the two bishops and a broad center later; it is the most ambitious. The Rubinstein 4.e3 is the most flexible, with Bd3, Nf3 and O-O to follow and the plan of f3 and e4 or the a3 trade at the right moment. The Sämisch 4.a3 forces ...Bxc3 and plays for the center with f3 and e4, accepting doubled pawns for space and attacking chances. Players who would rather not face it play 3.Nf3 and meet the Queen's Indian or Bogo-Indian instead. In every line the rule is the same: use the bishop pair and the center actively, and do not let Black blockade the doubled c-pawns with ...c5, ...Nc6 and ...Na5 and then win them.
Plans for both sides
White's plan
Keep or regain the bishop pair, build the center with e3 and d4 or f3 and e4, and open the position when the bishops will tell. With doubled c-pawns, play for the e4 break and the kingside attack before Black's blockade on c4 arrives; with an intact structure, use the space and the two bishops in a long strategic game.
Black's plan
Decide early whether to trade on c3 and blockade the doubled pawns with ...c5, ...Nc6, ...Na5 and ...Ba6 or to keep the bishop and play for ...d5 and ...c5 in the center. Control e4 with ...b6 and ...Bb7 or ...d5, keep the structure sound, and trade pieces when White's bishop pair would otherwise dominate.
Who should play it
Players of any style who want the most respected classical defense to 1.d4 — solid enough for must-hold games, flexible enough to play for wins.
History of the Nimzo-Indian Defense
The opening is named after Aron Nimzowitsch, who developed 3...Bb4 in the 1920s as the model of his hypermodern idea that the center can be controlled with pieces rather than occupied with pawns. Capablanca used it in the 1927 world championship, Botvinnik and Bronstein built their careers on it, and Kasparov, Karpov and Kramnik all relied on it in world championship matches. The Rubinstein, Sämisch, Leningrad and Kmoch systems carry the names of the White players who tried to refute it; none did, and it has been a pillar of every serious black repertoire against 1.d4 for a century.
Study the Nimzo-Indian Defense move by move
The first 3 lines of the interactive course, exactly as a signed-out visitor can play them — each move with the coaching note shown on the board.
Line 1 — against an inaccuracy
1.d4 White takes the center. 1...Nf6 We develop our knight in response. 2.c4 Our opponent grabs space on the queenside. 2...e6 Solid setup, and we open a line for our bishop. 3.Nc3 White brings out their knight. 3...Bb4 Pinning their knight. 4.Qc2 White reinforces the knight to prevent doubled pawns. 4...O-O We castle to protect the king. 5.a3 White challenges our bishop. 5...Bxc3+ We take their knight. 6.Qxc3 Our opponent takes back. 6...b6 We plan to fianchetto the light squared bishop. 7.Bg5 Activating their bishop. 7...Bb7 We complete the fianchetto. 8.e3 Clearing the e2 square for development. 8...d6 We clear d7 for our knight without blocking our bishop's diagonal. 9.Ne2 Our opponent brings out their bishop. 9...Nbd7 We activate our knight as well. 10.Qc2 White repositions the queen, anticipating ...Ne4. 10...c5 We increase pressure in the center. 11.Nc3 Repositioning the knight to a better square. 11...cxd4 We aim to open the c file. 12.exd4 Our opponent recaptures the pawn. 12...h6 We challenge their bishop and create an escape square for our king. 13.Bh4 Our opponent retreats the bishop, maintaining the pin. 13...Qc7 We step out of the pin. 14.f3 Aiming to restrict our fianchettoed bishop. 14...Rac8 We activate the rook along the c file. 15.Bd3 White finishes their development. 15...Ba6 We target the pawn on c4. 16.b3 Reinforcing the pawn. 16...d5 We exploit the pin, and White can no longer defend the c4 pawn.
Line 2 — the main line
1.d4 White takes the center. 1...Nf6 We develop our knight in response. 2.c4 Our opponent grabs space on the queenside. 2...e6 Solid setup, and we open a line for our bishop. 3.Nc3 White brings out their knight. 3...Bb4 Pinning their knight. 4.Qc2 White reinforces the knight to prevent doubled pawns. 4...O-O We castle to protect the king. 5.a3 White challenges our bishop. 5...Bxc3+ We take their knight. 6.Qxc3 Our opponent takes back. 6...b6 We plan to fianchetto the light squared bishop. 7.Bg5 Activating their bishop. 7...Bb7 We complete the fianchetto. 8.e3 Clearing the e2 square for development. 8...d6 We clear d7 for our knight without blocking our bishop's diagonal. 9.Ne2 Our opponent brings out their bishop. 9...Nbd7 We activate our knight as well. 10.Qc2 White repositions the queen, anticipating ...Ne4. 10...c5 We increase pressure in the center. 11.Ng3 Our opponent maneuvers their knight to the kingside, freeing the light squared bishop. 11...cxd4 We capture the pawn on d4. 12.exd4 Our opponent takes back. 12...h6 We challenge their bishop. 13.Be3 Retreating the bishop. 13...Rc8 We activate the rook, increasing pressure on the c4 pawn and gaining a lead in development.
Line 3 — the main line
1.d4 White takes the center. 1...Nf6 We develop our knight in response. 2.c4 Our opponent grabs space on the queenside. 2...e6 Solid setup, and we open a line for our bishop. 3.Nc3 White brings out their knight. 3...Bb4 Pinning their knight. 4.Qc2 White reinforces the knight to prevent doubled pawns. 4...O-O We castle to protect the king. 5.a3 White challenges our bishop. 5...Bxc3+ We take their knight. 6.Qxc3 Our opponent takes back. 6...b6 We plan to fianchetto the light squared bishop. 7.Bg5 Activating their bishop. 7...Bb7 We complete the fianchetto. 8.e3 Clearing the e2 square for development. 8...d6 We clear d7 for our knight without blocking our bishop's diagonal. 9.f3 Preventing our knight from jumping to e4. 9...Nbd7 We complete our development. 10.Bd3 Activating their bishop. 10...h6 We challenge their bishop and create an escape square for our king. 11.Bh4 Our opponent retreats, maintaining the pin. 11...e5 We strike in the center with a pawn break. 12.Ne2 Our opponent completes their development. 12...e4 We sacrifice a pawn temporarily to break open the center and create weaknesses. 13.fxe4 Our opponent accepts the sacrifice. 13...g5 We drive their bishop back, break the pin, and reactivate our knight. 14.Bg3 Retreating the bishop. 14...Nxe4 We recapture the central pawn, targeting their queen. 15.Qc2 Counterattacking our knight. 15...f5 We reinforce the knight and reach an active position with chances for both sides.
The free preview ends here — continue with all 25 lines in the interactive course, with instant feedback on every move you play.
Frequently asked questions
Why is the Nimzo-Indian considered Black's best defense to 1.d4?
It scores excellently at every level, offers multiple healthy structures rather than one narrow path, and has never been close to refutation in a century of top-level testing. The clearest endorsement: a large share of 1.d4 players choose 3.Nf3 or 3.g3 purely to avoid it.
What does Black get for giving up the bishop pair in the Nimzo?
Either doubled White c-pawns to blockade and attack — the classic Nimzowitsch plan with ...Ba6, ...Nc6-a5 — or time and structure while White spends moves keeping the pair. The exchange is a trade of long-term assets, and Black's side of it is fully sound.
What if White avoids the Nimzo-Indian with 3.Nf3?
Then Black needs a companion system — the Queen's Indian (...b6) and the Bogo-Indian (...Bb4+) are the classical partners, and Benoni or ...d5 setups are alternatives. This course focuses on the Nimzo itself, the backbone of the whole 1.d4 Nf6 2.c4 e6 repertoire.
Is the Nimzo-Indian good for beginners?
It is one of the best defenses to learn early because its central idea, controlling e4 with pieces and trading a bishop for a damaged structure, teaches a fundamental strategic trade-off. The plans are clear in the Rubinstein lines; the sharper Classical and Sämisch variations can come later.
How do you play against the Nimzo-Indian?
Either keep the bishop pair with 4.Qc2, the Classical, and use the two bishops and a broad center later, or play the flexible Rubinstein 4.e3, or force the trade with 4.a3 and play for e4. Many players avoid it with 3.Nf3 and face the Queen's Indian instead.
Nimzo-Indian or King's Indian: which should I play?
The Nimzo-Indian is the sounder, more classical choice and gives Black equality with winning chances in most lines; the King's Indian is the sharper, riskier counterattack. Solid players choose the Nimzo, attackers the King's Indian, and many strong players keep both.
Learn the Nimzo-Indian Defense with AI feedback
This page pairs the guide above with an interactive ChessMind AI course: a GM-authored repertoire you study move by move on a real board, then practice against a human-like chess AI opponent with instant feedback and spaced-repetition review, so the key positions actually stick. Start learning, jump straight into practice, or browse all opening courses.
New to a concept? Every term is defined in the chess terms glossary.