King's Indian with ...c5
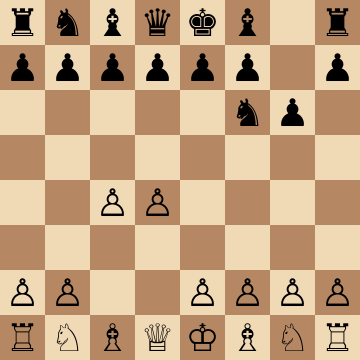
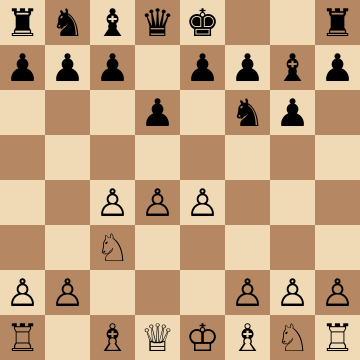
1.d4 Nf6 2.c4 g6 3.Nc3 Bg7 4.e4 d6
Against White's most aggressive King's Indian setups — the Saemisch, the Four Pawns — the classical ...e5 break can play into White's hands. This course teaches the other weapon: the ...c5 strike, steering the game into Benoni-style structures where Black's counterplay comes fastest.
Mainline
1.d4 Nf6 2.c4 g6 3.Nc3 Bg7 4.e4 d6 5.f3 O-O 6.Be3 c5
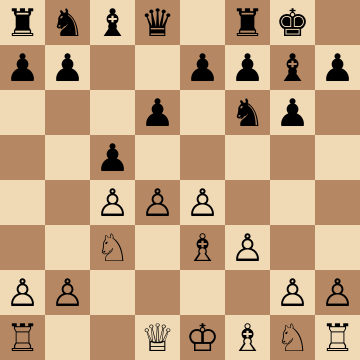
Saemisch Gambit: 7.dxc5 dxc5 8.Qxd8
1.d4 Nf6 2.c4 g6 3.Nc3 Bg7 4.e4 d6 5.f3 O-O 6.Be3 c5 7.dxc5 dxc5 8.Qxd8 Rxd8 9.Bxc5 Nc6
The critical test of 6...c5 — and Black's proudest moment. White wins a clean pawn into a queenless middlegame, yet practice and engines agree Black gets full value: 9...Nc6 prepares ...Nd4 and ...Nd7 to harass the c5-bishop, the g7-bishop rakes the very queenside White just weakened, and the g1-knight plus both White rooks remain spectators for many moves. Black scores superbly from this position; the course shows the regrouping schemes that keep the initiative burning deep into the endgame.
Saemisch Benoni: 7.d5 e6
1.d4 Nf6 2.c4 g6 3.Nc3 Bg7 4.e4 d6 5.f3 O-O 6.Be3 c5 7.d5 e6 8.Qd2 exd5 9.cxd5 a6 10.a4 Nbd7
Declining the gambit with 7.d5 steers into a Benoni where White's f3 setup is slightly slow — exactly what Black wants. The standard toolkit applies: exchange on d5, then ...a6 and ...Nbd7 preparing the thematic ...Ne5 jump or the ...b5 break, with the queenside majority ready to roll later. White's usual plans cost extra time here because f3 has stolen the g1-knight's natural square, and Black's counterplay lands first on the queenside.
Study the The Modern Benoni course
Four Pawns Attack: 6...c5 Main Line
1.d4 Nf6 2.c4 g6 3.Nc3 Bg7 4.e4 d6 5.f4 O-O 6.Nf3 c5 7.d5 e6 8.Be2 exd5 9.cxd5 Re8 10.e5 dxe5 11.fxe5 Ng4
Against the Four Pawns, ...c5 is not merely playable — it is the refutation attempt. White's massive center looks terrifying until 9...Re8 x-rays it, and when White lunges with 10.e5, the sequence 10...dxe5 11.fxe5 Ng4! piles onto the overextended e5-pawn; 12.Bg5 is met by 12...Qb6 adding pressure everywhere. White is already the one fighting for equality — the very tactics that drove 5.f4 out of master practice. Learn the forcing lines well; they decide by move twenty.
Averbakh System: 6.Bg5 c5
1.d4 Nf6 2.c4 g6 3.Nc3 Bg7 4.e4 d6 5.Be2 O-O 6.Bg5 c5 7.d5 e6 8.Qd2 exd5 9.exd5
The Averbakh's 6.Bg5 exists to punish an immediate ...e5, which makes 6...c5 the principled answer — Black strikes where the setup has no bite. After the standard exchange on d5 a Benoni structure arises in which the g5-bishop often proves misplaced: ...h6 puts the question, ...Qb6 ideas hit the abandoned b2-pawn, and ...Re8 with ...a6 and ...b5 generates the classic counterplay. Black gets all the usual Benoni activity with fewer of its usual dangers.
Saemisch with 7.Nge2: 8...Ne5
1.d4 Nf6 2.c4 g6 3.Nc3 Bg7 4.e4 d6 5.f3 O-O 6.Be3 c5 7.Nge2 Nc6 8.d5 Ne5 9.Ng3 h5
White's most solid reply holds the center with 7.Nge2, and Black responds by improving every piece: 7...Nc6 provokes 8.d5, the knight settles majestically on e5 — where evicting it with f4 would cost White the dark squares forever — and 9...h5! fixes the g3-knight as a target. The follow-up ...h4 wins more time, after which ...e6 or ...b5 opens a second front. This is model modern Saemisch handling: Black plays on both wings while White's pieces trip over the f3-pawn.
Benko-Style Gambit: 7.d5 b5
1.d4 Nf6 2.c4 g6 3.Nc3 Bg7 4.e4 d6 5.f3 O-O 6.Be3 c5 7.d5 b5
The most ambitious answer to 7.d5: Black offers the b-pawn Benko-style, arguing that White's slow f3 setup cannot afford open queenside files. After 8.cxb5 a6 the familiar machinery starts — ...axb5, rooks to a8 and b8, the g7-bishop pressing into b2 — but with White's king still central and the g1-knight undeveloped, every Benko idea gains force. If White keeps the position closed instead of grabbing, ...bxc4 trades a wing pawn for lasting pressure anyway. A fearless practical weapon.
Key ideas
- Meet the Saemisch and Four Pawns with ...c5, hitting d4 where those setups are weakest.
- Play the resulting Benoni structures with confidence: queenside majority, dark-square pressure, active pieces.
- Use the g7-bishop's full power — in the ...c5 structures its diagonal opens rather than closes.
- Keep one coherent repertoire: the same strike works against White's whole aggressive family.
Typical plans and structures
After ...c5, play typically continues d5 and now Black has the classic Benoni toolkit: ...e6 and ...exd5 for the majority structure, or gambit-flavored ...b5 breaks against the Saemisch's slow development. Knights route via a6-c7 or d7 toward b5 and e5, the queen finds a5 or b6, and the half-open files do the talking. The course pairs each White setup with its correct ...c5 timing — the difference between a strong strike and a premature one.
Who should play it
King's Indian players who want the sharpest practical answer to the Saemisch and Four Pawns, and anyone who enjoys Benoni-style counterattacking structures.
Frequently asked questions
Why play ...c5 instead of ...e5 against the Saemisch?
The Saemisch's f3 setup is built to weather the kingside storm that follows ...e5 — but it develops slowly, and ...c5 punishes exactly that. Opening the queenside and the long diagonal hits White before the attacking machine assembles.
Do I need to know Benoni theory to play this repertoire?
You inherit Benoni-style structures, but through a King's Indian move order that dodges White's sharpest direct Benoni tries. The course teaches the structures from scratch — majority play, the ...b5 break, dark-square strategy — assuming no prior Benoni knowledge.
Does the ...c5 plan work against the Four Pawns Attack?
It is the main line against it: after 5.f4 O-O 6.Nf3 c5 7.d5 e6, Black's counterplay in the center and on the e-file punishes White's ambitious pawn front. These positions score well for Black at every level.
Learn the King's Indian with ...c5 with AI feedback
This page pairs the guide above with an interactive ChessMind AI course: a GM-authored repertoire you study move by move on a real board, then practice against a human-like chess AI opponent with instant feedback and spaced-repetition review, so the key positions actually stick. Start learning, jump straight into practice, or browse all opening courses.
New to a concept? Every term is defined in the chess terms glossary.