Beating the Italian Game
1.e4 e5 2.Nf3 Nc6 3.Bc4 Bc5
The Italian Game (1.e4 e5 2.Nf3 Nc6 3.Bc4) is one of the most common openings you'll meet as Black. This guide gives you a clear, reliable way to equalize and play for the win.
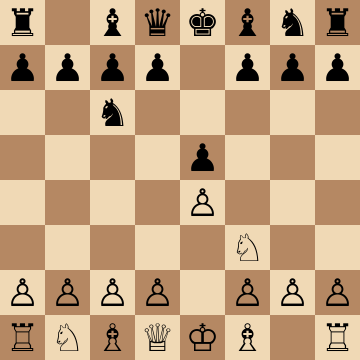
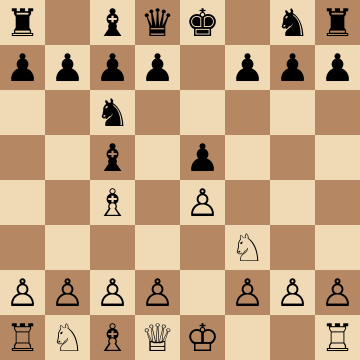
Mainline
1.e4 e5 2.Nf3 Nc6 3.Bc4 Bc5
Giuoco Piano (4.d3 — the quiet Italian)
1.e4 e5 2.Nf3 Nc6 3.Bc4 Bc5 4.d3 Nf6 5.c3 d6 6.O-O O-O
The modern main line at every level: both sides build slowly with c3, d3 and a knight manoeuvre to g3 or e3 before anything opens. Black's plans are ...a6 and ...Ba7 to keep the bishop, ...Re8 and eventually ...d5. Understanding beats memorization here — very few forced lines, many typical plans.
Evans Gambit (4.b4)
1.e4 e5 2.Nf3 Nc6 3.Bc4 Bc5 4.b4 Bxb4 5.c3 Ba5 6.d4
The romantic pawn sacrifice: White gives a pawn for a huge centre and fast development. Accepting is best, but Black must return the pawn at the right moment instead of clinging to it. Still a serious weapon — the attack plays itself if Black improvises.
Fried Liver Attack and the Two Knights (4.Ng5)
1.e4 e5 2.Nf3 Nc6 3.Bc4 Nf6 4.Ng5 d5 5.exd5 Na5
The line every club player meets: 4.Ng5 threatens f7 immediately, and the trap only works if Black replies 5...Nxd5. The correct answer is 5...Na5, offering a pawn to kick the bishop and take over the initiative. Learn this one sequence and the Fried Liver stops being scary forever.
Study the Fried Liver Attack course
Italian Gambit / Max Lange (4.d4)
1.e4 e5 2.Nf3 Nc6 3.Bc4 Bc5 4.d4 exd4 5.O-O Nf6
White blows the centre open a move early and heads for the Max Lange complications. Sharp, forcing and heavily analysed — but the critical positions are few, so a Black player with the key moves memorised comes out fine.
Hungarian Defense (3...Be7)
1.e4 e5 2.Nf3 Nc6 3.Bc4 Be7 4.d4 exd4 5.Nxd4 Nf6
Sidestep the whole Italian complex with a modest bishop move: no Evans, no Fried Liver, no Max Lange. Black concedes a little space in exchange for a rock-solid position and almost no theory — a legitimate choice if you would rather not memorise gambits.
Scotch Gambit move order (4.d4 exd4 5.c3)
1.e4 e5 2.Nf3 Nc6 3.Bc4 Bc5 4.d4 exd4 5.c3 dxc3 6.Nxc3
White returns a pawn for a development lead, transposing into Scotch Gambit structures from an Italian move order. Black is fine after accurate development, but should know that declining with ...d3 is the practical way to defuse the whole idea.
Study the Scotch Gambit course
Key ideas
- A concrete plan against the Italian instead of guessing move by move.
- Solid development that neutralizes White's early bishop.
- Know the key tactical ideas so you don't get caught out.
- Turn a common opening into a comfortable game for Black.
Typical plans and structures
Modern Italian games are slow-burn maneuvering battles: both sides castle short, White builds with c3, d3 and Re1, and Black counters with ...a6, ...Ba7, ...d6 and the key ...h6 and ...Re8 regrouping moves. Black's central break ...d5, timed correctly, is the great equalizer — and the course shows exactly when it works and when to prefer queenside expansion with ...b5. Against the aggressive Evans Gambit and the sharp 4.Ng5 tries, you get concrete, reliable answers.
Who should play it
1.e4 e5 players who want a dependable, well-understood answer to the Italian Game.
Study Beating the Italian Game move by move
The first 3 lines of the interactive course, exactly as a signed-out visitor can play them — each move with the coaching note shown on the board.
Line 1 — the main line
1.e4 White claims the center. 1...e5 We respond symmetrically. 2.Nf3 Threatening our e5 pawn. 2...Nc6 We protect the pawn with our knight. 3.Bc4 Our opponent goes for the Italian Opening. 3...Bc5 We develop our bishop as well, mirroring our opponent's setup. We delay playing ...Nf6 to avoid the Fried Liver Attack. 4.c3 Planning to support a future d2 d4 push. 4...Nf6 We attack their e4 pawn and prepare to castle. 5.d3 Our opponent avoids an immediate break (which would result in lots of trades), and instead, wants to play a long and complex game full of maneuvering. 5...d6 We reinforce our e5 pawn. 6.O-O Castling short as expected. This move renews the idea of d3 d4 since now we can't just trade on d4 and give a check on b4. 6...a6 We clear the a7 square for our dark squared bishop. In most lines our bishop will use that square to avoid being traded, and continue to create pressure along the g1 a7 diagonal. 7.Bb3 Our opponent retreats their bishop before we can push b7 b5 to attack it. 7...Ba7 We safeguard the bishop, expecting possible attacks from our opponent on d4 or b4. 8.Nbd2 White develops their knight. 8...O-O We castle. 9.h3 Our opponent prevents Bg4, restricting the activity of our light squared bishop. 9...h6 We prevent our opponent's pieces from reaching the g5 square. 10.Re1 Developing the rook and freeing the f1 square for the knight to maneuver. 10...Nh5 We want our knight on f4, coordinating with the queen to increase attacking chances. 11.Nf1 Our opponent repositions their knight using a standard Italian Opening idea, aiming for e3 to control f5 and d5. 11...Qf6 We bring out our queen to back up the knight. 12.Be3 Our opponent offers a bishop trade. 12...Bxe3 We exchange dark squared bishops, removing a key defender of f4. 13.Nxe3 Our opponent recaptures and completes their knight's maneuver. 13...Nf4 We bring our knight to the strong outpost on f4. The game is roughly balanced. Our opponent has a bit more control of the center, but we have pressure on the kingside.
Line 2 — punishing a blunder
1.e4 White claims the center. 1...e5 We respond symmetrically. 2.Nf3 Threatening our e5 pawn. 2...Nc6 We protect the pawn with our knight. 3.Bc4 Our opponent goes for the Italian Opening. 3...Bc5 We develop our bishop as well, mirroring our opponent's setup. We delay playing ...Nf6 to avoid the Fried Liver Attack. 4.c3 Planning to support a future d2 d4 push. 4...Nf6 We attack their e4 pawn and prepare to castle. 5.d3 Our opponent avoids an immediate break (which would result in lots of trades), and instead, wants to play a long and complex game full of maneuvering. 5...d6 We reinforce our e5 pawn. 6.O-O Castling short as expected. This move renews the idea of d3 d4 since now we can't just trade on d4 and give a check on b4. 6...a6 We clear the a7 square for our dark squared bishop. In most lines our bishop will use that square to avoid being traded, and continue to create pressure along the g1 a7 diagonal. 7.Bb3 Our opponent retreats their bishop before we can push b7 b5 to attack it. 7...Ba7 We safeguard the bishop, expecting possible attacks from our opponent on d4 or b4. 8.Nbd2 White develops their knight. 8...O-O We castle. 9.Re1 Our opponent forgets to play h2 h3, which gives us good counterplay by attacking the pawn on f2 directly. 9...Ng4 We threaten to capture on f2, and clear the way to play ...f7 f5 soon. 10.Re2 Protecting the pawn. 10...Kh8 This is a clever move based on strong calculation, we are planning to play ...f7 f5 in the next move. 11.h3 Our opponent tries to kick out our knight, but we have a great tactical resource. 11...f5!? We refuse to remove our knight to create some interesting complications. By the way, we could have also played ...Nh6 and ...f7 f5 if we wanted to play it safer. 12.hxg4 Accepting the knight is not a great idea, as we are in good shape to regain the material. 12...fxg4 We recapture, attack the knight, and we are ready to push ...g4 g3 next. Notice how well the bishop, rook and pawn work together. 13.Nh2 This is the only viable move for our opponent. 13...g3 We threaten the knight again, as well as the f2 pawn. 14.Nhf3? Our opponent is hoping to just keep the extra piece, and hope we'll release the tension by taking on f2 (where they would be a little better). 14...Bg4!! We don't retake the material right away, and instead, keep building pressure. The position is complex, but according to Stockfish we have almost a -2 advantage.
Line 3 — against an inaccuracy
1.e4 White claims the center. 1...e5 We respond symmetrically. 2.Nf3 Threatening our e5 pawn. 2...Nc6 We protect the pawn with our knight. 3.Bc4 Our opponent goes for the Italian Opening. 3...Bc5 We develop our bishop as well, mirroring our opponent's setup. We delay playing ...Nf6 to avoid the Fried Liver Attack. 4.c3 Planning to support a future d2 d4 push. 4...Nf6 We attack their e4 pawn and prepare to castle. 5.d3 Our opponent avoids an immediate break (which would result in lots of trades), and instead, wants to play a long and complex game full of maneuvering. 5...d6 We reinforce our e5 pawn. 6.O-O Castling short as expected. This move renews the idea of d3 d4 since now we can't just trade on d4 and give a check on b4. 6...a6 We clear the a7 square for our dark squared bishop. In most lines our bishop will use that square to avoid being traded, and continue to create pressure along the g1 a7 diagonal. 7.Bb3 Our opponent retreats their bishop before we can push b7 b5 to attack it. 7...Ba7 We safeguard the bishop, expecting possible attacks from our opponent on d4 or b4. 8.Nbd2 White develops their knight. 8...O-O We castle. 9.Re1 Our opponent forgets to play h2 h3, which gives us good counterplay by attacking the pawn on f2 directly. 9...Ng4 We threaten to capture on f2, and clear the way to play ...f7 f5 soon. 10.Re2 Protecting the pawn. 10...Kh8 This is a clever move based on strong calculation, we are planning to play ...f7 f5 in the next move. 11.h3 Our opponent tries to kick out our knight, but we have a great tactical resource. 11...f5!? We refuse to remove our knight to create some interesting complications. By the way, we could have also played ...Nh6 and ...f7 f5 if we wanted to play it safer. 12.exf5 This is the best response from White, trading rather than taking our "gift". Their hope is to hold on to this extra pawn. 12...Nh6 We remove our knight, and hope to recapture on f5 next. 13.g4 Our opponent holds on to the pawn, but we are ready with a powerful sacrifice. 13...Nxf5! We don't mind giving up the piece, because we'll end up with two pawns and initiative in exchange for it. 14.gxf5 The only response, taking our knight. 14...Bxf5 The position is very complex, we are threatening two pawns and will win one of them. We enjoy a safer king and active pieces, so overall it's a pleasant position for Black.
The free preview ends here — continue with all 18 lines in the interactive course, with instant feedback on every move you play.
Frequently asked questions
How should Black respond to the Italian Game?
Both the classical 3...Bc5 and the flexible 3...Nf6 are excellent. The key is having a full plan — piece placement, the moment for the ...d5 break, and answers to White's c3-d4 expansion — rather than a few memorized moves, which is what this course provides.
What is the difference between the Giuoco Piano and the Italian Game?
The Italian Game is the family name for positions after 3.Bc4; the Giuoco Piano ('quiet game') is the branch with 3...Bc5, and its slow c3-d3 form is the Giuoco Pianissimo — today's most common battleground, where understanding of plans matters far more than sharp theory.
Do I need to fear the Fried Liver Attack?
Only if you allow it: the Fried Liver arises after 3...Nf6 4.Ng5 d5 5.exd5 Nxd5?!. With the correct move orders and the recommended responses in this course, White's early Ng5 aggression is neutralized — and often backfires.
Learn Beating the Italian Game with AI feedback
This page pairs the guide above with an interactive ChessMind AI course: a GM-authored repertoire you study move by move on a real board, then practice against a human-like chess AI opponent with instant feedback and spaced-repetition review, so the key positions actually stick. Start learning, jump straight into practice, or browse all opening courses.
New to a concept? Every term is defined in the chess terms glossary.