Marshall Attack
1.e4 e5 2.Nf3 Nc6 3.Bb5 a6 4.Ba4 Nf6 5.O-O Be7 6.Re1 b5 7.Bb3 O-O 8.c3 d5
The Marshall Attack (8...d5!? in the Ruy Lopez) is that rare treasure: a gambit that is both fully sound and ferociously aggressive. Black gives a pawn for a lasting kingside initiative that has terrorized 1.e4 players for a century — Frank Marshall famously saved it for years to unleash it on Capablanca.
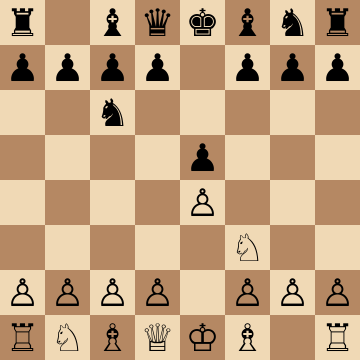
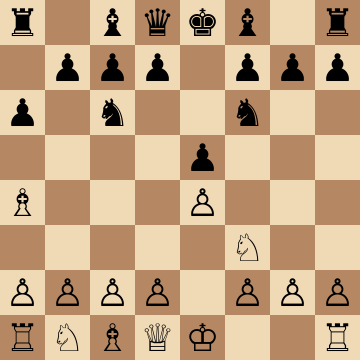
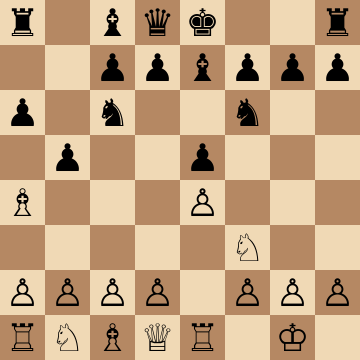
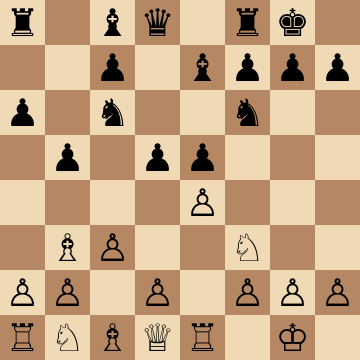
Mainline
1.e4 e5 2.Nf3 Nc6 3.Bb5 a6 4.Ba4 Nf6 5.O-O Be7 6.Re1 b5 7.Bb3 O-O 8.c3 d5 9.exd5 Nxd5 10.Nxe5 Nxe5 11.Rxe5 c6
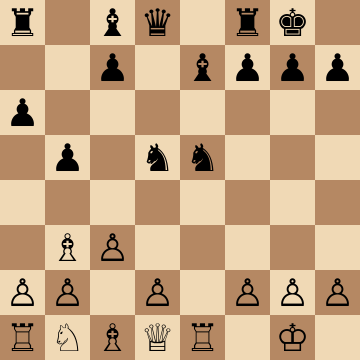
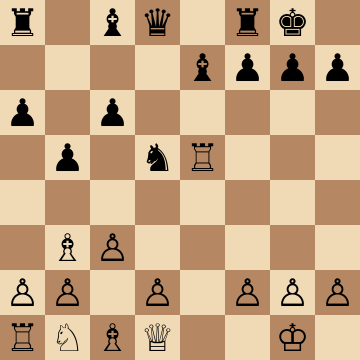
Main Line: 14...Qh3 Attack
1.e4 e5 2.Nf3 Nc6 3.Bb5 a6 4.Ba4 Nf6 5.O-O Be7 6.Re1 b5 7.Bb3 O-O 8.c3 d5 9.exd5 Nxd5 10.Nxe5 Nxe5 11.Rxe5 c6 12.d4 Bd6 13.Re1 Qh4 14.g3 Qh3
This is the picture every Marshall player dreams of: bishop on d6, queen on h3, and White's king suddenly alone. The g3 weakening is forced, and now ...Bg4, ...Rae8 and ...f5-f4 arrive in waves while White's queenside pieces watch from home. A century of analysis says White can survive with perfect play — but over the board, one imprecise defensive move and the attack lands on g3 or h2. Learn the piece routes here and they repeat in every sub-line.
Modern Tabiya: 15.Be3 Bg4 16.Qd3
1.e4 e5 2.Nf3 Nc6 3.Bb5 a6 4.Ba4 Nf6 5.O-O Be7 6.Re1 b5 7.Bb3 O-O 8.c3 d5 9.exd5 Nxd5 10.Nxe5 Nxe5 11.Rxe5 c6 12.d4 Bd6 13.Re1 Qh4 14.g3 Qh3 15.Be3 Bg4 16.Qd3 Rae8
White's best defensive formation — Be3, Qd3, Nd2 — is where modern Marshall theory lives. Black keeps full compensation with 15...Bg4 and 16...Rae8: every piece joins the attack, and the thematic ...Re6-h6 lift or ...f5 keeps White defending for hours. Many computer lines end in perpetual check or a drawn endgame, which is precisely the Marshall bargain: Black risks nothing, and only White has to remember the saving moves.
13.Re2?! Punished by 13...Bg4!
1.e4 e5 2.Nf3 Nc6 3.Bb5 a6 4.Ba4 Nf6 5.O-O Be7 6.Re1 b5 7.Bb3 O-O 8.c3 d5 9.exd5 Nxd5 10.Nxe5 Nxe5 11.Rxe5 c6 12.d4 Bd6 13.Re2 Bg4 14.f3 Qh4 15.g3 Bxg3 16.hxg3 Qxg3+
A natural-looking defensive try that loses by force. The rook retreat to e2 walks into 13...Bg4!, and after 14.f3 Qh4 White's kingside cover collapses: the sacrifice 15...Bxg3! rips open the king, and 16...Qxg3+ leaves White's exposed monarch facing the full attack. Club players find 13.Re2 constantly because it develops the defense of f2 — memorize this refutation and you will win games with it straight from the opening.
Anti-Marshall: 8.a4
1.e4 e5 2.Nf3 Nc6 3.Bb5 a6 4.Ba4 Nf6 5.O-O Be7 6.Re1 b5 7.Bb3 O-O 8.a4 b4 9.d3 d6 10.a5 Be6
Most strong players decline the gambit, and 8.a4 is the critical way: the a-file lever probes b5 before Black can play ...d5. Answer with 8...b4, keeping the queenside closed, then develop calmly — ...d6, ...Be6 challenging the b3 bishop, ...Rb8 and a timely ...d5 anyway. The positions are quieter than the Marshall proper, but Black's setup is harmonious and the b4 pawn cramps White's queenside for the whole middlegame.
Anti-Marshall: 8.h3 Bb7
1.e4 e5 2.Nf3 Nc6 3.Bb5 a6 4.Ba4 Nf6 5.O-O Be7 6.Re1 b5 7.Bb3 O-O 8.h3 Bb7 9.d3 d6 10.a3 Na5 11.Ba2 c5
The most popular Anti-Marshall at every level: 8.h3 stops ...Bg4 ideas and simply refuses to allow ...d5 under favorable terms. Black switches to a rich Ruy Lopez middlegame with 8...Bb7 — the bishop supports a later ...d5 anyway — followed by ...d6, ...Na5-c4 or ...c5 with classical queenside play. No need to force matters: the same player who chose 8.h3 to avoid your preparation now has to outplay you in a position you know better.
Anti-Marshall: Quiet 8.d3
1.e4 e5 2.Nf3 Nc6 3.Bb5 a6 4.Ba4 Nf6 5.O-O Be7 6.Re1 b5 7.Bb3 O-O 8.d3 d6 9.c3 Na5 10.Bc2 c5 11.Nbd2 Re8
With 8.d3 White protects e4 once and for all and steers toward slow maneuvering. Black should feel at home: ...d6, ...Na5 hitting the bishop, ...c5 and ...Re8 give the classical Chigorin-style setup where the extra space on the queenside is a long-term asset. The key point for Marshall players is psychological — nothing has gone wrong. Keep the pieces coordinated, prepare ...d5 in one go when White drifts, and the initiative returns.
Key ideas
- Sacrifice the e5-pawn to seize the initiative — Black's pieces reach dream squares with tempo.
- Attack with the thematic ...Bd6, ...Qh4 and ...f5-f4 storm against White's bare kingside.
- Trust the evaluation: engines confirm Black's full compensation, so press without fear.
- Force 1.e4 players into a century of theory — or into the meek Anti-Marshall sidelines.
Typical plans and structures
After 11...c6, Black regroups with ...Bd6, ...Qh4 and often ...Bg4 or the ...f5 pawn storm, while White's extra pawn sits irrelevant on the queenside for most of the middlegame. White's standard defensive setup — d4, Re1-e2 or g3 and Be3 — must survive wave after wave of pressure; a single slip and the attack crashes through on h2 or f2. Many lines end in dynamic equality or perpetual — which suits Black fine, since only White must find the precise path.
Who should play it
Ruy Lopez defenders who want winning chances with Black in the main lines, love the initiative, and would rather attack for a pawn than defend for equality.
Study the Marshall Attack move by move
The first 3 lines of the interactive course, exactly as a signed-out visitor can play them — each move with the coaching note shown on the board.
Line 1 — punishing a blunder
1.e4 typical central move. 1...e5 a double king's pawn struggle. 2.Nf3 natural developing move. 2...Nc6 Black develops and defends the pawn. 3.Bb5 Spanish opening. 3...a6 typical Spanish move. 4.Ba4 natural move. 4...Nf6 we attack e4. 5.O-O White protects their king. 5...Be7 we develop naturally to protect their King. 6.Re1 in defense of the e4 pawn. 6...b5 once the e4 pawn is defended, Axc6 is a threat. 7.Bb3 only move for White. 7...O-O protection for the king. 8.c3 with the idea of playing d4. 8...d5 characteristic move of the Marshall Attack. 9.exd5 natural capture. 9...Nxd5 we enter a Marshall Attack. 10.Nxe5 White captures the hanging pawn. 10...Nxe5 we recapture the central knight. 11.Rxe5 White captures the piece. 11...c6 Black sacrificed the e4 pawn in exchange for initiative. 12.d4 winning the center and defending the rook. 12...Bd6 we threaten and activate the rook. 13.Re1 White has to escape. 13...Qh4 we threaten the h2 pawn. 14.g3 only possible defense. 14...Qh3 we place the queen on an active square. 15.Be3 White seeks to complete their development. 15...Bg4 double function, we develop and attack. 16.Qd3 they escape from the threat. 16...f5 seeking initiative on the Kingside. 17.Nd2?! the development is a mistake. 17...f4 with attacking advantage for Black.
Line 2 — the main line
1.e4 typical central move. 1...e5 a double king's pawn struggle. 2.Nf3 natural developing move. 2...Nc6 Black develops and defends the pawn. 3.Bb5 Spanish opening. 3...a6 typical Spanish move. 4.Ba4 natural move. 4...Nf6 we attack e4. 5.O-O White protects their king. 5...Be7 we develop naturally to protect their King. 6.Re1 in defense of the e4 pawn. 6...b5 once the e4 pawn is defended, Axc6 is a threat. 7.Bb3 only move for White. 7...O-O protection for the king. 8.c3 with the idea of playing d4. 8...d5 characteristic move of the Marshall Attack. 9.exd5 natural capture. 9...Nxd5 we enter a Marshall Attack. 10.Nxe5 White captures the hanging pawn. 10...Nxe5 we recapture the central knight. 11.Rxe5 White captures the piece. 11...c6 Black sacrificed the e4 pawn in exchange for initiative. 12.d4 winning the center and defending the rook. 12...Bd6 we threaten and activate the rook. 13.Re1 White has to escape. 13...Qh4 we threaten the h2 pawn. 14.g3 only possible defense. 14...Qh3 we place the queen on an active square. 15.Qf3 seeks to defend the white squares. 15...Bg4 we develop and attack. 16.Qg2 White tries to exchange queens. 16...Qh5 in attacking position, we never exchange queens. 17.Nd2 White seeks to avoid Bf3. 17...Rae8 we seek the open file. 18.Rxe8 White exchanges material. 18...Rxe8 the threat on the first rank is unstoppable.
Line 3 — the main line
1.e4 typical central move. 1...e5 a double king's pawn struggle. 2.Nf3 natural developing move. 2...Nc6 Black develops and defends the pawn. 3.Bb5 Spanish opening. 3...a6 typical Spanish move. 4.Ba4 natural move. 4...Nf6 we attack e4. 5.O-O White protects their king. 5...Be7 we develop naturally to protect their King. 6.Re1 in defense of the e4 pawn. 6...b5 once the e4 pawn is defended, Axc6 is a threat. 7.Bb3 only move for White. 7...O-O protection for the king. 8.c3 with the idea of playing d4. 8...d5 characteristic move of the Marshall Attack. 9.exd5 natural capture. 9...Nxd5 we enter a Marshall Attack. 10.Nxe5 White captures the hanging pawn. 10...Nxe5 we recapture the central knight. 11.Rxe5 White captures the piece. 11...c6 Black sacrificed the e4 pawn in exchange for initiative. 12.d4 winning the center and defending the rook. 12...Bd6 we threaten and activate the rook. 13.Re1 White has to escape. 13...Qh4 we threaten the h2 pawn. 14.g3 only possible defense. 14...Qh3 we place the queen on an active square. 15.Qf3 seeks to defend the white squares. 15...Bg4 we develop and attack. 16.Qg2 White tries to exchange queens. 16...Qh5 in attacking position, we never exchange queens. 17.Nd2 White seeks to avoid Bf3. 17...Rae8 we seek the open file. 18.Rf1 seeks to take care of the first rank. 18...Re2 rooks on the second rank are dangerous. 19.Bd1 White tries to expel the rook. 19...Ne3 tactical blow with material gain.
The free preview ends here — continue with all 14 lines in the interactive course, with instant feedback on every move you play.
Frequently asked questions
Is the Marshall Attack sound?
Completely — it is one of the few classical gambits engines fully endorse. It has been trusted at the highest level for decades, and many elite players avoid it as White by choosing Anti-Marshall move orders rather than face it head-on.
What if White avoids the Marshall with an Anti-Marshall setup?
Moves like 8.a4, 8.h3 or 8.d4 dodge the gambit but concede the comfortable, active development Black wanted anyway. A complete Marshall repertoire — like the one in this course — includes clear plans against each Anti-Marshall, so nothing surprises you.
Why did Frank Marshall save this gambit for Capablanca?
Marshall reportedly kept the 8...d5 idea secret for years, waiting for a chance against the great Cuban — the famous game came at New York 1918. Capablanca defended brilliantly and won, but the opening itself passed the test of time far better than the ambush did.
Learn the Marshall Attack with AI feedback
This page pairs the guide above with an interactive ChessMind AI course: a GM-authored repertoire you study move by move on a real board, then practice against a human-like chess AI opponent with instant feedback and spaced-repetition review, so the key positions actually stick. Start learning, jump straight into practice, or browse all opening courses.
New to a concept? Every term is defined in the chess terms glossary.