King's Gambit
1.e4 e5 2.f4
The King's Gambit (1.e4 e5 2.f4) is the classic romantic attacking opening. White offers a pawn to seize the center and open lines for a fast kingside initiative.
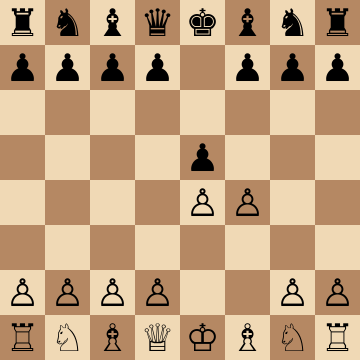
Mainline
1.e4 e5 2.f4 exf4 3.Nf3 g5 4.h4 g4 5.Ne5
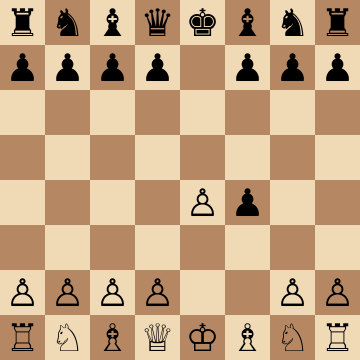
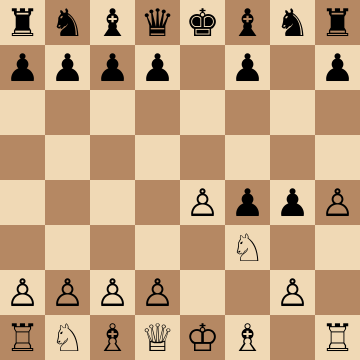
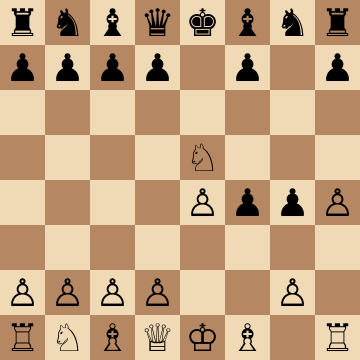
King's Gambit Accepted, Kieseritzky (5.Ne5)
1.e4 e5 2.f4 exf4 3.Nf3 g5 4.h4 g4 5.Ne5 Nf6 6.d4 d6
The main line of the King's Gambit and the sharpest way to play it: White gives the pawn, cracks open the f-file and gets a knight to e5 with tempo. Black holds the extra pawn with ...g5 but has to defend precisely. This is where the course starts, because everything else in the opening is measured against it.
Muzio Gambit (5.O-O)
1.e4 e5 2.f4 exf4 3.Nf3 g5 4.Bc4 g4 5.O-O gxf3 6.Qxf3
White sacrifices a whole knight for an attack on f7 — the most romantic line in chess and still dangerous in practice. Objectively Black survives with precise defence, but the practical scoring rate over the board tells another story. Excellent surprise weapon in fast time controls.
King's Gambit Declined (2...Bc5)
1.e4 e5 2.f4 Bc5 3.Nf3 d6 4.Nc3 Nf6
Black refuses the pawn and pins hopes on the a7-g1 diagonal, where the f-pawn has just left a hole. White must not grab material with 3.fxe5 (…Qh4+ is nasty) but simply develop. A common and sensible reply that every King's Gambit player has to be ready for.
Falkbeer Countergambit (2...d5)
1.e4 e5 2.f4 d5 3.exd5 e4 4.d3 Nf6
Counter in the centre instead of holding a pawn: Black returns material immediately to open lines against the weakened king. The modern verdict favours White with accurate play, but the positions are unlike anything else in the opening, so preparation matters more than usual.
Bishop's Gambit (3.Bc4)
1.e4 e5 2.f4 exf4 3.Bc4 Qh4+ 4.Kf1 d5
White skips Nf3 and invites the check on h4, giving up castling for fast development and pressure on f7. It looks reckless and is perfectly playable — the king on f1 is safer than it looks once the centre stabilises.
Fischer Defense (3...d6)
1.e4 e5 2.f4 exf4 3.Nf3 d6 4.d4 g5 5.h4 g4
Bobby Fischer's recommended antidote: ...d6 first takes the e5 square away from the knight before Black grabs space with ...g5. It removes the Kieseritzky entirely, which is why prepared Black players reach for it.
Key ideas
- Sacrifice a pawn to grab central space and rapid development.
- Open the f-file and generate direct attacking chances.
- Put immediate practical pressure on unprepared opponents.
- A time-tested weapon that is still dangerous in modern play.
Typical plans and structures
After 2...exf4 3.Nf3, White plays d4 and Bc4 or Bd3, castles (sometimes by hand) and uses the half-open f-file as a highway to f7. If Black defends the extra pawn with ...g5, White strikes with h4 and Ne5 — the famous Kieseritzky complex, where every tempo carries mating threats. Against the declined lines (2...Bc5, 2...d5), White gets the space and freer play the gambit was designed for at no material cost. The course maps the critical defenses and the attacking geometry that decides them.
How to reach the King's Gambit
The King's Gambit is 1.e4 e5 2.f4. Black's main decision comes at once: 2...exf4 accepts the pawn, after which 3.Nf3 is the King's Knight's Gambit and 3.Bc4 the Bishop's Gambit; 2...Bc5 declines it, keeping the bishop on the a7-g1 diagonal that f4 weakened; and 2...d5, the Falkbeer Countergambit, strikes back in the center. In the accepted lines Black's third move defines the system: 3...g5 holds the pawn and invites the Kieseritzky 4.h4 g4 5.Ne5 or the Muzio 4.Bc4 g4 5.O-O; 3...d6 is Fischer's defense; 3...d5 and 3...Nf6 are the modern, more restrained treatments.
Pros and cons of the King's Gambit
Pros
- The most direct attacking opening in chess: open f-file, fast development and threats against f7 from move three.
- Black must know concrete theory to survive; an unprepared opponent is often lost by move fifteen.
- Rich in famous games and patterns, so the ideas are easy to study and remember.
- Sidesteps the Petrov, the Berlin and every quiet 1.e4 e5 defense.
Cons
- Theory considers it roughly equal at best; Black has several sound ways to accept or decline and keep the balance.
- The pawn on f4 weakens the white king: ...Qh4+ ideas and the open e1-h4 diagonal are permanent problems.
- The Kieseritzky and Muzio lines require exact knowledge; a half-remembered line loses material.
- Rare at master level since the 1930s for good reason: the risk is not matched by a lasting advantage.
How to play against the King's Gambit
Black has three sound approaches. Accepting with 2...exf4 and returning the pawn early is the modern choice: 3.Nf3 d5 or 3...Nf6, or Fischer's 3...d6 preparing ...g5 in a safer form, all give Black comfortable development and a target on the weakened king. Declining with 2...Bc5 keeps the bishop aimed at g1, discourages castling, and leads to a solid game after ...d6 and ...Nf6. The Falkbeer 2...d5 fights for the initiative and suits attacking players, though modern theory prefers the quieter options. What loses is greed: holding the f4-pawn with ...g5 and ...h6 against a prepared opponent invites the Kieseritzky and Muzio attacks that the opening was built around. Return the pawn, develop, and use the open lines against White's king as much as White uses them against yours.
Plans for both sides
White's plan
Regain the f4-pawn or ignore it, open the f-file with O-O and Nf3-e5, and attack f7 with Bc4, Qf3 and the rook. Keep the center with d4 and use the knight on e5 as the spearhead. Do not let Black consolidate the extra pawn with ...g5 and ...Bg7 for free; break with h4 or g3 at once.
Black's plan
Give the pawn back at the right moment, complete development, and turn the weakened e1-h4 diagonal and the missing f-pawn against White's king with ...Qh4+ and ...Bc5 ideas. Break with ...d5 to open the center while White's king is still on e1, and trade off White's attacking pieces, especially the knight that reaches e5.
Who should play it
Attacking players who want to seize the initiative early and are comfortable playing for the initiative over material.
History of the King's Gambit
The King's Gambit is one of the oldest openings in chess, analyzed by Ruy López in 1561 and the main battleground of the romantic era: Anderssen's Immortal Game of 1851 was a Bishop's Gambit, and the names Kieseritzky, Muzio, Allgaier, Falkbeer and Cunningham all come from nineteenth-century practice. Steinitz and the classical school pushed it aside, and Bobby Fischer's 1961 article "A Bust to the King's Gambit", proposing 3...d6, gave it a reputation it never fully recovered from, though Spassky beat Fischer himself with it in 1960. Bronstein, Spassky and later Short and Nakamura kept it alive as a surprise weapon, and it remains a favorite of attacking club players everywhere.
Study the King's Gambit move by move
The first 3 lines of the interactive course, exactly as a signed-out visitor can play them — each move with the coaching note shown on the board.
Line 1 — the main line
1.e4 We claim the center. 1...e5 Our opponent mirrors us. 2.f4 We enter the King's Gambit! This pawn sacrifice aims to open lines and activate our pieces quickly. 2...exf4 Our opponent accepts the sacrifice, potentially risking their own development. 3.Nf3 We develop the knight. 3...g5 Our opponent reinforces their pawn and aims to push our knight with g5 g4. 4.h4 We challenge our opponent's structure, aiming to provoke an overextension. 4...g4 Attacking our knight but leaving their pawns vulnerable. 5.Ne5 We jump into the center to sidestep the threat, now targeting the g4 pawn. 5...Nf6 Developing the knight and putting pressure on e4. 6.Nxg4 We capture their pawn. 6...Nxe4 Our opponent recovers the material. 7.d3 Pressuring their knight and activating our bishop to target their f4 pawn. 7...Ng3 Attacking our rook. 8.Bxf4 We sacrifice the rook to activate our bishop and create a strong attack on their king. 8...Nxh1 Our opponent captures the rook. 9.Qe2+ We check, launching a coordinated attack with our knight and bishop. 9...Qe7 Our opponent blocks with the queen. 10.Nf6+ We exploit the pin by checking with the knight. 10...Kd8 Our opponent is forced to reposition their king. 11.Bxc7+ We sacrifice our bishop forcing the king into a vulnerable spot where it can be forked. 11...Kxc7 Our opponent takes. 12.Nd5+ We fork their king and queen, recovering the material. 12...Kd8 Our opponent moves their king back to safety. 13.Nxe7 We capture their queen. 13...Bxe7 Our opponent takes back. 14.Qf3 We have captured their queen and have a comfortable position.
Line 2 — punishing a blunder
1.e4 We claim the center. 1...e5 Our opponent mirrors us. 2.f4 We enter the King's Gambit! This pawn sacrifice aims to open lines and activate our pieces quickly. 2...exf4 Our opponent accepts the sacrifice, potentially risking their own development. 3.Nf3 We develop the knight. 3...g5 Our opponent reinforces their pawn and aims to push our knight with g5 g4. 4.h4 We challenge our opponent's structure, aiming to provoke an overextension. 4...g4 Attacking our knight but leaving their pawns vulnerable. 5.Ne5 We jump into the center to sidestep the threat, now targeting the g4 pawn. 5...h5?! Our opponent pushes the h pawn to reinforce g4. 6.Bc4 We activate the bishop, coordinating with the knight to target f7. 6...Nh6 Our opponent defends the f7 pawn with the knight. 7.d4 We claim more central space and prepare to capture on f4. 7...d6 Attacking our knight to relieve pressure on f7. 8.Nd3 We retreat the knight, increasing pressure on f4. 8...f3 Our opponent chooses to give up the pawn this way, aiming to weaken our pawn structure. 9.gxf3 We capture the pawn. 9...gxf3 Our opponent takes back. 10.Qxf3 We capture with the queen, and we're already threatening Bxh6 to put pressure on f7. 10...Bg4 Our opponent develops their bishop with a tempo. 11.Qf2 We pull back. 11...Qe7 Our opponent activates their queen to protect f7 and target our e4 pawn. 12.Nc3 We bring out our knight to support e4. 12...Nd7 Our opponent develops their queenside knight, aiming to castle long. 13.Bg5 With strong central control, we punish our opponent's weaknesses by attacking their queen and exposing their king.
Line 3 — punishing a blunder
1.e4 We claim the center. 1...e5 Our opponent mirrors us. 2.f4 We enter the King's Gambit! This pawn sacrifice aims to open lines and activate our pieces quickly. 2...exf4 Our opponent accepts the sacrifice, potentially risking their own development. 3.Nf3 We develop the knight. 3...g5 Our opponent reinforces their pawn and aims to push our knight with g5 g4. 4.h4 We challenge our opponent's structure, aiming to provoke an overextension. 4...g4 Attacking our knight but leaving their pawns vulnerable. 5.Ne5 We jump into the center to sidestep the threat, now targeting the g4 pawn. 5...h5?! Our opponent pushes the h pawn to reinforce g4. 6.Bc4 We activate the bishop, coordinating with the knight to target f7. 6...Nh6 Our opponent defends the f7 pawn with the knight. 7.d4 We claim more central space and prepare to capture on f4. 7...d6 Attacking our knight to relieve pressure on f7. 8.Nd3 We retreat the knight, increasing pressure on f4. 8...Be7? Our opponent lines up queen and bishop to threaten the h4 pawn. 9.Bxf4 We capture on f4. 9...Bxh4+ Our opponent continues with their plan, capturing the pawn with a check. 10.g3 We block the check, counterattacking the bishop. 10...Bf6 Our opponent retreats, targeting the d4 pawn. 11.Rxh5 We capture on h4, putting pressure on the knight. 11...Bg7 Our opponent pulls back to protect the knight. 12.Qe2 We reposition the queen, x-raying our opponent's king. 12...Nc6 Our opponent develops the queenside knight, threatening to take on d4. 13.c3 Reinforcing the d4 pawn. 13...Bd7 Our opponent moves the bishop to clear the way for long castling. 14.Nd2 With excellent piece coordination, we keep up constant pressure against our opponent's passive pieces.
The free preview ends here — continue with all 20 lines in the interactive course, with instant feedback on every move you play.
Frequently asked questions
Is the King's Gambit playable in modern chess?
Yes — while it is rarer at elite level, it remains fully viable and dangerous below it. Modern engines have actually rehabilitated several lines once thought dubious, and the practical burden on Black — precise defense from move two — is as heavy as ever.
Should Black accept the King's Gambit?
Accepting with 2...exf4 is critical and best according to theory, but it commits Black to defending against a development storm. Declining with 2...Bc5 or countering with the Falkbeer 2...d5 avoids some sharpness at the cost of conceding White the center — the course prepares you for all three.
What is the main line of the King's Gambit?
The historical main line is 2...exf4 3.Nf3 g5, when Black holds the pawn with the g-pawn chain and White breaks it up with 4.h4 g4 5.Ne5 — the Kieseritzky Gambit, a battlefield since the 1850s that is still theoretically alive today.
Is the King's Gambit refuted?
No. Fischer's 1961 "bust" with 3...d6 gives Black a good game, and engines rate the opening as roughly equal rather than bad for White. It is rare at the top because it offers no lasting advantage, not because it loses; at club level it remains one of the most dangerous openings to face.
How do you play against the King's Gambit?
Accept with 2...exf4 and return the pawn early with 3...d5 or 3...Nf6, or play Fischer's 3...d6; declining with 2...Bc5 is the calm alternative. In every case, develop fast and aim your pieces at the weakened e1-h4 diagonal rather than clinging to the pawn.
Is the King's Gambit good for beginners?
It is a great opening for learning attack and initiative, and it wins many games at beginner level. The cost is a weakened king and a lot of concrete theory in the sharpest lines, so learn the main defenses before playing it in serious games.
Learn the King's Gambit with AI feedback
This page pairs the guide above with an interactive ChessMind AI course: a GM-authored repertoire you study move by move on a real board, then practice against a human-like chess AI opponent with instant feedback and spaced-repetition review, so the key positions actually stick. Start learning, jump straight into practice, or browse all opening courses.
New to a concept? Every term is defined in the chess terms glossary.