Evans Gambit
1.e4 e5 2.Nf3 Nc6 3.Bc4 Bc5 4.b4
The Evans Gambit (1.e4 e5 2.Nf3 Nc6 3.Bc4 Bc5 4.b4!?) is the crown jewel of romantic chess: White gives the b-pawn to gain tempo on the bishop, build a massive center with c3 and d4, and attack before Black finishes developing. Anderssen and Morphy scored immortal wins with it — and Kasparov revived it in the modern era.
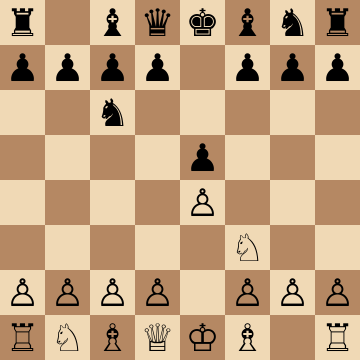
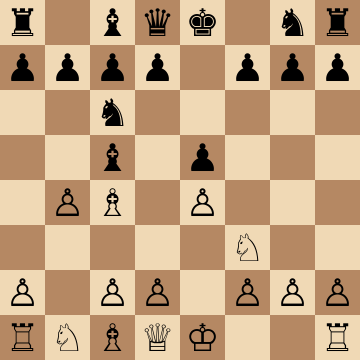
Mainline
1.e4 e5 2.Nf3 Nc6 3.Bc4 Bc5 4.b4 Bxb4 5.c3 Ba5 6.d4 exd4 7.O-O
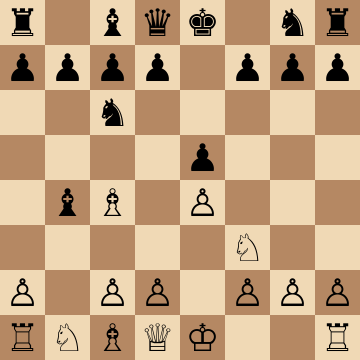
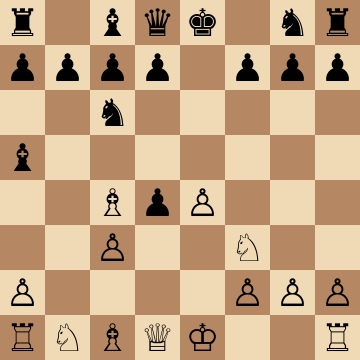
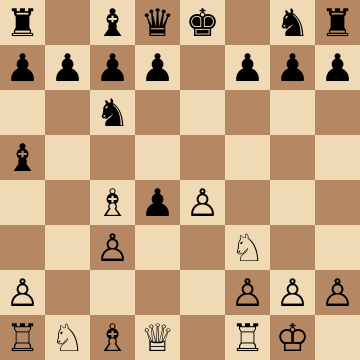
Compromised Defense: 7...dxc3
1.e4 e5 2.Nf3 Nc6 3.Bc4 Bc5 4.b4 Bxb4 5.c3 Ba5 6.d4 exd4 7.O-O dxc3 8.Qb3 Qf6 9.e5 Qg6 10.Nxc3 Nge7 11.Ba3
Taking a third pawn with 7...dxc3 is called the Compromised Defense for good reason. White gets everything the gambiteer dreams of: 8.Qb3 hits f7, 9.e5 gains time on the queen, 10.Nxc3 completes development, and 11.Ba3 freezes the black king in the center. Every White piece participates while Black's queenside sleeps — Rad1, Nd5 and central breakthroughs flow naturally. Material means nothing here; tempo is everything.
Evergreen Game Line: 7...d3
1.e4 e5 2.Nf3 Nc6 3.Bc4 Bc5 4.b4 Bxb4 5.c3 Ba5 6.d4 exd4 7.O-O d3 8.Qb3 Qf6 9.e5 Qg6 10.Re1 Nge7 11.Ba3
The 7...d3 pawn return tries to keep lines closed, and it produced the most celebrated game in chess history — Anderssen's Evergreen against Dufresne followed exactly this path. White simply ignores the d3-pawn: 8.Qb3 targets f7, 10.Re1 loads the e-file, and 11.Ba3 stops castling. The stray pawn on d3 falls whenever White wishes, while the attack down the center plays itself. A perfect illustration of why the Evans punishes passive defense.
Lasker Defense: 6...d6 Returning the Pawn
1.e4 e5 2.Nf3 Nc6 3.Bc4 Bc5 4.b4 Bxb4 5.c3 Ba5 6.d4 d6 7.Qb3 Qd7 8.dxe5 Bb6
Emanuel Lasker's defense once scared players away from the Evans: Black declines the center pawns, meets 7.Qb3 with 7...Qd7, and after 8.dxe5 retreats 8...Bb6, intending ...dxe5 with a solid, simplified position. The modern verdict is friendlier to White than Lasker's era believed — keep the queens on, develop with Nbd2 and a4, and use the space and easier development for a pleasant, riskless initiative rather than forcing matters.
Anderssen Defense 5...Be7 (Kasparov's 7.Be2)
1.e4 e5 2.Nf3 Nc6 3.Bc4 Bc5 4.b4 Bxb4 5.c3 Be7 6.d4 Na5 7.Be2 exd4 8.Qxd4 Nf6 9.e5 Nc6 10.Qh4 Nd5 11.Qg3
The modest retreat 5...Be7 is Black's most respected defense, and this is how Kasparov handled it in his famous win over Anand: 7.Be2 sidesteps the ...Na5 hit, 8.Qxd4 centralizes powerfully, and 9.e5 with 10.Qh4 chases Black's knights around the board. By 11.Qg3 White has a grip on the dark squares and pressure against g7 before Black has castled. The pawn deficit is temporary; the initiative is not.
Old Main Line: 5...Bc5 and the 8.d5 Push
1.e4 e5 2.Nf3 Nc6 3.Bc4 Bc5 4.b4 Bxb4 5.c3 Bc5 6.d4 exd4 7.cxd4 Bb6 8.d5 Na5 9.Bb2 Ne7 10.Bd3
Retreating to c5 lets White build the full pawn center, and 8.d5 fixes the advantage in space: the c6-knight is shoved to the rim, 9.Bb2 rakes the long diagonal at g7, and 10.Bd3 points everything at the black king. This is the classical Normal Position of Evans theory, beloved by Anderssen and Chigorin. The plan is direct — castle, bring the b1-knight to c3, and mass the pieces for a kingside strike while Black spends precious moves untangling the offside a5-knight.
Evans Gambit Declined: 4...Bb6
1.e4 e5 2.Nf3 Nc6 3.Bc4 Bc5 4.b4 Bb6 5.a4 a6 6.c3 Nf6 7.d3 d6 8.O-O
Declining with 4...Bb6 avoids the theoretical duel but hands White a free queenside expansion. The moves 5.a4 and 6.c3 gain space and prepare d4 under ideal conditions; note that grabbing with 5...Nxb4? runs into 6.a5, embarrassing the b6-bishop and regaining the material favorably. From the diagram, play the position like an improved Italian: d3, O-O, then d4 or the Nbd2-f1-g3 maneuver, with the extra queenside space paying dividends in every middlegame.
Key ideas
- Deflect the c5-bishop with 4.b4, then build the ideal center with c3 and d4 at full speed.
- Open lines while Black's queenside sleeps — every tempo of the gambit converts into attacking force.
- Aim the classic battery Bc4 plus Qb3 at f7, the weakest square in Black's camp.
- Learn the correct handling of the declined lines, where 4...Bb6 concedes White a pleasant space edge.
Typical plans and structures
After 4...Bxb4 5.c3 and 6.d4, White opens the center before Black can castle: typical follow-ups are Qb3 hitting f7, Ba3 preventing castling, and rooks flooding to the central files. Black's best defenses return the pawn for solidity, and the course shows how to keep a safe initiative there rather than overpressing. Against the declined 4...Bb6, White gains space with a4 and c3-d4 and plays a favorable Italian structure.
Who should play it
Attacking players who love open e4-e5 games and want a historically glorious, fully playable gambit that punishes routine development.
Study the Evans Gambit move by move
The first 3 lines of the interactive course, exactly as a signed-out visitor can play them — each move with the coaching note shown on the board.
Line 1 — punishing a blunder
1.e4 We take the center. 1...e5 Our opponent does the same, going for a double king's pawn opening. 2.Nf3 We develop our knight attacking the e5 pawn. 2...Nc6 Developing the knight and protecting the pawn. 3.Bc4 We launch an Italian Game. 3...Bc5 Our opponent chooses the Giuoco Piano, placing their bishop on the most active diagonal. 4.b4!? We go for the Evan's Gambit! We want to play c2 c3 and d2 d4, so we give up this pawn to do that with a tempo. Another motivation for this sacrifice is opening the a3 f8 diagonal, which can help us in attacking our opponent's king. 4...Bxb4 Our opponent takes the pawn with the bishop, this is the most common response. 5.c3 We play this move to take the center in the next move with d2 d4. 5...Ba5 The bishop retreats to a5 to keep an x-ray attack against our king. 6.d4 We take the center as planned. 6...exd4 Our opponent captures our pawn. The whole point of Black's previous move is that now we can't retake cxd4 because the pawn is pinned. 7.Qb3 We develop our queen, protecting our pawn on c3 and creating a threat against the f7 pawn. 7...Qe7 The queen develops, protecting the pawn on f7 and attacking our e4 pawn. 8.O-O We have to castle, to prevent ...Qxe4 taking the pawn with a check. 8...Bb6 Now that the pin is no longer there, our opponent moves the bishop to b6 to to protect their pawn on d4. 9.cxd4 We recapture the pawn, allowing some trades. 9...Nxd4 Capturing our pawn and forcing a trade. 10.Nxd4 We capture. 10...Bxd4 Our opponent retakes the knight and now threatens our rook on a1. 11.Nc3 We bring our knight into the game, threatening the usual Nd5 jump. 11...Nf6 Developing the knight, preventing the knight jump and preparing to castle. 12.Ba3 We activate our bishop hoping to prevent our opponent from castling. 12...d6 Blocking the diagonal, and hoping to castle in the next move. 13.Rad1 This is the best move for us, we activate our rook and force the bishop to decide where to go next. 13...Bb6?? Our opponent retreats with their bishop, giving us a key tempo to break in the center. 14.e5!! This is a standard tactical motif in the Evans Gambit, the pawn can't be captured with either queen or pawn, so we are winning with White.
Line 2 — the main line
1.e4 We take the center. 1...e5 Our opponent does the same, going for a double king's pawn opening. 2.Nf3 We develop our knight attacking the e5 pawn. 2...Nc6 Developing the knight and protecting the pawn. 3.Bc4 We launch an Italian Game. 3...Bc5 Our opponent chooses the Giuoco Piano, placing their bishop on the most active diagonal. 4.b4!? We go for the Evan's Gambit! We want to play c2 c3 and d2 d4, so we give up this pawn to do that with a tempo. Another motivation for this sacrifice is opening the a3 f8 diagonal, which can help us in attacking our opponent's king. 4...Bxb4 Our opponent takes the pawn with the bishop, this is the most common response. 5.c3 We play this move to take the center in the next move with d2 d4. 5...Ba5 The bishop retreats to a5 to keep an x-ray attack against our king. 6.d4 We take the center as planned. 6...exd4 Our opponent captures our pawn. The whole point of Black's previous move is that now we can't retake cxd4 because the pawn is pinned. 7.Qb3 We develop our queen, protecting our pawn on c3 and creating a threat against the f7 pawn. 7...Qe7 The queen develops, protecting the pawn on f7 and attacking our e4 pawn. 8.O-O We have to castle, to prevent ...Qxe4 taking the pawn with a check. 8...Bb6 Now that the pin is no longer there, our opponent moves the bishop to b6 to to protect their pawn on d4. 9.cxd4 We recapture the pawn, allowing some trades. 9...Nxd4 Capturing our pawn and forcing a trade. 10.Nxd4 We capture. 10...Bxd4 Our opponent retakes the knight and now threatens our rook on a1. 11.Nc3 We bring our knight into the game, threatening the usual Nd5 jump. 11...Nf6 Developing the knight, preventing the knight jump and preparing to castle. 12.Ba3 We activate our bishop hoping to prevent our opponent from castling. 12...d6 Blocking the diagonal, and hoping to castle in the next move. 13.Rad1 This is the best move for us, we activate our rook and force the bishop to decide where to go next. 13...Bxc3 This trade is necessary, because Black can't wait even one more move before castling. 14.Qxc3 We recapture the piece. 14...O-O Our opponent gets their king away from the center right on time. 15.Rfe1 We activate our rook, and plan to break with e4 e5 next. We are two pawns down, but have enough compensation for them, due to our strong bishop pair and excellent coordination.
Line 3 — against an inaccuracy
1.e4 We take the center. 1...e5 Our opponent does the same, going for a double king's pawn opening. 2.Nf3 We develop our knight attacking the e5 pawn. 2...Nc6 Developing the knight and protecting the pawn. 3.Bc4 We launch an Italian Game. 3...Bc5 Our opponent chooses the Giuoco Piano, placing their bishop on the most active diagonal. 4.b4!? We go for the Evan's Gambit! We want to play c2 c3 and d2 d4, so we give up this pawn to do that with a tempo. Another motivation for this sacrifice is opening the a3 f8 diagonal, which can help us in attacking our opponent's king. 4...Bxb4 Our opponent takes the pawn with the bishop, this is the most common response. 5.c3 We play this move to take the center in the next move with d2 d4. 5...Ba5 The bishop retreats to a5 to keep an x-ray attack against our king. 6.d4 We take the center as planned. 6...exd4 Our opponent captures our pawn. The whole point of Black's previous move is that now we can't retake cxd4 because the pawn is pinned. 7.Qb3 We develop our queen, protecting our pawn on c3 and creating a threat against the f7 pawn. 7...Qe7 The queen develops, protecting the pawn on f7 and attacking our e4 pawn. 8.O-O We have to castle, to prevent ...Qxe4 taking the pawn with a check. 8...Nf6 Developing the knight, clearing the way to castle short and threatening our e4 pawn. 9.cxd4 We recapture, establishing a strong center, and threatening Ba3 combined with e4 e5 next. 9...Nxe4 Taking the pawn is not just about the material, our opponent also needs to take this pawn in order to neutralize our very strong e4 e5 break. 10.Ba3 We activate our bishop attacking the queen. 10...d6 Our opponent has to block this diagonal if they plan to castle. 11.Bd3 We attack the knight on e4, creating an unstoppable threat for a double attack, we'll see it next. 11...O-O Castling, there's nothing better. 12.d5 We advance this pawn to kick out the knight and to prepare Qa4 with a double attack. 12...Nb8 The knight goes away, there are no better squares. 13.Qa4 This is the point of our prior two moves, we are attacking the knight and bishop. 13...Nxf2 The knight is lost, so it might as well capture a pawn on its way out. 14.Rxf2 This is the best response (we don't want to expose our king), this means we are also giving up the exchange next. 14...Bb6 Black will capture on f2 very soon. 15.Qc2 We are going to play with two minor pieces against a rook and three pawns, which may seem like a lot of material. However, White's pieces are very well placed compared to Black's undeveloped queenside, we actually have the upper hand.
The free preview ends here — continue with all 19 lines in the interactive course, with instant feedback on every move you play.
Frequently asked questions
Is the Evans Gambit still playable in modern chess?
Absolutely — Garry Kasparov famously beat Anand with it in 1995, and it remains a dangerous practical weapon at every level. Black can equalize with deep preparation, but the margin for error is thin and the resulting positions still favor the attacker's understanding.
What does White get for the pawn in the Evans Gambit?
Time and the center: the attacked bishop must move again, White plays c3 and d4 with tempo, and the lines open while Black's queenside is untouched. It is the purest demonstration of converting material into initiative in the whole opening repertoire.
Should Black accept or decline the Evans Gambit?
Accepting with 4...Bxb4 is critical but demands precise knowledge; declining with 4...Bb6 is safer but concedes White a comfortable space advantage without any material investment. This course prepares you to profit against both decisions.
Learn the Evans Gambit with AI feedback
This page pairs the guide above with an interactive ChessMind AI course: a GM-authored repertoire you study move by move on a real board, then practice against a human-like chess AI opponent with instant feedback and spaced-repetition review, so the key positions actually stick. Start learning, jump straight into practice, or browse all opening courses.
New to a concept? Every term is defined in the chess terms glossary.