King's Indian with ...e5
1.d4 Nf6 2.c4 g6 3.Nc3 Bg7
The classical King's Indian with ...e5 is chess's great attacking defense: Black closes the center, points every piece at White's king, and plays the ...f5-f4 pawn storm that has produced more brilliancies than any other Black setup. Kasparov's weapon; Radjabov's weapon; maybe yours.
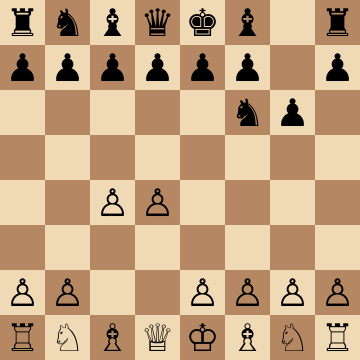
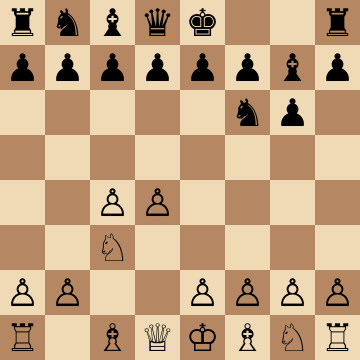
Mainline
1.d4 Nf6 2.c4 g6 3.Nc3 Bg7 4.e4 d6 5.Nf3 O-O 6.Be2 e5 7.O-O Nc6 8.d5 Ne7
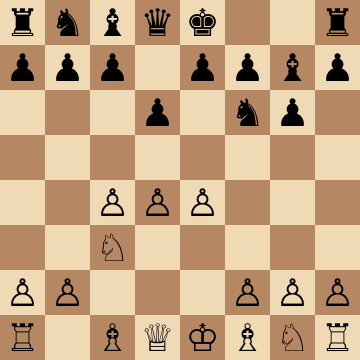
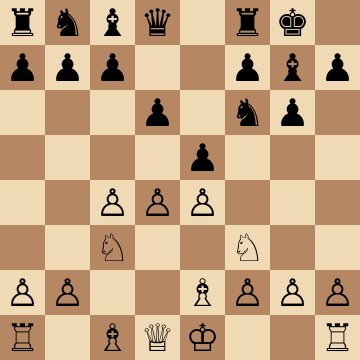
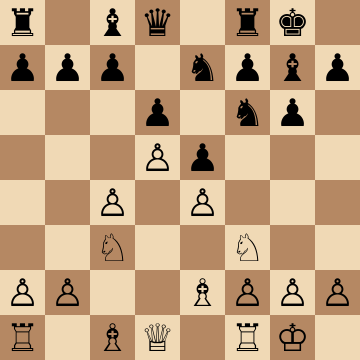
Mar del Plata: 9.Ne1 and ...f5
1.d4 Nf6 2.c4 g6 3.Nc3 Bg7 4.e4 d6 5.Nf3 O-O 6.Be2 e5 7.O-O Nc6 8.d5 Ne7 9.Ne1 Nd7 10.Be3 f5 11.f3 f4 12.Bf2 g5
The most famous race in chess. White's 9.Ne1 clears the way for c5 and queenside invasion; Black answers 9...Nd7 and launches the storm: ...f5, ...f4, ...g5-g4 with every piece flowing kingside behind the pawns. The golden rule for Black — ignore the queenside. Even a lost rook on a8 does not matter if ...g3 crashes through first. Learn the standard sacrifices on g4 and h3; they are the line's main currency.
Bayonet Attack (9.b4)
1.d4 Nf6 2.c4 g6 3.Nc3 Bg7 4.e4 d6 5.Nf3 O-O 6.Be2 e5 7.O-O Nc6 8.d5 Ne7 9.b4 Nh5 10.Re1 f5 11.Ng5 Nf4 12.Bxf4 exf4
Kramnik's 9.b4 is the modern main line and the sternest test of the classical King's Indian: White starts the queenside attack a full move faster. Black's best answer is immediate activity — 9...Nh5 eyes f4, and after 11.Ng5 Nf4 12.Bxf4 exf4 the g7 bishop wakes up and the f-pawn cramps White's kingside. Play ...h6, ...fxe4 or ...Nf6 depending on White's setup; the course maps each branch with clear piece routes.
Classical 9.Nd2 with ...a5
1.d4 Nf6 2.c4 g6 3.Nc3 Bg7 4.e4 d6 5.Nf3 O-O 6.Be2 e5 7.O-O Nc6 8.d5 Ne7 9.Nd2 a5 10.Rb1 Nd7 11.a3 f5 12.b4 Kh8
The old main line: 9.Nd2 reroutes toward c4 and b-file play, and Black's precise 9...a5 slows the expansion before returning to business with ...Nd7 and ...f5. The kingside plan is the same beloved storm — ...f4, ...g5, rook lifts via f6 — but here Black has bought extra time on the other wing. The prophylactic 12...Kh8 sidesteps tactical tricks on g8 before committing to ...f4 or the flexible ...b6.
Exchange Variation (7.dxe5)
1.d4 Nf6 2.c4 g6 3.Nc3 Bg7 4.e4 d6 5.Nf3 O-O 6.Be2 e5 7.dxe5 dxe5 8.Qxd8 Rxd8 9.Bg5 Re8 10.Nd5 Nxd5 11.cxd5 c6
Trading queens is how solid players try to bore the King's Indian to death — do not oblige them. After 9.Bg5 Re8 10.Nd5, the accurate 10...Nxd5 11.cxd5 c6! dissolves White's grip immediately: the d5 pawn trades off or becomes weak, and Black's active pieces and kingside majority give real endgame winning chances. Know this equalizing sequence and the Exchange Variation loses all its sting.
Petrosian System (7.d5)
1.d4 Nf6 2.c4 g6 3.Nc3 Bg7 4.e4 d6 5.Nf3 O-O 6.Be2 e5 7.d5 a5 8.Bg5 h6 9.Bh4 Na6
Closing the center a move early, White intends Bg5 to pin the ...f5 plan into paralysis. Black's remedy is well established: 7...a5 secures the c5-square, ...h6 and the flexible ...Na6-c5 follow, and only then comes the kingside play with ...Qe8, ...Nh7 or ...Bd7. Patience is the theme — break the pin, install the knight on c5, and the classical ...f5 storm proceeds with all its usual force one setup phase later.
Fianchetto Variation (...Nbd7 and ...c6)
1.d4 Nf6 2.c4 g6 3.Nf3 Bg7 4.g3 O-O 5.Bg2 d6 6.O-O Nbd7 7.Nc3 e5 8.e4 c6
Against the fianchetto, the raw kingside storm rarely works — the g2 bishop defends everything — so Black shifts to a central strategy. The classical setup ...Nbd7, ...e5 and ...c6 keeps every option alive: ...exd4 with piece play, ...a6 and ...b5 expansion, or a well-timed ...Qb6 hitting b2 and d4. The struggle is slower and more positional here, and the course shows exactly where the winning attempts hide for Black.
Key ideas
- Strike with ...e5 and welcome the closed center — the locked pawns are the launchpad for the attack.
- Execute the sacred plan: ...f5, ...f4, ...g5-g4 with every piece flowing kingside.
- Understand the race: White queens on the queenside file while Black mates — tempo counting decides.
- Cover the whole classical family: Mar del Plata, the Fianchetto system, Exchange endgames and more.
Typical plans and structures
In the Mar del Plata main line (7...Nc6 8.d5 Ne7), the plans are famously pure: White plays c5, Nd2-c4 and the b-file invasion; Black answers ...f5, ...f4, ...g5 and the g-file storm with ...Rf6-h6 lifts and piece sacrifices on g4 or h3 as standard equipment. Against the Fianchetto and Exchange variations the course shifts gears — showing where ...e5 play turns positional and how Black still fights for the full point.
Who should play it
Attacking players willing to study plans deeply and accept double-edged races — the KID with ...e5 rewards courage and preparation like nothing else.
Study the King's Indian with ...e5 move by move
The first 3 lines of the interactive course, exactly as a signed-out visitor can play them — each move with the coaching note shown on the board.
Line 1 — punishing a blunder
1.d4 Our opponent takes the center. 1...Nf6 We control the center indirectly with our knight. 2.c4 Taking even more control of the center. 2...g6 We prepare to Fianchetto on the kingside. 3.Nc3 Developing the knight, and preparing to take even more center with e2 e4 in the future. 3...Bg7 We are officially playing the King's Indian Defense! We fianchetto our bishop and plan to castle short. 4.e4 By adding a third pawn to the center, our opponent prevents us from changing our mind and going for a Grunfeld. 4...d6 There's a chance our opponent might want to play e4 e5, so we play this move right away. In these positions we always play for the dark squares. In this course, we review those lines where Black's recommended approach is ... e7 e5. 5.Nf3 Developing the knight with the most standard setup. 5...O-O We castle short. 6.Be2 Our opponent goes for a Classical variation against the King's Indian. 6...e5 We break in the center. 7.d5 Choosing the Petrosian System! This move is a great option to get a positional game while avoiding a lot of theory. 7...a5 We play this move to make it harder for our opponent to advance b2 b4 and c4 c5. Also, we like to secure the c5 square for our knight in some variations. 8.Bg5 Developing the bishop, and somewhat disrupting our development (we're planning to remove the knight and play ...f7 f5 sooner or later). 8...h6 Typical response, we want to know right away where this bishop is going (retreating or maintaining the pin). If it retreats to e3, we can jump ...Ng4 followed by ...f7 f5. 9.Bh4 The bishop maintains the pin, this is the main line. 9...Na6 We develop our knight, making it even harder to advance b2 b4 and c4 c5. 10.Nd2 The knight jumps to d2, partially, to prevent ideas like ...g6 g5 and ...Nh5. Another reason is that, once White manages to break with c4 c5, they like to have a knight jump to c4. 10...Qe8 We move our queen away from the pin. 11.O-O Castling short, the only typical option in these lines. 11...Nh7 We move our knight to clear the way for a possible ... f7 f5 break, as well as other ideas like ...h6 h5 threatening to trap the bishop. 12.a3 Our opponent threatens to play b2 b4 next move, taking advantage of a pin along the a file (we can't trade and take the pawn with our knight, the rook would be hanging). 12...Bd7 We develop our bishop, connecting queen and rook (no longer hanging), and threatening ...a5 a4 to make the queenside expansion more difficult. 13.b3 This is a standard response. The point is: if we push ...a5 a4, they can respond with b3 b4 leaving our pawn seriously vulnerable. White's plan is to play Rb1 and b3 b4 sooner or later. 13...h5 We take some space on the kingside, and threaten to trap the bishop with ...g6 g5 and ...h5 h4. We also clear the h6 square for our bishop. 14.f3 Clearing the f2 square for the bishop to scape. 14...Bh6 We activate our bishop, and create the possibility of a ...Be3+. 15.Bf2 Our opponent stops us from delivering that check. 15...Qe7 We play this move to prepare . ..h4 to gain more space on the kingside. We also threaten ...Qg5 (attacking the knight) followed by ...Bh3. 16.Qc2 Developing the queen and clearing some squares to facilitate a defense of the kingside. 16...h4 We advance on the kingside, and prepare a promising attack. 17.Rab1 Our opponent continues with their usual plan. They will do b3 b4 and c4 c5 very soon if we let them. 17...Bf4 We play this move to increase our influence on the kingside. In particular, we plan ...Qg5 making it harder to push g2 g3. 18.b4? So far the game was kind of balanced, but this move is a serious mistake (yet very common even at master level). We have a very strong response. 18...Qg5! We activate our queen gaining a tempo, by attacking the knight on d2. 19.Rfd1 The rook protects the knight, there's no better options. 19...Bh3 We attack on g2, and prepare ...Bxg2 followed by ...h4 h3 next. We'll likely end up with a pawn up plus a very serious attack.
Line 2 — the main line
1.d4 Our opponent takes the center. 1...Nf6 We control the center indirectly with our knight. 2.c4 Taking even more control of the center. 2...g6 We prepare to Fianchetto on the kingside. 3.Nc3 Developing the knight, and preparing to take even more center with e2 e4 in the future. 3...Bg7 We are officially playing the King's Indian Defense! We fianchetto our bishop and plan to castle short. 4.e4 By adding a third pawn to the center, our opponent prevents us from changing our mind and going for a Grunfeld. 4...d6 There's a chance our opponent might want to play e4 e5, so we play this move right away. In these positions we always play for the dark squares. In this course, we review those lines where Black's recommended approach is ... e7 e5. 5.Nf3 Developing the knight with the most standard setup. 5...O-O We castle short. 6.Be2 Our opponent goes for a Classical variation against the King's Indian. 6...e5 We break in the center. 7.d5 Choosing the Petrosian System! This move is a great option to get a positional game while avoiding a lot of theory. 7...a5 We play this move to make it harder for our opponent to advance b2 b4 and c4 c5. Also, we like to secure the c5 square for our knight in some variations. 8.Bg5 Developing the bishop, and somewhat disrupting our development (we're planning to remove the knight and play ...f7 f5 sooner or later). 8...h6 Typical response, we want to know right away where this bishop is going (retreating or maintaining the pin). If it retreats to e3, we can jump ...Ng4 followed by ...f7 f5. 9.Bh4 The bishop maintains the pin, this is the main line. 9...Na6 We develop our knight, making it even harder to advance b2 b4 and c4 c5. 10.Nd2 The knight jumps to d2, partially, to prevent ideas like ...g6 g5 and ...Nh5. Another reason is that, once White manages to break with c4 c5, they like to have a knight jump to c4. 10...Qe8 We move our queen away from the pin. 11.O-O Castling short, the only typical option in these lines. 11...Nh7 We move our knight to clear the way for a possible ... f7 f5 break, as well as other ideas like ...h6 h5 threatening to trap the bishop. 12.a3 Our opponent threatens to play b2 b4 next move, taking advantage of a pin along the a file (we can't trade and take the pawn with our knight, the rook would be hanging). 12...Bd7 We develop our bishop, connecting queen and rook (no longer hanging), and threatening ...a5 a4 to make the queenside expansion more difficult. 13.b3 This is a standard response. The point is: if we push ...a5 a4, they can respond with b3 b4 leaving our pawn seriously vulnerable. White's plan is to play Rb1 and b3 b4 sooner or later. 13...h5 We take some space on the kingside, and threaten to trap the bishop with ...g6 g5 and ...h5 h4. We also clear the h6 square for our bishop. 14.f3 Clearing the f2 square for the bishop to scape. 14...Bh6 We activate our bishop, and create the possibility of a ...Be3+. 15.Rb1 Our opponent ignores our plan to give a check on e3, and just focuses on their goal: pushing b3 b4 to expand on the queenside. 15...Be3+ We give the check. Typically, the dark squared bishop is the bad bishop in this pawn structure, but now that the bishop is outside the pawn chain, it is very strong. 16.Kh1 The king goes away, the other option was trading dark squared bishops, which is typically very OK for Black. 16...Bc5 We play a clever move. Our bishop takes on a strong outpost on c5, attacks the a3 pawn and makes it even harder to push b3 b4. 17.Qc1 Protecting the a3 pawn. 17...c6 Another interesting idea. We create the possibility of trading pawns on d5, but will only do it under very specific circumstances (otherwise, we just keep the tension). 18.Na2 This is exactly what we were expecting when we played ...c7 c6. This weird-looking move is actually standard, and it's the easiest way for White to finally achieve their goal of pushing b3 b4. 18...cxd5 We trade pawns on d5, this was the whole point! Since our opponent will play b3 b4 hoping for c4 c5, we just trade pawns eliminating the possibility of a future c4 c5 break. 19.cxd5 Recapturing the pawn. We enter a King's Indian Type 1 structure (White would like to play on the c file, and place a knight on c4 among other ideas). 19...b5! Our plan is complete, and we have a great position. Our opponent's entire queenside plan has been neutralized, it's hard for our opponent to invade along the c file since all squares are covered so well, and they can't even jump knight to c4.
Line 3 — the main line
1.d4 Our opponent takes the center. 1...Nf6 We control the center indirectly with our knight. 2.c4 Taking even more control of the center. 2...g6 We prepare to Fianchetto on the kingside. 3.Nc3 Developing the knight, and preparing to take even more center with e2 e4 in the future. 3...Bg7 We are officially playing the King's Indian Defense! We fianchetto our bishop and plan to castle short. 4.e4 By adding a third pawn to the center, our opponent prevents us from changing our mind and going for a Grunfeld. 4...d6 There's a chance our opponent might want to play e4 e5, so we play this move right away. In these positions we always play for the dark squares. In this course, we review those lines where Black's recommended approach is ... e7 e5. 5.Nf3 Developing the knight with the most standard setup. 5...O-O We castle short. 6.Be2 Our opponent goes for a Classical variation against the King's Indian. 6...e5 We break in the center. 7.O-O Our opponent castles, inviting the Mar del Plata variation. 7...Nc6 We accept the challenge, entering one of the coolest variations in all of chess. We're putting pressure on d4, threatening ...exd4 and ...Nxe4, so our opponent is forced to react. 8.d5 Closing the center to eliminate the central tension, and setup a typical Kingsindian Type 3 structure. 8...Ne7 The knight reroutes to this square, where it supports the ...f7 f5 break and may maneuver into the kingside via g6 f4 as well. White has lots of continuations, but they all revolve around the typical c4 c5 break on the queenside. 9.Ne1 Our opponent wants to play Be3 to support c4 c5, so they play Ne1 to prevent the response ...Ng4 disrupting the bishop. The knight is actually a little nicer on d2, but that would prevent the bishop from developing in the first place. 9...Nd7 We move our knight out of the way to prepare the ...f7 f5 break. 10.Be3 Developing the bishop as planned. 10...f5 We attack the base of the pawn chain, and may add pressure next move with ...Nf6 if needed. 11.f3 Our opponent supports the pawn right away. 11...f4 Since our opponent already played f2 f3, it makes sense for us to push and attack on the kingside. Notice we don't necessarily rush this advance if f2 f3 hasn't been played, because then Bg4 from White might be an annoying response. 12.Bf2 The bishop goes away while staying on the g1 a7 diagonal (supporting the queenside play with c4 c5). 12...g5 We expand on the kingside, our plan is to attack the base of the chain again with ...g5 g4. 13.Nd3 The knight activates and prepares the c4 c5 break again. 13...Ng6 Our knight moves to g6 clearing the 7th rank, part of our standard setup. 14.c5 The break is achieved, and one positional threat is c5 c6, so we move our knight away from this. 14...Nf6 This move increases our control of the g4 square, we may continue with ...h7 h5 and the ...g5 g4 break. 15.Rc1 Our opponent wants to invade along the c file. One typical way is trading pawns on d6 followed by Nb5-Nc7-Ne6 with a very good position. 15...Rf7 This is our typical setup, the rook on f7 does a great job covering the c7 square. Also, we can play ...Bf8 if we ever need to protect our d6 pawn. We have a very interesting position with chances for both.
The free preview ends here — continue with all 19 lines in the interactive course, with instant feedback on every move you play.
Frequently asked questions
Is the King's Indian sound at high levels?
Yes — it has been a world-championship weapon for seventy years, from Bronstein and Fischer to Kasparov, and modern engines have refreshed rather than refuted it. White gets serious tries, but Black's attacking resources keep proving sufficient.
What is the Mar del Plata variation?
The iconic main line: 6.Be2 e5 7.O-O Nc6 8.d5 Ne7, named for a 1953 game in Mar del Plata, Argentina. It defines the KID's soul — White storms the queenside, Black storms the king, and the fastest attack wins.
What if White avoids the main lines with the Exchange Variation?
After dxe5 dxe5 and the queen trade, White hopes for a dull edge — but Black equalizes comfortably with accurate play and keeps winning chances thanks to the better minor pieces in many endings. The course gives the precise antidote so the 'drawing line' holds no fear.
Learn the King's Indian with ...e5 with AI feedback
This page pairs the guide above with an interactive ChessMind AI course: a GM-authored repertoire you study move by move on a real board, then practice against a human-like chess AI opponent with instant feedback and spaced-repetition review, so the key positions actually stick. Start learning, jump straight into practice, or browse all opening courses.
New to a concept? Every term is defined in the chess terms glossary.