Benko Gambit
1.d4 Nf6 2.c4 c5 3.d5 b5
The Benko Gambit (1.d4 Nf6 2.c4 c5 3.d5 b5) trades a single pawn for something money can't buy: permanent, easy-to-play pressure. Black's rooks land on the open a- and b-files, the Bg7 rakes the long diagonal, and White spends the whole game defending — often still suffering deep into the endgame.
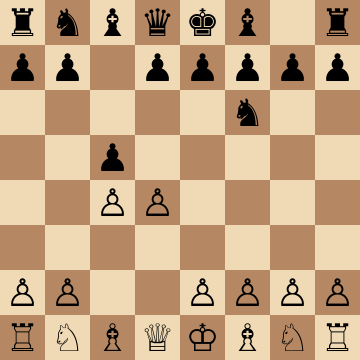
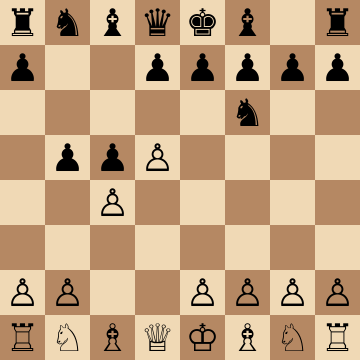
Mainline
1.d4 Nf6 2.c4 c5 3.d5 b5 4.cxb5 a6 5.bxa6 g6 6.Nc3 Bxa6 7.Nf3 d6 8.g3 Bg7
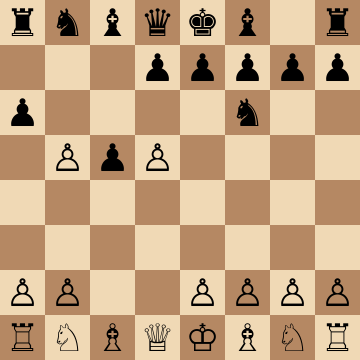
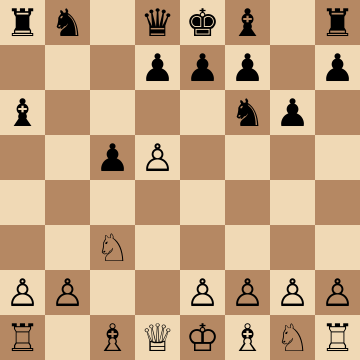
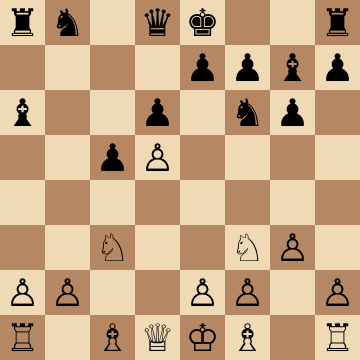
Fianchetto Main Line (Fully Accepted)
1.d4 Nf6 2.c4 c5 3.d5 b5 4.cxb5 a6 5.bxa6 g6 6.Nc3 Bxa6 7.Nf3 d6 8.g3 Bg7 9.Bg2 Nbd7 10.O-O O-O
White's most respected treatment: the g2-bishop reinforces d5 and the king tucks away. Black's setup writes itself — ...Nbd7-b6, queen to a5 or b6, rooks to a8 and b8 — and then the pressure begins. The key understanding is that Black is in no hurry: every trade of minor pieces makes the a- and b-file pressure heavier, and the endgame a pawn down is often winning for Black because White's queenside cannot advance.
King Walk Line (7.e4 Bxf1)
1.d4 Nf6 2.c4 c5 3.d5 b5 4.cxb5 a6 5.bxa6 g6 6.Nc3 Bxa6 7.e4 Bxf1 8.Kxf1 d6 9.g3 Bg7 10.Kg2 O-O
Grabbing the full center with 7.e4 costs White castling rights after 7...Bxf1 8.Kxf1, and the king spends two more tempi reaching g2. Those tempi are Benko gold: Black castles, doubles on the a-file and plants a knight on b6 or g4-e5 before White's rooks are even connected. Play ...Nbd7, ...Qa5 or ...Qb6 and ...Rfb8, and remember the thematic ...e6 break if White ever overextends with e5.
Half-Accepted: the 5.b6 Return
1.d4 Nf6 2.c4 c5 3.d5 b5 4.cxb5 a6 5.b6 Qxb6 6.Nc3 d6 7.e4 g6 8.Nf3 Bg7
Returning the pawn with 5.b6 tries to deny Black the open files that define the gambit. The clean answer is 5...Qxb6: the queen is well placed on b6, hitting b2 and supporting ...c4-ideas, and Black keeps the a6-square for the bishop. Continue with ...g6, ...Bg7 and ...O-O, then generate play with ...a5-a4 or the central ...e6 break — a comfortable, risk-free version of the Benko where Black is not even a pawn down.
Nescafe Frappe Attack (5.Nc3!?)
1.d4 Nf6 2.c4 c5 3.d5 b5 4.cxb5 a6 5.Nc3 axb5 6.e4 b4 7.Nb5 d6 8.Bf4 g5 9.Bxg5 Nxe4
White's trickiest sideline: the knight leaps to b5 eyeing d6 and c7, and 8.Bf4 piles onto d6. Black must know the antidote — the cold-blooded 8...g5! 9.Bxg5 Nxe4, hitting the g5-bishop and breaking the grip by force. The complications favor the prepared player: Black regains the piece or emerges with a monster on e4 and open lines everywhere. Unprepared, this line is exactly where Benko players get ambushed.
Quiet 5.e3 and the ...Qa5+ Trick
1.d4 Nf6 2.c4 c5 3.d5 b5 4.cxb5 a6 5.e3 axb5 6.Bxb5 Qa5+ 7.Nc3 Bb7
A modest-looking decline with a concrete tactical flaw: after 5...axb5 6.Bxb5 Black inserts 6...Qa5+, and suddenly the b5-bishop and the d5-pawn are both loose. 7.Nc3 Bb7 keeps piling on d5 and the long diagonal, and White is already the one solving problems. Even when White wriggles out, Black gets normal Benko pressure with the extra bonus of an exposed bishop on b5 to harass with ...Ne4 or ...Bxc3 ideas.
Key ideas
- Sacrifice the b-pawn to open the a- and b-files where Black's rooks dominate for the rest of the game.
- Fianchetto with ...g6 and ...Bg7, adding relentless pressure on the a1-h8 diagonal.
- Play the same clear plan every game: ...Nbd7, ...Qa5 or ...Qb6, doubling on the open files.
- Enjoy an endgame paradox: even with queens off, Black's activity often outweighs the missing pawn.
Typical plans and structures
Black's play flows on the queenside: rooks to a8 and b8, queen to a5 or b6, knights maneuvering to b6, c7-b5 or g4-e5, always pressing a2, b2 and White's cramped queenside majority. White usually tries to consolidate with Nf3, g3 and Bg2 or an early e4 with f3 — the course shows how to keep the initiative against each setup and when to regain the pawn on favorable terms. Even simplified positions stay unpleasant for White.
Who should play it
Players who want an active, strategic answer to 1.d4 with plans they can master once and apply forever — ideal if you prefer initiative over material.
Study the Benko Gambit move by move
The first 3 lines of the interactive course, exactly as a signed-out visitor can play them — each move with the coaching note shown on the board.
Line 1 — the main line
1.d4 Our opponent claims the center. 1...Nf6 We develop the knight. 2.c4 White expands on the queenside. 2...c5 We challenge their center with a pawn break. 3.d5 Our opponent pushes the pawn, aiming to gain space. 3...b5 We give up a pawn to undermine their center and activate our pieces with tempo. 4.cxb5 Our opponent accepts the sacrifice. 4...a6 We offer a pawn trade to develop our bishop. 5.bxa6 Our opponent takes on a6. 5...g6 We prepare to fianchetto the dark squared bishop. 6.Nc3 Our opponent brings out their knight. 6...Bxa6 We recapture on a6, activating the bishop. 7.e4 White grabs space in the center, offering a bishop trade. 7...Bxf1 We take the bishop. 8.Kxf1 Our opponent recaptures, losing castling rights but hoping to reach g2 after g2 g3. 8...d6 We prevent their pawns from pushing forward. 9.g3 Making room for their king. 9...Bg7 We fianchetto the bishop, a key piece for attacking dark squares and the b2 pawn. 10.Kg2 White sticks to their plan. 10...O-O We castle. 11.Qc2 Our opponent develops the queen. 11...Na6 We activate the knight, aiming for ...Nb4. 12.Nf3 Our opponent brings out their knight, freeing the h1 rook. 12...Nb4 We jump with the knight, gaining a tempo on their queen. 13.Qd1 Our opponent pulls the queen back to its starting square. 13...Qb6 We activate the queen, building pressure on the b file. 14.Bd2 Our opponent develops their bishop. 14...Nd3 We exploit our opponent's weaknesses and will soon regain the material with an initiative edge.
Line 2 — the main line
1.d4 Our opponent claims the center. 1...Nf6 We develop the knight. 2.c4 White expands on the queenside. 2...c5 We challenge their center with a pawn break. 3.d5 Our opponent pushes the pawn, aiming to gain space. 3...b5 We give up a pawn to undermine their center and activate our pieces with tempo. 4.cxb5 Our opponent accepts the sacrifice. 4...a6 We offer a pawn trade to develop our bishop. 5.bxa6 Our opponent takes on a6. 5...g6 We prepare to fianchetto the dark squared bishop. 6.Nc3 Our opponent brings out their knight. 6...Bxa6 We recapture on a6, activating the bishop. 7.e4 White grabs space in the center, offering a bishop trade. 7...Bxf1 We take the bishop. 8.Kxf1 Our opponent recaptures, losing castling rights but hoping to reach g2 after g2 g3. 8...d6 We prevent their pawns from pushing forward. 9.Qe2 White activates their queen. 9...Nbd7 We develop the knight to increase our control over e5. 10.f4 White expands on the kingside. 10...Bg7 We fianchetto the bishop and prepare to castle. 11.Nf3 Our opponent brings out their knight. 11...O-O We castle. 12.h3 White clears h2 for their king. 12...Nh5 We reposition the knight, threatening a fork on g3 and clearing our bishop's diagonal, with strong pressure on their king.
Line 3 — the main line
1.d4 Our opponent claims the center. 1...Nf6 We develop the knight. 2.c4 White expands on the queenside. 2...c5 We challenge their center with a pawn break. 3.d5 Our opponent pushes the pawn, aiming to gain space. 3...b5 We give up a pawn to undermine their center and activate our pieces with tempo. 4.cxb5 Our opponent accepts the sacrifice. 4...a6 We offer a pawn trade to develop our bishop. 5.bxa6 Our opponent takes on a6. 5...g6 We prepare to fianchetto the dark squared bishop. 6.Nc3 Our opponent brings out their knight. 6...Bxa6 We recapture on a6, activating the bishop. 7.Nf3 Our opponent develops the knight. 7...d6 We block their d5 pawn and clear space to develop the knight. 8.e4 Our opponent takes central space and offers a bishopt trade. 8...Bxf1 We capture on f1. 9.Kxf1 Our opponent recaptures with the king, losing castling rights and aiming for Kg2. 9...Bg7 We activate the bishop and prepare to castle. 10.g3 Our opponent sticks to their plan. 10...O-O We castle. 11.Kg2 White brings the king to g2, freeing the rook. 11...Nbd7 We bring out the knight. 12.Be3 Our opponent develops the bishop. 12...Ng4 We jump in with the knight, threatening to capture their bishop and double their pawns. 13.Re1 Reinforcing the bishop. 13...Nxe3+ We have the edge with an active bishop and open files for our rooks, while neutralizing their center.
The free preview ends here — continue with all 11 lines in the interactive course, with instant feedback on every move you play.
Frequently asked questions
Is the Benko Gambit sound at higher levels?
Yes — it has been employed by world-class players, including Veselin Topalov and Magnus Carlsen on occasion. White can fight for an edge, but Black's compensation is long-term and structural, not a trick that gets refuted.
What happens if White declines the Benko Gambit?
Declining with 4.Nf3, 4.Qc2 or the modern 4.cxb5 a6 5.b6 avoids the main lines but gives Black easy equality or a comfortable version of Benoni-style play. The course covers every major declining setup.
Why play the Benko instead of a mainstream defense to 1.d4?
Because the plans repeat from game to game, your preparation compounds: instead of an ocean of theory you master one structure deeply. And unlike most gambits, the pressure persists into the endgame — there is no moment where the compensation simply expires.
Learn the Benko Gambit with AI feedback
This page pairs the guide above with an interactive ChessMind AI course: a GM-authored repertoire you study move by move on a real board, then practice against a human-like chess AI opponent with instant feedback and spaced-repetition review, so the key positions actually stick. Start learning, jump straight into practice, or browse all opening courses.
New to a concept? Every term is defined in the chess terms glossary.