Budapest Gambit
1.d4 Nf6 2.c4 e5 3.dxe5 Ng4 4.Nf3
The Budapest Gambit (1.d4 Nf6 2.c4 e5) throws the first punch against 1.d4: Black offers the e-pawn to develop with tempo and drag the game away from quiet queen's-pawn channels. White must know precise moves just to keep the balance — and most club players don't.
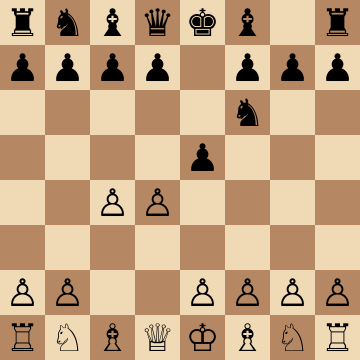
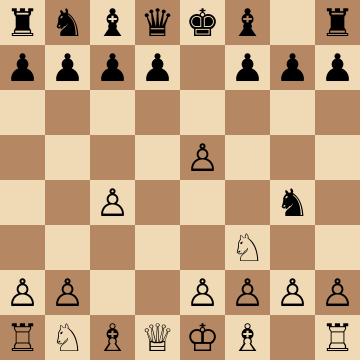
Mainline
1.d4 Nf6 2.c4 e5 3.dxe5 Ng4 4.Nf3
4.Bf4 Main Line with 6...Qe7
1.d4 Nf6 2.c4 e5 3.dxe5 Ng4 4.Bf4 Nc6 5.Nf3 Bb4+ 6.Nbd2 Qe7 7.a3 Ngxe5 8.Nxe5 Nxe5 9.e3 Bxd2+ 10.Qxd2 d6
The heart of the Budapest. Black regains the pawn with 7...Ngxe5 and, after the trades, reaches a position with a beautiful e5 knight and pressure against the c4 pawn. The plan is direct: ...O-O, ...Re8 or ...Rb8 with ...b6, and dark-square play that White's slightly loosened queenside never fully answers. Material is level, the structure is sound, and Black is the one who knows the terrain.
Adler Variation: 4.Nf3 Bc5
1.d4 Nf6 2.c4 e5 3.dxe5 Ng4 4.Nf3 Bc5 5.e3 Nc6 6.Be2 Ngxe5 7.Nxe5 Nxe5 8.O-O O-O
White's most natural reply — defend nothing, develop everything — and Black's answer is immediate: 4...Bc5 eyes f2 and forces 5.e3, shutting in the c1 bishop. The e5 pawn falls back into Black's hands with ...Ngxe5, leaving a comfortable middlegame where the c5 bishop and e5 knight own the dark squares. Play ...Re8, ...a5 and ...d6, and remember that White's extra queenside space means little while your pieces are this active.
Alekhine Variation: 4.e4 Nxe5
1.d4 Nf6 2.c4 e5 3.dxe5 Ng4 4.e4 Nxe5 5.f4 Nec6 6.Be3 Bb4+ 7.Nc3 Bxc3+ 8.bxc3 Qe7
The critical test in the eyes of theory: White returns the pawn to build a huge pawn front with e4 and f4. Black must not drift — 5...Nec6 followed by 6...Bb4+ and 7...Bxc3+ damages the queenside, and 8...Qe7 immediately attacks the overextended e4 pawn. White's center looks imposing but every advance creates new holes; Black plays against the weakened dark squares for the rest of the game.
Fajarowicz Gambit: 3...Ne4
1.d4 Nf6 2.c4 e5 3.dxe5 Ne4 4.a3 Nc6 5.Nf3 d6 6.exd6 Bxd6
The Budapest's wild cousin: instead of chasing the e5 pawn, the knight leaps to e4 and Black plays for rapid development and tricks on the dark squares. Against the accurate 4.a3 — stopping every ...Bb4 idea — Black should switch to 4...Nc6 and 5...d6, regaining the pawn with easy piece play. A surprise weapon worth knowing even if 3...Ng4 is your bread and butter; club players rarely meet it well twice.
Kieninger Trap: 8.axb4?? Nd3#
1.d4 Nf6 2.c4 e5 3.dxe5 Ng4 4.Bf4 Nc6 5.Nf3 Bb4+ 6.Nbd2 Qe7 7.a3 Ngxe5 8.axb4 Nd3#
The most famous smothered mate in opening theory, and it appears straight out of the Budapest main line. After 7...Ngxe5, the b4 bishop is genuinely en prise — but taking it loses on the spot: 8.axb4?? Nd3 is checkmate, because the e2 pawn is pinned by the queen on e7 and every escape square is occupied by White's own pieces. Thousands of players have fallen for it, and even after the correct 8.Nxe5 Nxe5 the same ...Nd3+ fork keeps hanging over White's position.
4.Bf4 g5!? — The Aggressive Bayonet
1.d4 Nf6 2.c4 e5 3.dxe5 Ng4 4.Bf4 g5 5.Bg3 Bg7 6.Nf3 Nc6 7.Nc3 Ngxe5 8.Nxe5 Nxe5
For players who want maximum chaos: 4...g5 kicks the bishop before regaining the pawn, gaining time and space on the kingside. The g7 bishop lands on the long diagonal with real force, and after ...Ngxe5 Black's pieces swarm the dark squares. The cost is a looser king position, so this line rewards concrete calculation — play it against opponents who defend passively, and keep 4...Nc6 in reserve for tougher opposition.
Key ideas
- Strike with 2...e5 before White finishes setting up, and regain the pawn in almost every line.
- Develop with threats: ...Ng4, ...Nc6 and ...Bb4+ hit e5 and c3 while White untangles.
- Know the trap potential: the smothered-mate pattern on d3 has caught thousands of unprepared players.
- Reach fresh middlegame structures where your preparation, not White's, decides the character of the game.
Typical plans and structures
In the main lines Black regains the e5-pawn with ...Nc6 and ...Ngxe5 (or keeps pressure with ...Qe7), then plays against White's slightly loosened queenside with ...O-O, ...Re8 and ...d6. Against 4.Bf4, the check ...Bb4+ and ...Qe7 build up on e5; against 4.Nf3, Black's initiative on the dark squares persists. White's extra space on the queenside is the long-term counterweight, and the course shows how Black's piece activity keeps full value against every setup.
Who should play it
Players who dislike slow queen's-pawn maneuvering and want an early initiative with clear piece play and real trap potential.
Study the Budapest Gambit move by move
The first 3 lines of the interactive course, exactly as a signed-out visitor can play them — each move with the coaching note shown on the board.
Line 1 — punishing a blunder
1.d4 Our opponent claims the center. 1...Nf6 We develop the knight. 2.c4 White expands on the queenside. 2...e5 We enter the Budapest Gambit, undermining their center. 3.dxe5 Our opponent accepts the gambit, threatening our knight. 3...Ng4 We reposition the knight, counterattacking the pawn. 4.Nf3 White develops their knight, protecting the pawn. 4...Nc6 We bring out our knight, increasing pressure on e5. 5.Bf4 White activates their bishop, reinforcing the center. 5...Bb4+ We develop our bishop with a check. 6.Nbd2 Our opponent blocks with the knight. 6...Qe7 We activate our queen, increasing pressure on e5. 7.a3 Our opponent challenges the bishop. 7...Ngxe5 We take on e5, sacrificing the bishop to exploit our queen's X-ray on their king. 8.axb4 White takes the bishop, overlooking the tactic. 8...Nd3# The e2 pawn is pinned, so we jump in with the knight and deliver checkmate.
Line 2 — the main line
1.d4 Our opponent claims the center. 1...Nf6 We develop the knight. 2.c4 White expands on the queenside. 2...e5 We enter the Budapest Gambit, undermining their center. 3.dxe5 Our opponent accepts the gambit, threatening our knight. 3...Ng4 We reposition the knight, counterattacking the pawn. 4.Nf3 White develops their knight, protecting the pawn. 4...Nc6 We bring out our knight, increasing pressure on e5. 5.Bf4 White activates their bishop, reinforcing the center. 5...Bb4+ We develop our bishop with a check. 6.Nbd2 Our opponent blocks with the knight. 6...Qe7 We activate our queen, increasing pressure on e5. 7.a3 Our opponent challenges the bishop. 7...Ngxe5 We take on e5, sacrificing the bishop to exploit our queen's X-ray on their king. 8.Nxe5 Our opponent trades on e5. 8...Nxe5 We recapture with the knight. 9.Bxe5 White captures the knight. 9...Bxd2+ We capture their knight with check. 10.Qxd2 Our opponent takes back with the queen. 10...Qxe5 We recapture on e5. 11.e3 Freeing the light squared bishop. 11...O-O After the exchanges, we emerge with a centralized queen and a comfortable game.
Line 3 — the main line
1.d4 Our opponent claims the center. 1...Nf6 We develop the knight. 2.c4 White expands on the queenside. 2...e5 We enter the Budapest Gambit, undermining their center. 3.dxe5 Our opponent accepts the gambit, threatening our knight. 3...Ng4 We reposition the knight, counterattacking the pawn. 4.Nf3 White develops their knight, protecting the pawn. 4...Nc6 We bring out our knight, increasing pressure on e5. 5.Bf4 White activates their bishop, reinforcing the center. 5...Bb4+ We develop our bishop with a check. 6.Nc3 White blocks the check with the knight. 6...Qe7 We activate the queen, increasing pressure on e5. 7.Qd5 Our opponent centralizes the queen to reinforce the pawn. 7...Bxc3+ We capture on c3, weakening their pawn structure. 8.bxc3 Our opponent has to take back with the pawn. 8...f6 Offering a pawn trade. 9.exf6 Our opponent captures on f6. 9...Nxf6 We recapture with the knight, threatening their queen. 10.Qd3 Our opponent retreats the queen. 10...d6 Freeing the light squared bishop. 11.e3 Our opponent makes room on e2 for the bishop. 11...O-O We castle. 12.Be2 Our opponent sticks to their plan. 12...Ne4 Centralizing the knight. 13.O-O Our opponent castles. 13...Bf5 We develop the bishop, X-raying their queen. 14.Qd5+ Our opponent repositions the queen with check. 14...Kh8 With a safe king and active pieces, we compensate for the sacrifice by targeting their weak pawn structure.
The free preview ends here — continue with all 19 lines in the interactive course, with instant feedback on every move you play.
Frequently asked questions
Is the Budapest Gambit a real gambit?
Only briefly — in most main lines Black regains the e5-pawn by force within a few moves. What Black really gains is active development and an unusual structure; what Black risks is far less than in true pawn-down gambits.
What is the famous trap in the Budapest Gambit?
After 3.dxe5 Ng4 4.Bf4 Nc6 5.Nf3 Bb4+ 6.Nbd2 Qe7 7.a3 Ngxe5 8.axb4?? Nd3#, Black delivers a smothered mate on move eight. Even players who avoid the mate often stumble into losing a piece in the same variation.
Can White avoid the Budapest by declining the pawn?
Yes, with 3.d5 or 3.e3, but both concede easy development and comfortable equality — Black gets a pleasant reversed-Benoni or classical structure. The critical test is accepting, and that is where this course concentrates its firepower.
Learn the Budapest Gambit with AI feedback
This page pairs the guide above with an interactive ChessMind AI course: a GM-authored repertoire you study move by move on a real board, then practice against a human-like chess AI opponent with instant feedback and spaced-repetition review, so the key positions actually stick. Start learning, jump straight into practice, or browse all opening courses.
New to a concept? Every term is defined in the chess terms glossary.