Danish Gambit
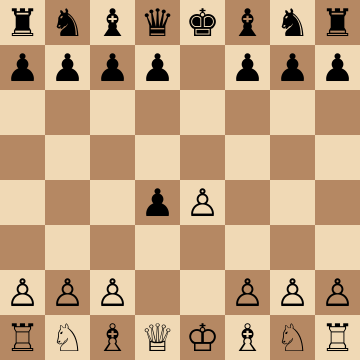
1.e4 e5 2.d4 exd4 3.c3
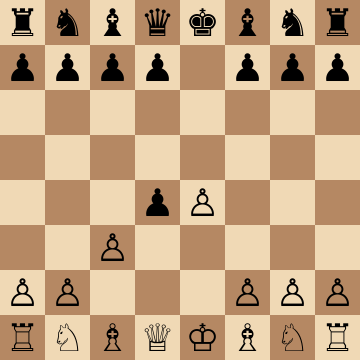
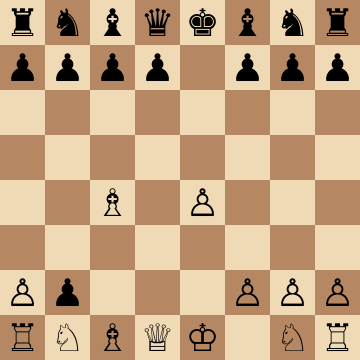
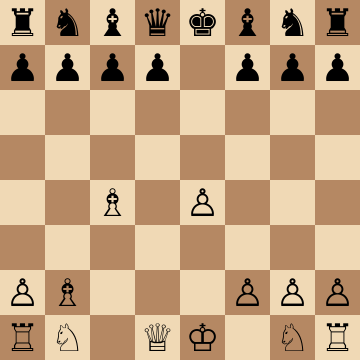
The Danish Gambit (1.e4 e5 2.d4 exd4 3.c3) offers one pawn, then a second, for the most extreme development lead in classical chess: after 4.Bc4 cxb2 5.Bxb2 both bishops rake the kingside while Black has moved nothing but pawns. It is romantic, 19th-century chess — and a ruthless punisher of greedy defenders.
Mainline
1.e4 e5 2.d4 exd4 3.c3 dxc3 4.Bc4 cxb2 5.Bxb2
Accepted Main Line with 5...d6
1.e4 e5 2.d4 exd4 3.c3 dxc3 4.Bc4 cxb2 5.Bxb2 d6 6.Nf3 Nc6 7.O-O Nf6 8.Nc3 Be7 9.Qb3
When Black keeps both pawns and hunkers down with 5...d6, White simply completes the dream setup: knights to f3 and c3, short castling, and Qb3 striking f7 and b7 in one move. Black's extra material sits on the queenside while every White piece points at the king. The plans are direct — Nd5, Ng5 ideas, rooks to d1 and e1 — and Black must find several accurate defensive moves just to survive the opening.
Schlechter Defense (5...d5)
1.e4 e5 2.d4 exd4 3.c3 dxc3 4.Bc4 cxb2 5.Bxb2 d5 6.Bxd5 Nf6 7.Bxf7+ Kxf7 8.Qxd8 Bb4+ 9.Qd2 Bxd2+ 10.Nxd2
The critical test: Black returns both pawns with 5...d5 to blunt the raking bishops. The famous sequence 6.Bxd5 Nf6 7.Bxf7+ Kxf7 8.Qxd8 Bb4+ forces a queen trade, but the resulting endgame is no refuge — White's queenside majority and Black's exposed king still offer real practical chances. This course shows how to press the position with c4, Ngf3 and O-O-O rather than accepting an early handshake.
Copenhagen Line with 5...Bb4+
1.e4 e5 2.d4 exd4 3.c3 dxc3 4.Bc4 cxb2 5.Bxb2 Bb4+ 6.Nc3 Nf6 7.Ne2 Nxe4 8.O-O Nxc3 9.Nxc3 Bxc3 10.Bxc3
Grabbing a third pawn with 7...Nxe4 is the greediest defense of all, and 8.O-O punishes it: after the forced trades on c3, White's dark-squared bishop stares down the naked long diagonal at g7. Castling kingside walks into mating patterns; staying in the center invites Re1 and Qd-side switches. A single well-prepared White player wins this position again and again at club level.
Declined with 3...d5
1.e4 e5 2.d4 exd4 3.c3 d5 4.exd5 Qxd5 5.cxd4 Nc6 6.Nf3 Bg4 7.Be2 Bb4+ 8.Nc3
The soundest way to duck the gambit: Black counters in the center before taking on c3. White recaptures on d4 and reaches a healthy isolated-queen-pawn position with free development and the better bishop. Watch the classic trap — after 8.Nc3, the careless 8...Bxf3 9.Bxf3 Qxd4?? loses on the spot to 10.Bxc6+ picking up the queen. Play actively with O-O, Be3 and d5 breaks and White keeps the initiative.
Declined with 4...d5
1.e4 e5 2.d4 exd4 3.c3 dxc3 4.Bc4 d5 5.Bxd5 Nf6 6.Nxc3 Nxd5 7.Nxd5
One pawn taken, one returned: 4...d5 is the modern recommendation against the Danish, giving back material before the b2 bishop ever appears. White should not panic — 5.Bxd5 and 6.Nxc3 recover the pawn with a lead in development, and 7.Nxd5 leaves a strong knight eyeing c7 while Black still has the whole kingside to develop. The middlegame is only a little better for White, but it is White who is pressing.
Key ideas
- Sacrifice one or two pawns for a monstrous pair of raking bishops on c4 and b2.
- Attack f7 and g7 simultaneously — many games end before Black completes development.
- Learn when to accept the endgame equalizer ...d5 and keep pressing with better activity.
- A devastating surprise weapon at club level and in blitz, where defense is hardest.
Typical plans and structures
With both bishops aimed at the kingside, White develops with Nf3, O-O, Qb3 or Nc3-d5 ideas and open lines toward f7. The critical defensive resource is the central counter ...d5, returning material to blunt the bishops — the course shows how to keep an initiative even there, and how to punish every attempt to cling to the extra pawns. Move order matters: knowing the traps in the accepted lines wins many games outright.
Who should play it
Romantics and attackers who value initiative over material and want e4-e5 games decided by tactics, not endgame technique.
Study the Danish Gambit move by move
The first 3 lines of the interactive course, exactly as a signed-out visitor can play them — each move with the coaching note shown on the board.
Line 1 — punishing a blunder
1.e4 We take the center. 1...e5 Our opponent does the same. 2.d4 We break in the center because we want to play the Danish gambit. 2...exd4 Our opponent has little choice other than trading pawns on d4. 3.c3 We don't recapture and instead offer another pawn, officially launching the Danish Gambit. Our goal is to gain a significant development lead for the price of one, two and even three pawns. 3...dxc3 Our opponent accepts the gambit, and they are now a pawn up. 4.Bc4 We develop our bishop into the most promising diagonal, attacking the critical f7 square, and inviting our opponent to keep the second extra pawn. 4...cxb2 Our opponent is not afraid of the risks, and wants to be two pawns up. 5.Bxb2 We recapture the pawn, and now have two powerful bishops working together on consecutive diagonals. 5...Bb4+ This check is the most popular continuation, it develops a piece and somewhat disrupts our development. 6.Nc3 We block the check developing our knight. This move makes more sense than Nd2 because the knight on c3 can jump to d5 sooner or later. 6...Nf6 Developing the knight, preparing to castle and aiming for ...Nxe4 sooner or later. 7.Ne2 We develop our knight offering up a third pawn. The reason we bring the knight to e2 rather than f3 is we want to protect the knight on c3 in case our opponent takes ...Nxe4. 7...Nxe4? Taking a third pawn may seem tempting, but this is actually a decisive error. 8.O-O We castle short, eliminating the pin against our knight and attacking the knight on e4. Although we are three pawns down, we have a decisive advantage due to our development lead. 8...Bxc3 Our opponent trades the bishop. One reason is they may worry about Qb3 (a double attack hitting the bishop and the pawn on f7). 9.Nxc3 We recapture the piece attacking the knight and opening the e file for our rook. 9...Nxc3 Our opponent trades knights, since their knight is under attack and they are in a rush to continue their development. We don't mind this trade as it opens up our bishop on b2. 10.Bxc3 Remember this bishop pair, working together on consecutive diagonals, in the spirit of the Danish Gambit. We are threatening Bxg7 as well as Re1. 10...O-O Our opponent castles short to get their king away from the center, but the king won't be safe anywhere. 11.Qg4 We threaten checkmate with Qxg7#. 11...g6 The only way to prevent the capture on g7, but now the a1 h8 is weakened decisively. 12.Qd4 Our opponent can't block Qg7# since their f pawn is pinned.
Line 2 — punishing a blunder
1.e4 We take the center. 1...e5 Our opponent does the same. 2.d4 We break in the center because we want to play the Danish gambit. 2...exd4 Our opponent has little choice other than trading pawns on d4. 3.c3 We don't recapture and instead offer another pawn, officially launching the Danish Gambit. Our goal is to gain a significant development lead for the price of one, two and even three pawns. 3...dxc3 Our opponent accepts the gambit, and they are now a pawn up. 4.Bc4 We develop our bishop into the most promising diagonal, attacking the critical f7 square, and inviting our opponent to keep the second extra pawn. 4...cxb2 Our opponent is not afraid of the risks, and wants to be two pawns up. 5.Bxb2 We recapture the pawn, and now have two powerful bishops working together on consecutive diagonals. 5...Bb4+ This check is the most popular continuation, it develops a piece and somewhat disrupts our development. 6.Nc3 We block the check developing our knight. This move makes more sense than Nd2 because the knight on c3 can jump to d5 sooner or later. 6...Nf6 Developing the knight, preparing to castle and aiming for ...Nxe4 sooner or later. 7.Ne2 We develop our knight offering up a third pawn. The reason we bring the knight to e2 rather than f3 is we want to protect the knight on c3 in case our opponent takes ...Nxe4. 7...Nxe4? Taking a third pawn may seem tempting, but this is actually a decisive error. 8.O-O We castle short, eliminating the pin against our knight and attacking the knight on e4. Although we are three pawns down, we have a decisive advantage due to our development lead. 8...Bxc3 Our opponent trades the bishop. One reason is they may worry about Qb3 (a double attack hitting the bishop and the pawn on f7). 9.Nxc3 We recapture the piece attacking the knight and opening the e file for our rook. 9...Nf6 The knight retreats to avoid activating our bishop on b2, but this does not work. 10.Re1+ We give this check to activate our rook and force our opponent to lose castling rights. 10...Kf8 The king goes away, the only move. 11.Nd5! This is a very important move! We want to open up our bishop on b2, and we are happy to trade the only piece our opponent has developed so far. We are threatening to trade followed by Qd5-Qxf7#. 11...d6 Trying to catch up on development, at least hoping for ...Be6 to block the incoming threat on f7. 12.Nxf6 We trade as expected, doubling pawns and creating new weaknesses. 12...gxf6 Recapturing the piece. 13.Qh5 We threaten a checkmate on f7. 13...Be6 This is a desperate attempt to block the checkmate threat. 14.Qh6+ We choose to focus on the f6 pawn instead. 14...Ke8 The king goes away, the only move. 15.Bxf6 This is a double attack on the queen and rook. We gain a lot of material, and the game.
Line 3 — punishing a blunder
1.e4 We take the center. 1...e5 Our opponent does the same. 2.d4 We break in the center because we want to play the Danish gambit. 2...exd4 Our opponent has little choice other than trading pawns on d4. 3.c3 We don't recapture and instead offer another pawn, officially launching the Danish Gambit. Our goal is to gain a significant development lead for the price of one, two and even three pawns. 3...dxc3 Our opponent accepts the gambit, and they are now a pawn up. 4.Bc4 We develop our bishop into the most promising diagonal, attacking the critical f7 square, and inviting our opponent to keep the second extra pawn. 4...cxb2 Our opponent is not afraid of the risks, and wants to be two pawns up. 5.Bxb2 We recapture the pawn, and now have two powerful bishops working together on consecutive diagonals. 5...Bb4+ This check is the most popular continuation, it develops a piece and somewhat disrupts our development. 6.Nc3 We block the check developing our knight. This move makes more sense than Nd2 because the knight on c3 can jump to d5 sooner or later. 6...Nf6 Developing the knight, preparing to castle and aiming for ...Nxe4 sooner or later. 7.Ne2 We develop our knight offering up a third pawn. The reason we bring the knight to e2 rather than f3 is we want to protect the knight on c3 in case our opponent takes ...Nxe4. 7...Nxe4? Taking a third pawn may seem tempting, but this is actually a decisive error. 8.O-O We castle short, eliminating the pin against our knight and attacking the knight on e4. Although we are three pawns down, we have a decisive advantage due to our development lead. 8...Nxc3 Trading the knight, hoping to castle next. 9.Nxc3 We recapture the piece, and we are threatening Re1 forcing our opponent to lose their castling rights. 9...O-O The king runs away from the center as soon as possible, although we are ready to attack it on the kingside as well. 10.Nd5! This is a very important move, we open up our bishop on b2, and centralize our knight with a tempo. 10...Bc5 The bishop moves back to a safe square. 11.Qg4 We bring out our queen, threatening checkmate on g7. 11...f6 Our opponent tries blocking the a1 h8 diagonal, but that's the beauty of having a bishop pair work together: if they block one diagonal, the open the other one. 12.Ne7+! We deliver a double check and get our opponent ready for a thematic checkmate. 12...Kh8 The king moves away, the only move. 13.Ng6+ This was the point! We give up our knight to force the opening of the h file. 13...hxg6 Our opponent is forced to capture the knight. 14.Qh3# We deliver a beautiful checkmate.
The free preview ends here — continue with all 21 lines in the interactive course, with instant feedback on every move you play.
Frequently asked questions
Is the Danish Gambit refuted?
Black can equalize with precise play — notably the ...d5 counter returning the material — but equalizing is not refuting. Below master level Black rarely finds every accurate move, and one slip against the raging bishops is usually fatal.
Should I accept both pawns against the Danish Gambit?
Taking everything with 3...dxc3 4.Bc4 cxb2 5.Bxb2 is critical but extremely dangerous: White's bishops and open lines generate threats faster than Black can develop. Declining or returning a pawn is safer — and this course prepares White for all three approaches.
Who played the Danish Gambit historically?
It flourished in the romantic era of the late 19th century, championed by attacking players in the age of Anderssen and Blackburne, and remains a favorite of attacking club players today precisely because defense-first technique is a modern skill.
Learn the Danish Gambit with AI feedback
This page pairs the guide above with an interactive ChessMind AI course: a GM-authored repertoire you study move by move on a real board, then practice against a human-like chess AI opponent with instant feedback and spaced-repetition review, so the key positions actually stick. Start learning, jump straight into practice, or browse all opening courses.
New to a concept? Every term is defined in the chess terms glossary.