Beat the London
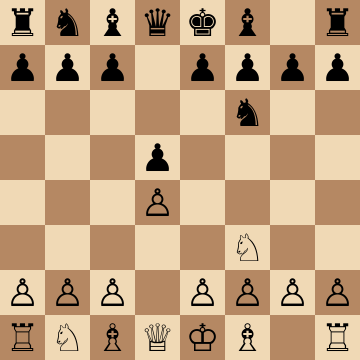
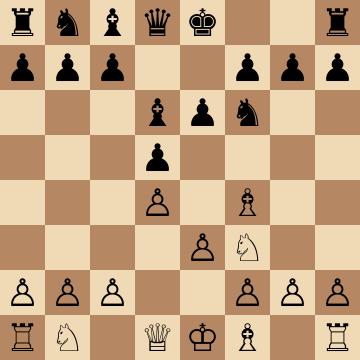
1.d4 d5 2.Nf3 Nf6 3.Bf4 e6 4.e3 Bd6
The London System's whole appeal is comfort — the same setup, the same plans, game after game. This repertoire takes that comfort away: with the direct 3...e6 and 4...Bd6, Black challenges the London bishop immediately and fights for the initiative instead of drifting into White's favorite structures.
Mainline
1.d4 d5 2.Nf3 Nf6 3.Bf4 e6 4.e3 Bd6
Main Line: 5.Bg3 with ...c5 and ...Nc6
1.d4 d5 2.Nf3 Nf6 3.Bf4 e6 4.e3 Bd6 5.Bg3 O-O 6.Bd3 c5 7.c3 Nc6 8.Nbd2 b6
London players almost always preserve the bishop with 5.Bg3, and this tabiya is where the repertoire lives. Black takes the queenside squares the London ignores: ...c5, ...Nc6, then ...b6 and ...Bb7 preparing ...cxd4 with play down the c-file. The standing option of ...Bxg3 means White's showpiece bishop never fully participates, and the usual Ne5-f4 plans arrive a step too late. Concrete, active play against an opponent who expected autopilot.
The Trade: 5.Bxd6 with the ...e5 Plan
1.d4 d5 2.Nf3 Nf6 3.Bf4 e6 4.e3 Bd6 5.Bxd6 Qxd6 6.Nbd2 O-O 7.Bd3 c5 8.c3 Nc6 9.O-O e5
Trading on d6 is White's most common reaction at club level, and it hands Black an improved structure: the queen recaptures onto a fine central post, and the freeing break ...e5 arrives in one go. After 9...e5 Black's pieces flow naturally — ...Re8, ...Bg4, or ...e4 gaining kingside space — while White's trademark bishop is gone and the London's whole point went with it. This position shows why 4...Bd6 asks the question the London least wants to answer.
Queenside Sting: ...c5 and ...Qb6
1.d4 d5 2.Nf3 Nf6 3.Bf4 e6 4.e3 Bd6 5.Bg3 O-O 6.Bd3 c5 7.c3 Qb6
A classic anti-London motif folded into the repertoire: with White's dark-squared bishop far from home on g3, the b2-pawn is short a defender, and 7...Qb6 attacks it while leaning on d4. White usually answers Qb3, when the calm ...c4 gains queenside space with tempo; the alternatives Rb1 and Qc1 are passive moves no London player wants to make. Either way Black has extracted a concession by move seven and follows up with ...Nc6, ...Bd7 and a rook to c8.
Early 2.Bf4 Move Order (Nbd2 Systems)
1.d4 d5 2.Bf4 Nf6 3.e3 e6 4.Nd2 Bd6 5.Bg3 c5 6.c3 Nc6 7.Ngf3 O-O
Modern London players prefer the 2.Bf4 move order with a quick Nd2, sidestepping some of Black's sharpest tries and keeping Ne5 resources available. The good news: your repertoire barely changes. Play the same ...e6, ...Bd6, ...c5 and ...Nc6 scheme, castle, and continue with ...b6, ...Bb7 and a timely ...e5 or ...cxd4. The course maps each move-order wrinkle onto the same familiar middlegame plans, so the London's flexibility never catches you out.
Breaking the Ne5 Clamp
1.d4 d5 2.Nf3 Nf6 3.Bf4 e6 4.e3 Bd6 5.Bg3 O-O 6.Bd3 c5 7.c3 Nc6 8.Ne5 Qc7
Every London player dreams of the Ne5 clamp supported by f4, so dismantling it is core knowledge. The accurate 8...Qc7 adds a third attacker to e5 and prepares the clean undermining plan of ...Nd7 and ...f6. One tactical detail keeps you safe: avoid the greedy 8...Nxe5? 9.dxe5, when the pawn forks d6 and f6 and wins material. Handled correctly, the knight gets challenged before f4 arrives, and White's prized outpost turns into a target on a half-open file.
Light-Square Trade: ...b6 and ...Ba6
1.d4 d5 2.Nf3 Nf6 3.Bf4 e6 4.e3 Bd6 5.Bg3 O-O 6.Bd3 b6 7.Nbd2 Ba6 8.Bxa6 Nxa6 9.O-O c5
An excellent low-maintenance weapon: since the d3-bishop is the London's main attacker, Black simply trades it off with ...b6 and ...Ba6. After 8.Bxa6 Nxa6 the knight rejoins via c7 toward b5 or e6, and 9...c5 opens the queenside where Black is faster. With both White bishops neutralized — one traded, the other staring at its own pawn chain from g3 — the position loses its teeth for White, and Black grinds away with ...Rc8, ...Qe7 and pressure down the c-file.
Key ideas
- Challenge the f4-bishop with an early ...Bd6 — trade it or push it around, but never leave it comfortable.
- Fight for the center with ...c5 and ...Nc6 before White's slow setup consolidates.
- Know the antidotes to the London's pet tricks: the Ne5 outpost, the Bxc7 tactics, the h4 lunges.
- Play for a win with Black: unbalance a system whose players expect a quiet, riskless game.
Typical plans and structures
After 4...Bd6 Black resolves the dark-squared bishops on White's least favorable terms, then expands with ...c5, ...Nc6 or ...b6 and ...Bb7, taking the queenside space the London concedes. Typical middlegames feature a well-timed ...e5 or ...c4 clamp, minority-attack ideas, and pressure down the c-file — plans that London players, used to autopilot opponents, rarely face with precision. The course also covers White's move-order tricks (early Nbd2, h4 systems) so nothing lands as a surprise.
Who should play it
Anyone sick of seeing the London every week — club players especially — who wants a single, reliable repertoire that turns White's comfort system into a real game.
Study Beat the London move by move
The first 3 lines of the interactive course, exactly as a signed-out visitor can play them — each move with the coaching note shown on the board.
Line 1 — the main line
1.d4 Our opponent takes control of the center. 1...d5 We reply symmetrically. 2.Nf3 White brings out their knight. 2...Nf6 We develop the knight as well. 3.Bf4 Our opponent enters the London System, known for its schematic approach and solid structure. 3...e6 Freeing the dark squared bishop. 4.e3 White prepares to develop their bishop as well. 4...Bd6 We confront the bishop, offering a trade. 5.Bg3 Our opponent retreats the bishop to avoid doubling pawns on the f file. 5...O-O We castle. 6.Nbd2 Our opponent brings out their knight. 6...c5 We strike with a pawn break to challenge their central control. 7.c3 Forming a solid pawn chain that reinforces d4. 7...Qc7 We develop the queen. 8.Bd3 Our opponent activates the bishop, preparing to castle. 8...Nbd7 We develop the knight, planning a future e6 e5 push. 9.O-O Our opponent castles. 9...Bxg3 We trade bishops to create doubled pawns and prepare a central break. 10.hxg3 Our opponent takes back. 10...e5 We increase the pressure on d4, threatening a fork on their bishop and knight. 11.dxe5 Our opponent trades to simplify the position. 11...Nxe5 We take back, targeting their bishop. 12.Nxe5 Our opponent captures the knight. 12...Qxe5 We recapture with the queen. 13.Nf3 Attacking our queen. 13...Qe7 After exchanging our opponent's bishop and central pawn, we secure central control and neutralize their typical London plans.
Line 2 — the main line
1.d4 Our opponent takes control of the center. 1...d5 We reply symmetrically. 2.Nf3 White brings out their knight. 2...Nf6 We develop the knight as well. 3.Bf4 Our opponent enters the London System, known for its schematic approach and solid structure. 3...e6 Freeing the dark squared bishop. 4.e3 White prepares to develop their bishop as well. 4...Bd6 We confront the bishop, offering a trade. 5.Bg3 Our opponent retreats the bishop to avoid doubling pawns on the f file. 5...O-O We castle. 6.Nbd2 Our opponent brings out their knight. 6...c5 We strike with a pawn break to challenge their central control. 7.c3 Forming a solid pawn chain that reinforces d4. 7...Qc7 We develop the queen. 8.Bd3 Our opponent activates the bishop, preparing to castle. 8...Nbd7 We develop the knight, planning a future e6 e5 push. 9.Qe2 Planning to push e3 e4. 9...e5 We strike in the center ahead of our opponent to seize the initiative. 10.dxe5 Our opponent simplifies to prevent our pawn from advancing to e4. 10...Nxe5 We recapture with the knight, attacking their bishop. 11.Nxe5 Our opponent trades, preparing to bring the other knight to f4. 11...Bxe5 We take back. 12.Nf3 Gaining a tempo on our bishop. 12...Bxg3 We capture to relieve the pressure, but we open the h file for their rook. 13.hxg3 Our opponent recaptures, accepting doubled pawns. 13...h6 We neutralize threats along the h file, maintaining central control and a lead in development.
Line 3 — against an inaccuracy
1.d4 Our opponent takes control of the center. 1...d5 We reply symmetrically. 2.Nf3 White brings out their knight. 2...Nf6 We develop the knight as well. 3.Bf4 Our opponent enters the London System, known for its schematic approach and solid structure. 3...e6 Freeing the dark squared bishop. 4.e3 White prepares to develop their bishop as well. 4...Bd6 We confront the bishop, offering a trade. 5.Bg3 Our opponent retreats the bishop to avoid doubling pawns on the f file. 5...O-O We castle. 6.Nbd2 Our opponent brings out their knight. 6...c5 We strike with a pawn break to challenge their central control. 7.c3 Forming a solid pawn chain that reinforces d4. 7...Qc7 We develop the queen. 8.Bd3 Our opponent activates the bishop, preparing to castle. 8...Nbd7 We develop the knight, planning a future e6 e5 push. 9.Qe2 Planning to push e3 e4. 9...e5 We strike in the center ahead of our opponent to seize the initiative. 10.dxe5 Our opponent simplifies to prevent our pawn from advancing to e4. 10...Nxe5 We recapture with the knight, attacking their bishop. 11.Nxe5 Our opponent trades, preparing to bring the other knight to f4. 11...Bxe5 We take back. 12.Bh4 Our opponent repositions their bishop to avoid doubled pawns, but this allows us to develop with tempo and activate our pieces. 12...Bg4 Targeting their queen. 13.Nf3 Our opponent blocks with the knight. 13...d4 We open the center to exploit their uncastled king and the alignment of their king and queen on the same file. 14.cxd4 Our opponent trades to reduce pressure. 14...cxd4 We take back. 15.exd4 Our opponent captures again. 15...Bf4 We reposition the bishop to clear the e file for our rook. 16.Bxf6 Our opponent captures to create doubled pawns on our side, but lacks the development to launch an initiative. 16...gxf6 We recapture with the pawn. 17.Kf1 Our opponent avoids castling since the pin on their f3 knight makes ...Bxh2+ work. 17...Rfe8 We activate the rook along the e file, putting pressure on their queen. 18.Qd1 Our opponent retreats their queen to its initial square. 18...Rac8 We control the open files and diagonals, with a safer king and a clear lead in activity.
The free preview ends here — continue with all 12 lines in the interactive course, with instant feedback on every move you play.
Frequently asked questions
Why does an early ...Bd6 annoy London players?
The London revolves around the f4-bishop. Offering the trade with ...Bd6 forces an uncomfortable decision at once: exchange it (giving up the system's soul), retreat to g3 (allowing ...Bxg3 and a half-open h-file for Black in some lines), or lose time. Every answer costs something.
Is the London System actually hard to beat?
It is hard to refute but easy to neutralize: its strength is familiarity, not objective advantage. A prepared opponent who knows the correct piece placement equalizes comfortably and often takes over — which is exactly what this repertoire is built to do.
Does this repertoire work against the Jobava London too?
The related systems with Nc3 and Bf4 (Jobava style) need slightly different handling, and the course addresses the key move-order differences so your ...e6 and ...Bd6 plan adapts instead of walking into the Nb5 tricks.
Learn Beat the London with AI feedback
This page pairs the guide above with an interactive ChessMind AI course: a GM-authored repertoire you study move by move on a real board, then practice against a human-like chess AI opponent with instant feedback and spaced-repetition review, so the key positions actually stick. Start learning, jump straight into practice, or browse all opening courses.
New to a concept? Every term is defined in the chess terms glossary.