Slav Defense
1.d4 d5 2.c4 c6
The Slav Defense (1.d4 d5 2.c4 c6) is the Queen's Gambit answered with common sense: defend d5 with a pawn, keep the c8-bishop's diagonal open, and build a position with no weaknesses at all. A world-championship staple for a hundred years — and still Black's most trustworthy wall against 1.d4.
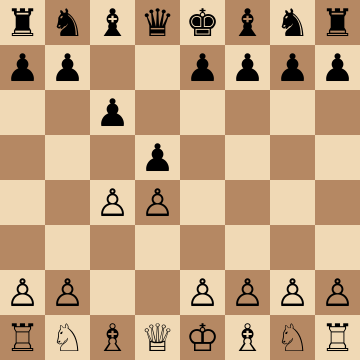
Mainline
1.d4 d5 2.c4 c6 3.Nf3 Nf6 4.Nc3 dxc4 5.a4 Bf5 6.e3 e6 7.Bxc4 Bb4 8.O-O O-O
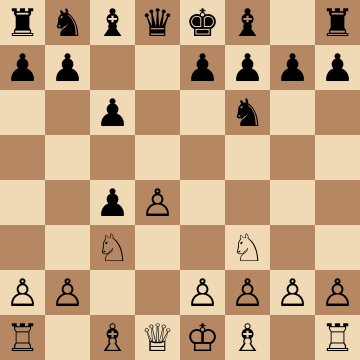
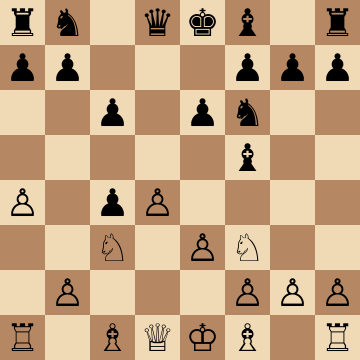
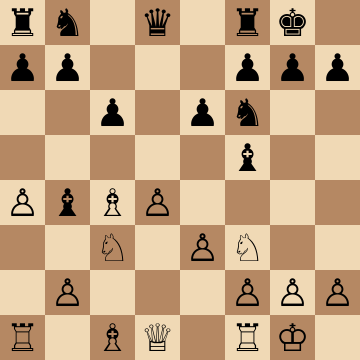
Dutch Variation Main Line
1.d4 d5 2.c4 c6 3.Nf3 Nf6 4.Nc3 dxc4 5.a4 Bf5 6.e3 e6 7.Bxc4 Bb4 8.O-O O-O 9.Qe2 Nbd7 10.e4 Bg6 11.Bd3 Bh5
The classical heart of the Slav: Black has developed the problem bishop, castled, and now meets 10.e4 with the poised retreat ...Bg6 and the pinning ...Bh5. White's broad center is real but so is Black's grip on it — ...e5 or ...c5 breaks come next, and the b4-bishop takes the sting out of e4-e5 ideas. A hundred years of world-championship praxis says Black equalizes here with accurate play; the course shows exactly which accuracy.
6.Ne5 Variation with ...Nbd7
1.d4 d5 2.c4 c6 3.Nf3 Nf6 4.Nc3 dxc4 5.a4 Bf5 6.Ne5 Nbd7 7.Nxc4 Qc7 8.g3 e5 9.dxe5 Nxe5 10.Bf4 Nfd7 11.Bg2
White's sharpest attempt sends the knight to collect c4 and fianchettoes against the queenside. Black's antidote is the central strike 8...e5!, giving the pawn back for full piece activity: after 10.Bf4 Nfd7 both knights coordinate around e5, and ...f6, ...Be6 or ...g5 ideas follow depending on White's setup. The middlegame is double-edged and heavily analyzed — this is the one Slav line where knowing concrete theory pays immediate dividends.
Exchange Slav: Winning Symmetric Positions
1.d4 d5 2.c4 c6 3.cxd5 cxd5 4.Nc3 Nf6 5.Bf4 Nc6 6.e3 Bf5 7.Nf3 e6 8.Qb3 Bb4 9.Bb5 O-O
White's drawing weapon — on paper. The mirrored structure hides real content: Black develops the bishop outside the chain, meets 8.Qb3 with the counterpin 8...Bb4, and castles first. From there, minor-piece placement decides everything; ...Ne4, ...Rc8 and a well-timed ...Qa5 or ...a6 question each White piece in turn. Symmetry only guarantees a draw if both sides play equally well, and the prepared player rarely has the worse half of it.
Geller Gambit: 5.e4 b5!
1.d4 d5 2.c4 c6 3.Nf3 Nf6 4.Nc3 dxc4 5.e4 b5 6.e5 Nd5 7.a4 e6 8.axb5 Nxc3 9.bxc3 cxb5 10.Ng5 Bb7
The one line where White refuses to regain c4 politely — and Black should keep the pawn with confidence. After 5...b5 6.e5 Nd5, the trades on c3 and b5 leave Black a clean pawn up, and 10.Ng5 launches White's do-or-die attack against f7 and e6. The defense holds: 10...Bb7, ...Qd5 hitting g2, and ...h6 at the right moment. Materialism is correct here; White's compensation runs out before Black's extra queenside pawns do.
Quiet 4.e3: Solid Development with ...Bf5
1.d4 d5 2.c4 c6 3.Nf3 Nf6 4.e3 Bf5 5.Nc3 e6 6.Nh4 Bg6 7.Nxg6 hxg6 8.Qb3 Qb6
Against slow e3 systems Black gets the ideal Slav for free: the c8-bishop reaches f5 before ...e6 closes the door. White's only try for relevance is 6.Nh4 chasing it, and the calm 6...Bg6 7.Nxg6 hxg6 actually helps Black — the h-file opens for the rook and the structure stays flawless. Meet 8.Qb3 with 8...Qb6, offering a trade that leads to an effortless equal endgame with the better pawn formation.
Key ideas
- Support d5 with 2...c6 and keep the light-squared bishop free — the improvement on the Queen's Gambit Declined.
- Play the main-line plan: take on c4 at the right moment and develop the bishop actively to f5.
- Keep a healthy structure in every line: the Slav's pawn formation has no permanent weaknesses to attack.
- Learn the instructive plans — minority-attack defense, the ...c5 and ...e5 breaks — that carry every Slav middlegame.
Typical plans and structures
In the main line Black cashes ...dxc4 to gain time (5.a4 stops ...b5) and develops the bishop to f5 before ...e6 — solving the QGD's eternal problem piece. Play continues with ...Bb4, ...Nbd7 and the central ...c5 or ...e5 breaks once development completes. Against the Exchange Slav the course shows how symmetrical does not mean drawish, and the anti-Slav systems (e3 lines, the Slav Geller Gambit) each get a clear, sound recipe.
Who should play it
Players who want a solid, classical defense to the Queen's Gambit that lasts a lifetime — safe enough for must-not-lose games, instructive enough to build real positional skill.
Study the Slav Defense move by move
The first 3 lines of the interactive course, exactly as a signed-out visitor can play them — each move with the coaching note shown on the board.
Line 1 — the main line
1.d4 Our opponent claims the center. 1...d5 We play symmetrically. 2.c4 Our opponent enters the Queen's Gambit. 2...c6 We reply with the Slav Defense, declining the gambit and reinforcing d5 without blocking the light squared bishop. 3.Nf3 Our opponent develops their knight. 3...Nf6 We develop the knight as well. 4.Nc3 Inreasing pressure on d5. 4...a6 We prepare to expand on the queenside with ...b7 b5. 5.e3 Freeing the light squared bishop to reinforce c4. 5...b5 Challening the c4 pawn. 6.b3 Our opponent defends the pawn. 6...Bg4 Pinning their knight. 7.Be2 Our opponent brings out the bishop and prepares to castle. 7...e6 Once the bishop is out of the pawn chain, we can play . ..e7 e6. 8.O-O Our opponent castles. 8...Nbd7 We develop the knight. 9.h3 Challenging our bishop. 9...Bh5 We retreat the bishop, maintaining pressure on the knight. 10.Bb2 Our opponent fianchettoes on the queenside. 10...Bd6 We bring out our bishop. 11.Ne5 Centralizing the knight and offering a bishop trade. 11...Bxe2 We capture on e2. 12.Nxe2 Our opponent recaptures with the knight, allowing the b2 bishop to support e5. 12...Qc7 We activate the queen, increasing pressure against their knight. 13.cxd5 Our opponent trades on d5. 13...cxd5 We take back with the c pawn. 14.Rc1 Developing the rook with tempo on our queen. 14...Qb8 We retreat the queen, keeping strong pressure on the diagonal and a solid position.
Line 2 — against an inaccuracy
1.d4 Our opponent claims the center. 1...d5 We play symmetrically. 2.c4 Our opponent enters the Queen's Gambit. 2...c6 We reply with the Slav Defense, declining the gambit and reinforcing d5 without blocking the light squared bishop. 3.Nf3 Our opponent develops their knight. 3...Nf6 We develop the knight as well. 4.Nc3 Inreasing pressure on d5. 4...a6 We prepare to expand on the queenside with ...b7 b5. 5.e3 Freeing the light squared bishop to reinforce c4. 5...b5 Challening the c4 pawn. 6.b3 Our opponent defends the pawn. 6...Bg4 Pinning their knight. 7.h3 Challenging our bishop. 7...Bxf3 We capture their knight. 8.Qxf3 Our opponent takes back with the queen. 8...e5 We strike in the center with a pawn sacrifice. 9.dxe5 Our opponent takes the pawn. 9...Bb4 We bring out the bishop, threatening to capture their knight with a fork. 10.Bd2 Our opponent unpins the knight. 10...Bxc3 We capture on c3. 11.Bxc3 Our opponent takes back. 11...Ne4 We jump into the center with our knight, pressuring their bishop. 12.Bb4 Our opponent repositions their bishop, stopping us from castling. 12...bxc4 We take on c4. 13.bxc4 Our opponent takes back. 13...Qb6 We bring out the queen with tempo on their bishop and ready to exploit our opponent's weaknesses on the queenside.
Line 3 — against an inaccuracy
1.d4 Our opponent claims the center. 1...d5 We play symmetrically. 2.c4 Our opponent enters the Queen's Gambit. 2...c6 We reply with the Slav Defense, declining the gambit and reinforcing d5 without blocking the light squared bishop. 3.Nf3 Our opponent develops their knight. 3...Nf6 We develop the knight as well. 4.Nc3 Inreasing pressure on d5. 4...a6 We prepare to expand on the queenside with ...b7 b5. 5.e3 Freeing the light squared bishop to reinforce c4. 5...b5 Challening the c4 pawn. 6.b3 Our opponent defends the pawn. 6...Bg4 Pinning their knight. 7.h3 Challenging our bishop. 7...Bxf3 We capture their knight. 8.gxf3 Our opponent takes back with the pawn. 8...Nbd7 We develop the knight, aiming to launch the ...e7 e5 pawn break. 9.f4 Our opponent expands on the kingside, stopping our plan. 9...g6 We prepare to fianchetto. 10.Bb2 Our opponent develops their bishop. 10...Bg7 We bring out our bishop as well. 11.c5 Our opponent releases the tension by pushing the c pawn, closing the queenside. 11...Ne4 We jump into the center with our knight. 12.Nxe4 Our opponent trades on e4. 12...dxe4 We take back. 13.Qc2 Targeting our pawn. 13...f5 We push the f pawn to reinforce e4. 14.h4 Our opponent aims to weaken our pawn structure with h4 h5. 14...Nf6 We neutralize our opponent's threats and prepare to jump into d5 with the knight to exploit their weaknesses.
The free preview ends here — continue with all 20 lines in the interactive course, with instant feedback on every move you play.
Frequently asked questions
What is the difference between the Slav and the Queen's Gambit Declined?
Both defend d5 with a pawn, but the Slav's 2...c6 keeps the c8-bishop's diagonal open — in the QGD, 2...e6 locks it behind the chain. The trade-off is the c6-square taken from the knight; the Slav's century of elite service says the bargain is excellent.
Why does Black capture on c4 in the main line?
3...Nf6 4.Nc3 dxc4 gains a tempo (White must spend a4 to regain the pawn favorably) and clears d5 so the f5-bishop and later ...c5 or ...e5 breaks come freely. It converts a static plus (structure) into dynamic development time.
Is the Slav good against the Exchange Variation?
The Exchange Slav aims for symmetry and a quiet life — but Black equalizes comfortably and keeps play with the minority-attack structures and piece activity. The course treats it seriously so the 'drawing weapon' becomes just another middlegame you know better.
Learn the Slav Defense with AI feedback
This page pairs the guide above with an interactive ChessMind AI course: a GM-authored repertoire you study move by move on a real board, then practice against a human-like chess AI opponent with instant feedback and spaced-repetition review, so the key positions actually stick. Start learning, jump straight into practice, or browse all opening courses.
New to a concept? Every term is defined in the chess terms glossary.