Albin Countergambit
1.d4 d5 2.c4 e5
The Albin Countergambit (1.d4 d5 2.c4 e5) answers the Queen's Gambit with an immediate counterstrike. After 3.dxe5 d4, Black's advanced d-pawn cramps White's position and sets real problems: one careless move and White stumbles into the famous Lasker Trap. Black gets quick development and lasting initiative for the pawn.
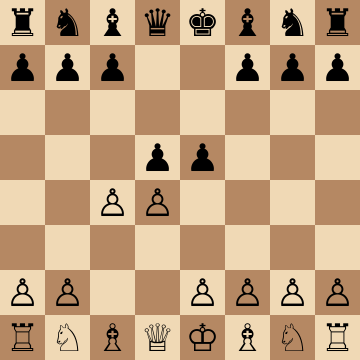
Mainline
1.d4 d5 2.c4 e5 3.dxe5 d4 4.Nf3 Nc6 5.g3 Nge7 6.Bg2 Ng6
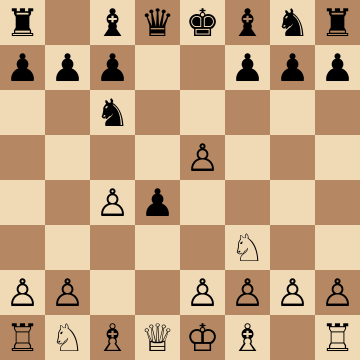
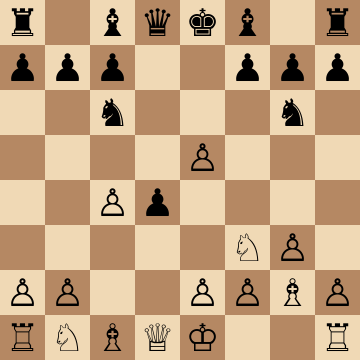
Lasker Trap (4.e3? Bb4+)
1.d4 d5 2.c4 e5 3.dxe5 d4 4.e3 Bb4+ 5.Bd2 dxe3 6.Bxb4 exf2+ 7.Ke2 fxg1=N+
The most famous trap in the Albin begins with a natural move: 4.e3? attacks d4, but 4...Bb4+ 5.Bd2 dxe3 already poisons everything. The point is 6.Bxb4?? exf2+ 7.Ke2 fxg1=N+! — Black underpromotes to a knight with check, and after ...Bg4+ the White king is dragged into the open with decisive material loss. Even White's best tries leave him struggling. Learn this sequence cold: club players stumble into 4.e3 constantly.
Modern Main Line: 5.g3 Nge7
1.d4 d5 2.c4 e5 3.dxe5 d4 4.Nf3 Nc6 5.g3 Nge7 6.Bg2 Ng6 7.Bg5 Be7 8.Bxe7 Qxe7 9.O-O Ngxe5 10.Nxe5 Nxe5
White's soundest setup is the fianchetto, and Black's answer is the knight tour ...Nge7-g6, hitting e5 a second time. When White trades dark-squared bishops and castles, Black simply regains the pawn with ...Ngxe5 and stands actively: the d4-pawn cramps White, the e5-knight sits beautifully, and ...O-O-O or ...c6 completes a comfortable game. This Morozevich-inspired treatment is what revived the entire gambit at top level.
Old Main Line: 5...Bg4 with Long Castling
1.d4 d5 2.c4 e5 3.dxe5 d4 4.Nf3 Nc6 5.g3 Bg4 6.Bg2 Qd7 7.O-O O-O-O
Before the ...Nge7 plan took over, this was the classical treatment: bishop to g4, queen to d7, king to the queenside. The setup produces opposite-side attacks in which Black hurls the h-pawn at White's fianchetto with ...h5-h4 while the wedge on d4 keeps White's pieces tangled. It is sharper and riskier than the modern main line — the right choice when you want every game to become a race to the enemy king.
Knight Pressure Line: 5.Nbd2 and Nb3
1.d4 d5 2.c4 e5 3.dxe5 d4 4.Nf3 Nc6 5.Nbd2 Nge7 6.Nb3 Nf5
Some White players gang up on d4 immediately with Nbd2-b3. The cool reply 6...Nf5 shores up the pawn and eyes ...h5 or ...Be7 with kingside play to follow. Remember the resource ...a5-a4: it harasses the b3-knight and gains queenside space with tempo. If White does bag the d4-pawn at the cost of several tempi, Black's development lead and open lines typically provide full compensation and then some.
Queenside Expansion: 5.a3 and b4
1.d4 d5 2.c4 e5 3.dxe5 d4 4.Nf3 Nc6 5.a3 Nge7 6.b4 Ng6 7.Bb2
With 5.a3 White rules out ...Bb4+ forever and expands with b4 and Bb2, usually intending to hand the e5-pawn back in exchange for queenside play. Black should not panic: continue the ...Nge7-g6 maneuver, consider ...a5 to pry at the pawn chain before it rolls, and collect e5 at the right moment. The resulting middlegame pits White's advancing queenside pawns against Black's superior activity around the cramping d4-wedge.
Key ideas
- Plant a thorn on d4 that restricts White's pieces deep into the middlegame.
- Develop rapidly with ...Nc6, ...Nge7-g6 and ...Bg4 or ...Bf5, recovering the e5-pawn or ignoring it for activity.
- Punish natural-looking moves — 4.e3? runs into the Lasker Trap with an underpromotion to a knight.
- Drag positional 1.d4 players into sharp, concrete play they never wanted.
Typical plans and structures
Black often castles long or keeps the king flexible, using the half-open e-file and the cramping d4-pawn as long-term assets. The knight route ...Nge7-g6 regains e5 or supports ...h5-h4 play against White's fianchetto. White's principled setup is g3, Bg2, Nbd2 and a2-a3 with b2-b4, trying to return the pawn for queenside pressure — the course shows how Black keeps the initiative in exactly those lines.
Who should play it
Tactically-minded players who face 1.d4 and want a sound surprise weapon that forces the game onto their terms from move two.
Study the Albin Countergambit move by move
The first 3 lines of the interactive course, exactly as a signed-out visitor can play them — each move with the coaching note shown on the board.
Line 1 — the main line
1.d4 White claims the center. 1...d5 We mirror their move. 2.c4 White plays the Queen's Gambit, likely expecting a quiet game. 2...e5 We strike back with the Albin Countergambit. 3.dxe5 White accepts the pawn sacrifice. 3...d4 We push forward, disrupting their setup. 4.Nf3 White immediately attacks our advanced pawn. 4...Nc6 We support d4 with our knight. 5.Nbd2 White develops, planning to bring their knight to b3 to pressure our pawn. 5...Nge7 We prepare to defend with a knight. 6.Nb3 White completes their knight's maneuver. 6...Nf5 Our knight steps up to defend. 7.e4 White pushes, challenging the knight. 7...dxe3 We take en passant and open lines. 8.Qxd8+ White initiates a queen trade. 8...Nxd8 We recapture, keeping our right to castle. 9.fxe3 White takes back, doubling pawns to keep the bishop pair. 9...g6 We prepare to fianchetto. 10.Bd2 White wants their bishop on the long diagonal too. 10...Bg7 We target their e5 pawn. 11.Kf2 White improves their king. 11...O-O We castle and bring the rook into play. 12.Bc3 White reinforces e5. 12...Re8 We activate the rook along the e file, increasing pressure on their pawn. 13.Bd3 White finishes developing. 13...Nc6 We reactivate this knight. 14.e4 White pushes again, forcing a retreat. 14...Nh6 We reposition the knight, preparing a return via g4. 15.h3 White prevents Ng4. 15...Nxe5 We capture and enter a comfortable middlegame without queens.
Line 2 — punishing a blunder
1.d4 White claims the center. 1...d5 We mirror their move. 2.c4 White plays the Queen's Gambit, likely expecting a quiet game. 2...e5 We strike back with the Albin Countergambit. 3.dxe5 White accepts the pawn sacrifice. 3...d4 We push forward, disrupting their setup. 4.Nf3 White immediately attacks our advanced pawn. 4...Nc6 We support d4 with our knight. 5.e3 White targets our d4 pawn. 5...Bb4+ We strike with a check. 6.Bd2 White blocks. 6...dxe3 Our pawn presses on. 7.Bxb4 They take our bishop. 7...exf2+ We take on f2 with check. 8.Ke2 White's king must stay linked to the queen. 8...Qxd1+ We exchange queens. 9.Kxd1 White takes back. 9...Nxb4 We recapture the bishop and stay a pawn up with a clear activity edge.
Line 3 — the main line
1.d4 White claims the center. 1...d5 We mirror their move. 2.c4 White plays the Queen's Gambit, likely expecting a quiet game. 2...e5 We strike back with the Albin Countergambit. 3.dxe5 White accepts the pawn sacrifice. 3...d4 We push forward, disrupting their setup. 4.Nf3 White immediately attacks our advanced pawn. 4...Nc6 We support d4 with our knight. 5.g3 White goes for a fianchetto. 5...Be6 We target the c4 pawn. 6.Nbd2 They defend. 6...Qd7 We develop the queen, eyeing queenside castling. 7.Bg2 White lines up on the long diagonal. 7...Bh3 We challenge their bishop right away. 8.O-O White castles for safety. 8...Bxg2 We remove their key defender. 9.Kxg2 They recapture. 9...h5 We begin a kingside pawn storm. 10.h4 White locks the structure. 10...O-O-O We castle queenside. 11.a3 White starts their own attack. 11...Nge7 We reposition our knight. 12.b4 Our opponent launches a pawn storm on the queenside. 12...Ng6 We complete the knight maneuver, pressuring e5.
The free preview ends here — continue with all 8 lines in the interactive course, with instant feedback on every move you play.
Frequently asked questions
Is the Albin Countergambit sound?
It is a respectable practical weapon. Grandmaster Alexander Morozevich revived it at top level, showing Black gets genuine compensation with accurate play. At club level the initiative and trap potential make it score excellently.
What is the Lasker Trap in the Albin Countergambit?
After 1.d4 d5 2.c4 e5 3.dxe5 d4 4.e3? Bb4+ 5.Bd2 dxe3!, White is already in serious trouble: 6.Bxb4?? exf2+ 7.Ke2 fxg1=N+! wins with an underpromotion. It is one of the most famous opening traps in chess.
How should White meet the Albin Countergambit?
The main line is 4.Nf3 followed by g3 and Bg2, returning to solid development. This course prepares you for exactly that setup, with clear plans to keep pressure and full value for the sacrificed pawn.
Learn the Albin Countergambit with AI feedback
This page pairs the guide above with an interactive ChessMind AI course: a GM-authored repertoire you study move by move on a real board, then practice against a human-like chess AI opponent with instant feedback and spaced-repetition review, so the key positions actually stick. Start learning, jump straight into practice, or browse all opening courses.
New to a concept? Every term is defined in the chess terms glossary.