Beat the Queen's Gambit Accepted
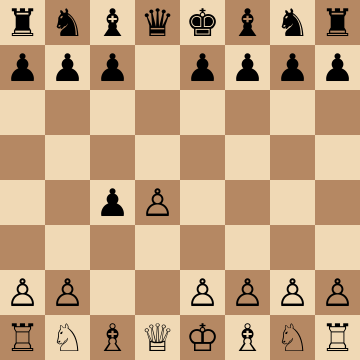
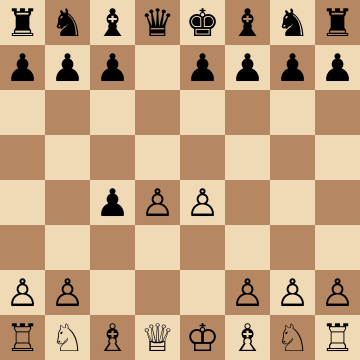
1.d4 d5 2.c4 dxc4 3.e4
The Queen's Gambit Accepted (1.d4 d5 2.c4 dxc4) is one of Black's most popular choices — take the pawn, develop quickly, strike back with ...c5. This course meets it with an aggressive approach: White uses the time Black spent on captures to seize the center and attack, rather than settling for the well-mapped equalish main lines.
Mainline
1.d4 d5 2.c4 dxc4 3.e4
Central Main Line: 3.e4 e5 4.Nf3
1.d4 d5 2.c4 dxc4 3.e4 e5 4.Nf3 exd4 5.Bxc4 Nc6 6.O-O Be6 7.Bxe6 fxe6 8.Qb3 Qd7 9.Qxb7 Rb8 10.Qa6 Nf6
This is the aggressive backbone of the repertoire: 3.e4 grabs the full center immediately. Black's critical try returns the pawn with 3...e5, and after 5.Bxc4 the bishop takes dead aim at f7 and e6. The forcing 8.Qb3 line shows the concrete point — Black's structure gets shredded on the light squares, and even after 9...Rb8 10.Qa6 White keeps the initiative and the healthier pawns. Development with tempo, every single move.
Punishing the 3...b5 Pawn Grab
1.d4 d5 2.c4 dxc4 3.e4 b5 4.a4 c6 5.axb5 cxb5 6.Nc3 a6 7.Nxb5 axb5 8.Rxa8 Bb7 9.Ra1
Trying to keep the extra pawn with 3...b5 is the QGA's oldest sin, and 4.a4 punishes it by force. After 4...c6 5.axb5 cxb5, the hammer 7.Nxb5! exploits the loose a8-rook: 7...axb5 8.Rxa8 wins the exchange outright, and 9.Ra1 consolidates. Students should play this sequence out until it is automatic — half of your club opponents will grab the pawn, and the refutation must come without thinking.
3...Nf6 4.e5: Space and Attack
1.d4 d5 2.c4 dxc4 3.e4 Nf6 4.e5 Nd5 5.Bxc4 Nb6 6.Bd3 Nc6 7.Ne2
Developing with 3...Nf6 lets White advance 4.e5 with tempo, driving the knight to d5 and then b6 while the c4-pawn falls anyway. The refined 6.Bd3 keeps the bishop on the attacking diagonal, and 7.Ne2 prepares f4 or Be3 without allowing ...Nb4 tricks. White's plan is a straightforward kingside expansion behind the e5-wedge — Black's knights sit on the queenside watching the attack arrive from the other flank.
3...c5 Break: 4.d5 Space Clamp
1.d4 d5 2.c4 dxc4 3.e4 c5 4.d5 Nf6 5.Nc3 b5 6.Bf4
Striking with 3...c5 invites 4.d5, converting the game into a Benoni structure where Black is a full tempo down and the c4-pawn is a long-term loan, not a gain. When Black tries to hold everything with 5...b5, the developing 6.Bf4 keeps calm — e5 breaks and Nxb5 tactics hang over the position, and White will regain c4 at the moment of maximum inconvenience. Space plus lead in development equals attack.
3...e5 with 4...Bb4+ Check
1.d4 d5 2.c4 dxc4 3.e4 e5 4.Nf3 Bb4+ 5.Bd2 Bxd2+ 6.Nbxd2 exd4 7.Bxc4 Nc6 8.O-O
The check on b4 is Black's attempt to trade into a quieter version of the central line — allow it and keep the initiative anyway. After 6.Nbxd2 exd4, White does not hurry to regain d4: 7.Bxc4 and 8.O-O first, because the lead in development matters more than the pawn. Rooks come to e1 and d1, the d4-pawn falls when convenient, and Black spends the whole opening catching up. A model of dynamic pawn play.
Key ideas
- Use Black's spent tempo: the c4-pawn always comes back, and White converts the time into activity.
- Occupy the center ambitiously — the big-center approach asks Black questions from move three.
- Punish the greedy ...b5 attempts to keep the pawn, which lose by force to well-known blows.
- Attack the queenside dark squares and the half-open c-file once development completes.
Typical plans and structures
White regains the pawn under favorable circumstances and builds an active setup: central pawns rolling, bishop actively placed on the a2-g8 diagonal aiming at f7, and rapid piece pressure before Black's ...c5 and ...b5 expansion coordinates. Black's critical decisions — when to play ...c5, how to develop the c8-bishop — each carry concrete drawbacks that the course targets. The recurring theme is initiative: in the QGA, whoever develops with purpose first dictates the middlegame.
Who should play it
1.d4 players who face the QGA constantly and want an ambitious, initiative-first repertoire instead of the heavily-analyzed neutral main lines.
Study Beat the Queen's Gambit Accepted move by move
The first 3 lines of the interactive course, exactly as a signed-out visitor can play them — each move with the coaching note shown on the board.
Line 1 — the main line
1.d4 We take the center. 1...d5 Our opponent responds symmetrically. 2.c4 We play the Queen's Gambit, inviting our opponent to cede some central control by accepting the pawn. 2...dxc4 Our opponent accepts the gambit! Of course, they know what they are doing and this is a very respectable line if played accurately. We will take control of the center, but Black has several ways to obtain counterplay. 3.e4 We play the most aggressive setup by forming our "perfect center" (with e4 and d4), and now threaten Bxc4 regaining the pawn. 3...e5 Our opponent challenges our center immediately by offering a pawn, we don't want to accept this countergambit. 4.Nf3 We develop our knight and protect the pawn, to avoid ...Qxd4 which would take our pawn while offering a queen trade we want to avoid. 4...exd4 Taking another pawn, we are momentarily two pawns down, but can regain one right away. 5.Bxc4 We recapture the c4 pawn, creating some pressure on f7. 5...Nc6 Our opponent develops a knight and protects the d4 pawn. 6.O-O We castle short and may continue with Qb3 to start an attack. 6...Be6 Offering to trade bishops in order to neutralize the pressure along the diagonal. 7.Bb5 We avoid the trade and instead threaten Nxd4 as well as Bxc6 doubling the pawns. 7...Bc5 Developing the bishop and protecting the d4 pawn once more. 8.b4! We want to develop our bishop via b2, so offer another pawn to gain a tempo. Our opponent should not take it. 8...Bb6 This is the right response, the bishop remains safe and continues to protect the pawn on d4. 9.a4 We threaten to trap the bishop with a4 a5. 9...a6 Our opponent clears the a7 square for the bishop to escape. 10.Bxc6+ We trade a defender for the d4 pawn and damage our opponent's pawn structure. 10...bxc6 Recapturing the piece. 11.a5 We push the pawn before our opponent plays ...a6 a5 turning our a4 pawn into a vulnerability. 11...Ba7 Moving the bishop back to a safe square. 12.Bb2 We can finally develop our bishop, attacking the d4 pawn, we'll regain it in the next move. 12...Nf6 Developing the knight and putting some pressure on our e4 pawn. 13.Bxd4 We regain the pawn. 13...Bxd4 Our opponent trades bishops, it's bound to happen sooner or later. 14.Nxd4 We have regained the pawn and have a slightly better pawn structure because of the double isolated pawns on c6 and c7.
Line 2 — against an inaccuracy
1.d4 We take the center. 1...d5 Our opponent responds symmetrically. 2.c4 We play the Queen's Gambit, inviting our opponent to cede some central control by accepting the pawn. 2...dxc4 Our opponent accepts the gambit! Of course, they know what they are doing and this is a very respectable line if played accurately. We will take control of the center, but Black has several ways to obtain counterplay. 3.e4 We play the most aggressive setup by forming our "perfect center" (with e4 and d4), and now threaten Bxc4 regaining the pawn. 3...e5 Our opponent challenges our center immediately by offering a pawn, we don't want to accept this countergambit. 4.Nf3 We develop our knight and protect the pawn, to avoid ...Qxd4 which would take our pawn while offering a queen trade we want to avoid. 4...exd4 Taking another pawn, we are momentarily two pawns down, but can regain one right away. 5.Bxc4 We recapture the c4 pawn, creating some pressure on f7. 5...Nc6 Our opponent develops a knight and protects the d4 pawn. 6.O-O We castle short and may continue with Qb3 to start an attack. 6...Be6 Offering to trade bishops in order to neutralize the pressure along the diagonal. 7.Bb5 We avoid the trade and instead threaten Nxd4 as well as Bxc6 doubling the pawns. 7...Bc5 Developing the bishop and protecting the d4 pawn once more. 8.b4! We want to develop our bishop via b2, so offer another pawn to gain a tempo. Our opponent should not take it. 8...Bxb4 Our opponent takes the pawn, but leaves their bishop exposed. 9.Qa4 We threaten to capture the bishop. 9...a5 Our opponent tries to keep the bishop on b4 to block our queen and prevent us from capturing Nxd4. 10.a3 We expel the bishop to capture on d4 next. 10...Be7 The bishop needs to retreat and it can't go to c5 (it would be lost after Bxc6). 11.Nxd4 We have regained one pawn and will regain the other after capturing on c6. We are better due to our strong initiative and our opponent's king still being in the center.
Line 3 — against an inaccuracy
1.d4 We take the center. 1...d5 Our opponent responds symmetrically. 2.c4 We play the Queen's Gambit, inviting our opponent to cede some central control by accepting the pawn. 2...dxc4 Our opponent accepts the gambit! Of course, they know what they are doing and this is a very respectable line if played accurately. We will take control of the center, but Black has several ways to obtain counterplay. 3.e4 We play the most aggressive setup by forming our "perfect center" (with e4 and d4), and now threaten Bxc4 regaining the pawn. 3...e5 Our opponent challenges our center immediately by offering a pawn, we don't want to accept this countergambit. 4.Nf3 We develop our knight and protect the pawn, to avoid ...Qxd4 which would take our pawn while offering a queen trade we want to avoid. 4...exd4 Taking another pawn, we are momentarily two pawns down, but can regain one right away. 5.Bxc4 We recapture the c4 pawn, creating some pressure on f7. 5...c5? Our opponent tries to hold on to the extra pawn, but this is very dangerous. 6.Ne5 We threaten to capture on f7, and our opponent needs to find very precise moves to avoid losing immediately. 6...Be6 The only move, preventing an immediate capture. 7.Bxe6 We trade bishops to facilitate a deadly check on h5. 7...fxe6 Recapturing the piece. 8.Qh5+ The only logical continuation, we bring our queen into the attack with a check. 8...g6 Another only move, since ...Ke7 would have lost almost immediately. 9.Qh3 Rather than taking on g6, we rather attack the pawn on e6 and keep our options open. 9...Qf6 Again, the best defensive move, protecting both pawns no e6 and g6. 10.f4 We support the knight and prepare to bring more pieces into the attack. 10...Nd7 Our opponent wants to trade our key attacker even if it means losing their castling rights. We are not in a rush to accept this trade, although we won't prevent it either. 11.O-O We castle short, offering another pawn. If the pawn is not captured, we are preparing an invasion with Na3-Nb5. 11...Nxe5 Accepting the challenge is very dangerous because Black's king is still in the center and very unsafe. 12.fxe5 We recapture the piece. 12...Qxe5 Black is now two pawns up, but we have a massive development lead and are ready to exploit it! 13.Bf4 We develop the bishop with a tempo, and don't mind offering a third pawn. 13...Qxe4 Black keeps taking the bait, although at this point other choices would be lost too. 14.Na3 Although we are three pawns down, we are completely winning. Our next moves will be Rae1, Nb5 and possibly Be5 with all kinds of decisive threats.
The free preview ends here — continue with all 19 lines in the interactive course, with instant feedback on every move you play.
Frequently asked questions
Can Black just keep the extra pawn in the Queen's Gambit Accepted?
No — attempts to hold c4 with ...b5 fail tactically: the classic sequence with a4 and axb5 or the Qf3 double attack wins material or worse. Every QGA main line has Black returning the pawn; the fight is about what each side gets in the meantime.
Why is the QGA popular with Black players?
It avoids the cramped positions of the Declined lines: Black gets free development, the c8-bishop escapes the pawn chain, and the ...c5 counterstrike promises clean equality if White plays routinely. That last word is the key — this course exists so you never play routinely against it.
What is White's most aggressive approach against the QGA?
Grabbing the full center immediately is the most ambitious try, forcing Black to prove the counterattack works before development is complete. That initiative-first philosophy is the backbone of this course's repertoire.
Learn Beat the Queen's Gambit Accepted with AI feedback
This page pairs the guide above with an interactive ChessMind AI course: a GM-authored repertoire you study move by move on a real board, then practice against a human-like chess AI opponent with instant feedback and spaced-repetition review, so the key positions actually stick. Start learning, jump straight into practice, or browse all opening courses.
New to a concept? Every term is defined in the chess terms glossary.