London System
1.d4 d5 2.Nf3 Nf6 3.Bf4
The London System is a solid, low-maintenance setup for White built around an early Bf4. Instead of memorizing long forcing lines, you learn a small number of reliable ideas you can play against almost anything Black tries.
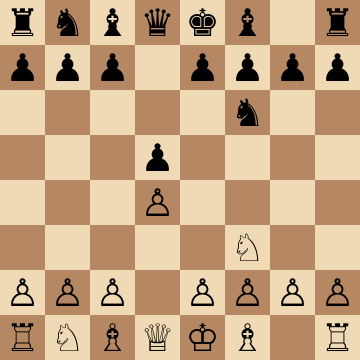
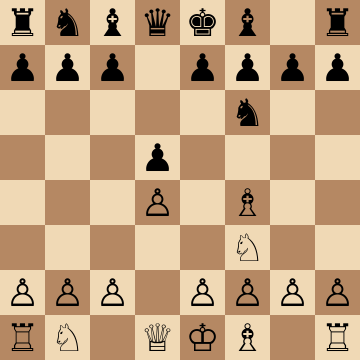
Mainline
1.d4 d5 2.Nf3 Nf6 3.Bf4 c5 4.e3 Nc6 5.Nbd2 e6 6.c3 Bd6 7.Bg3 O-O 8.Bd3
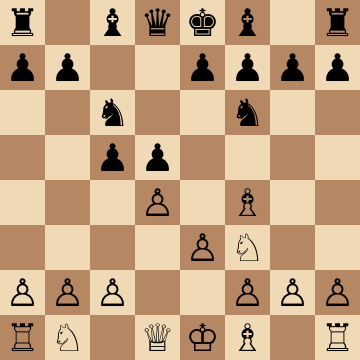
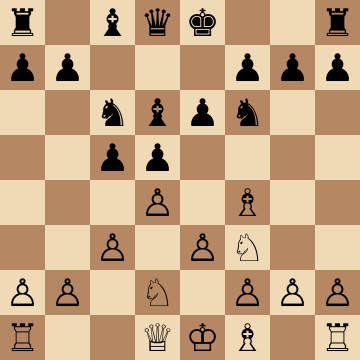
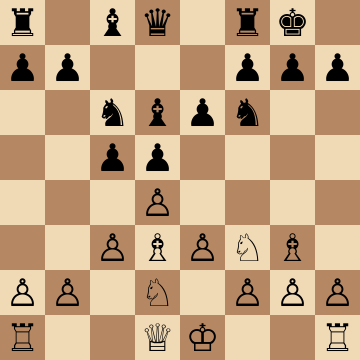
London System vs ...c5 (main line)
1.d4 d5 2.Nf3 Nf6 3.Bf4 c5 4.e3 Nc6 5.c3 Qb6
Black's most testing setup: hit d4 with ...c5 and probe b2 with ...Qb6. White's modern answer is to let the queen sit there and play Qb3 or Nbd2-b3, keeping the structure and finishing development. Knowing this exact sequence is what separates a London player from someone just pushing pieces to the same squares.
London System vs the King's Indian setup (...g6)
1.d4 Nf6 2.Nf3 g6 3.Bf4 Bg7 4.e3 O-O 5.h3 d6
Against a kingside fianchetto the bishop on f4 already eyes the weakened dark squares. White plays h3 to give the bishop a retreat, castles, and expands with e4 or c4 depending on Black's break. Solid, low-theory, and it keeps the King's Indian player out of their own preparation.
Jobava London (2.Nc3 and 3.Bf4)
1.d4 Nf6 2.Nc3 d5 3.Bf4 e6 4.e3 Bd6 5.Bg3
The aggressive cousin of the classical London: the knight goes to c3 instead of d2, ready for Nb5 tricks and a quick f3-e4 push. It has become a favorite at every level because it keeps the London's simplicity while playing for a real attack.
London System vs ...Bf5 (the mirror)
1.d4 d5 2.Nf3 Nf6 3.Bf4 Bf5 4.e3 e6 5.c4 c6
Black copies the setup and develops the bishop outside the pawn chain. White breaks the symmetry with c4 and pressure on the queenside — the standard recipe against any mirror system: be the first to create a concrete threat.
Accelerated London (2.Bf4)
1.d4 d5 2.Bf4 Nf6 3.e3 e6 4.Nf3 Bd6
Playing Bf4 before Nf3 dodges the ...Bf5 and ...Qb6 lines, at the cost of allowing ...c5 with tempo ideas. A useful move-order tool once you know which structures you want to steer into.
How Black should meet the London
1.d4 d5 2.Nf3 Nf6 3.Bf4 e6 4.e3 Bd6 5.Bg3 O-O
If you are on the receiving end, the most reliable plan is to trade the strong dark-squared bishop with ...Bd6 and then play ...c5 or ...Ne4 at the right moment. Handled correctly the London gives Black an easy game — the trick is knowing the trade timing.
Study the Beat the London System course
Key ideas
- A flexible d4 + Bf4 setup you can reach against most Black replies.
- Rock-solid pawn structure that is hard to break down.
- Clear middlegame plans (piece placement, kingside expansion) rather than heavy theory.
- Ideal for players who want to spend time improving, not memorizing.
Typical plans and structures
The pieces have standing orders: bishop to f4 (retreating to g3 when hit), pawns to e3 and c3, knights to d2 and f3, bishop to d3, castle short. From there White chooses between the central e3-e4 break, the queenside b4 clamp, and the classic kingside attack with Ne5, f4 and Qf3-h3 against a castled king. Because the structure is so stable, mistakes rarely get punished severely — while Black must still solve real problems, especially against the Ne5 attacking setup.
How to reach the London System
The London System is a setup, not a move order, so it can be reached against almost any Black reply: 1.d4 d5 2.Bf4 or 2.Nf3 Nf6 3.Bf4, 1.d4 Nf6 2.Bf4, and even 1.d4 with ...g6, ...c5 or ...e6 setups all lead to the same structure with the bishop on f4, pawns on e3, c3 and d4, knights on f3 and d2, and the bishop on d3. The Accelerated London 2.Bf4 is the modern move order because it keeps c3 flexible; the Jobava London 2.Nc3 and 3.Bf4 is the aggressive cousin that puts the knight on c3 instead of d2 and aims for e4 or Nb5.
Pros and cons of the London System
Pros
- One setup against every defense: the same twelve moves work whether Black plays ...d5, ...Nf6 and ...g6, or ...c5.
- Almost no forcing theory; the plans matter more than the lines, which is why it is the most popular club opening in the world.
- The bishop comes out before e3 closes it in, and the structure has no weaknesses, so mistakes are rarely punished hard.
- Real attacking chances against a castled king with Ne5, f4 and the Qf3-h3 lift, and a clear queenside plan with b4 and c4 when Black plays ...c5.
Cons
- Black equalizes comfortably with the right setup; the London gives up any claim to an opening advantage.
- The early ...c5 and ...Qb6 hitting b2 is awkward if White does not know the answer, and ...Bf5 mirrors the plan for Black.
- Playing it on autopilot leads to lifeless, drawish positions, which is why strong players think of it as a weapon for the middlegame rather than the opening.
- The Jobava lines are sharper but need real preparation, and the Accelerated 2.Bf4 allows ...c5 with ...Qb6 immediately.
How to play against the London System
Black's best answers all attack the London's one soft spot, the b2-pawn and the c1-h6 diagonal behind the f4-bishop. The most testing is an early ...c5 followed by ...Qb6, forcing White to choose between the awkward Qb3 trade, the pawn sacrifice Nc3, and the passive Qc1; a prepared London player knows the answer, an unprepared one loses a pawn or the initiative. The second is the mirror setup with ...Bf5, which neutralizes the d3-bishop and leaves a symmetrical, equal game. The King's Indian setup with ...g6, ...Bg7, ...d6 and ...Nbd7 followed by ...Qe8 and ...e5 is the choice of players who want a fight: it takes the London's favourite Ne5 square away and prepares a kingside expansion. Whatever you choose, do not copy White's slow plan; the London is only dangerous against a Black player who waits.
Plans for both sides
White's plan
Complete the setup, castle short, and choose the plan by Black's structure: against ...d5 and ...e6, play Ne5, f4 and the Qf3-h3 lift for a kingside attack, or the e4 break after Re1 and Qe2; against ...c5, hold the center with c3 and dxc5 at the right moment and use the queenside with a4 and b4 or the c4 break. Keep the f4-bishop, retreating to g3 when it is hit by ...Nh5 or ...Bd6, and never allow ...e5 for free.
Black's plan
Strike at b2 early with ...c5 and ...Qb6, or take the e5-square away with ...Nbd7 and ...Qe8 in the King's Indian setup, and play ...e5 as soon as it is supported. Trade the d3-bishop with ...Bf5 or ...Bg4 and ...Bxf3 when the kingside attack is coming, and use the c-file and the ...c5 break for counterplay. Do not let White's slow buildup turn into an attack for free.
Who should play it
Club and improving players who want a dependable White opening with a low theory burden and clear plans.
History of the London System
The name comes from the 1922 London tournament, where several masters, including Alekhine and Capablanca, used the Bf4 setup with success, though the structure had been played for decades before. It stayed a quiet, respectable system through the twentieth century until the 2010s, when Carlsen, Kamsky and Grischuk brought it into elite practice and Carlsen used it in the 2016 world championship. The Jobava London, named after the Georgian grandmaster Baadur Jobava, added a sharp modern branch in the same decade. Online it became the most played 1.d4 opening of all, the choice of a generation of club players who wanted a system rather than a theory battle.
Study the London System move by move
The first 3 lines of the interactive course, exactly as a signed-out visitor can play them — each move with the coaching note shown on the board.
Line 1 — punishing a blunder
1.d4 We start with a solid central pawn. 1...d5 Black does the same. 2.Nf3 We develop our knight toward the center. 2...Nf6 Black mirrors us. 3.Bf4 We bring out our bishop to support the setup. 3...c5 Black quickly challenges the center. 4.e3 We defend the pawn and prepare to develop. 4...Nc6 More pressure on the center. 5.Nbd2 This knight supports the center and keeps our structure flexible. 5...e6 Solid, but blocks the light square bishop. 6.c3 We build a strong center and pawn triangle. 6...Nh5 Black plays actively, hitting our bishop. 7.Bg5 We attack the queen. 7...f6 Black hits our bishop. 8.Bh4 We retreat and keep pressure. 8...cxd4 Black trades in the center. 9.cxd4 We recapture and hold the center. 9...Be7 Black prepares to castle. 10.Bd3 We develop and eye key squares. 10...O-O Black castles. 11.g4 We challenge the knight. 11...g5 Black defends actively. 12.Qb1 We activate the queen for kingside attack. 12...gxh4?? Black takes but opens their king. 13.Bxh7+ We start the attack deep in enemy lines. 13...Kh8 King steps aside. 14.Qg6! Queen joins the attack. 14...Ng7 Black blocks and defends. 15.Qh6 We threaten mate. 15...Rf7 Black defends. 16.Bg6+ We check and force movement. 16...Kg8 King steps aside. 17.Qh7+ Another strong check. 17...Kf8 Black tries to escape. 18.Qh8# We deliver checkmate.
Line 2 — the main line
1.d4 We start with a solid central pawn. 1...d5 Black does the same. 2.Nf3 We develop our knight toward the center. 2...Nf6 Black mirrors us. 3.Bf4 We bring out our bishop to support the setup. 3...c5 Black quickly challenges the center. 4.e3 We defend the pawn and prepare to develop. 4...Nc6 More pressure on the center. 5.Nbd2 This knight supports the center and keeps our structure flexible. 5...e6 Solid, but blocks the light square bishop. 6.c3 We build a strong center and pawn triangle. 6...Bd6 Black wants to trade our bishop. 7.Bg3 We step back and stay ready to recapture. 7...O-O Black castles. 8.Bd3 Our bishop helps control the center. 8...b6 Black gets ready to develop. 9.e4 We strike in the center. 9...Be7 Black retreats. 10.e5 We push and kick the knight. 10...Nh5 Black moves awkwardly. 11.Ng5 We launch tactics with a possible knight sac. 11...Bxg5 Black takes. 12.Qxh5 We recapture with tempo and threaten mate. 12...g6 Blocking the checkmate threat. 13.Qe2 We retreat for now, but prepare to launch a kingside attack with h2 h4-h5. 13...cxd4 Our opponent does not miss the chance to take our central pawn. 14.h4 We push forward with our kingside attack. 14...Be7 Our opponent brings the bishop back (rather than trading it) because it's a valuable defender. 15.h5 Although we are a pawn down, we have a significant advantage due to our kingside attack.
Line 3 — against an inaccuracy
1.d4 We start with a solid central pawn. 1...d5 Black does the same. 2.Nf3 We develop our knight toward the center. 2...Nf6 Black mirrors us. 3.Bf4 We bring out our bishop to support the setup. 3...c5 Black quickly challenges the center. 4.e3 We defend the pawn and prepare to develop. 4...Nc6 More pressure on the center. 5.Nbd2 This knight supports the center and keeps our structure flexible. 5...e6 Solid, but blocks the light square bishop. 6.c3 We build a strong center and pawn triangle. 6...Bd6 Black wants to trade our bishop. 7.Bg3 We step back and stay ready to recapture. 7...O-O Black castles. 8.Bd3 Our bishop helps control the center. 8...b6 Black gets ready to develop. 9.e4 We strike in the center. 9...Be7 Black retreats. 10.e5 We push and kick the knight. 10...Nh5 Black moves awkwardly. 11.Ng5 We launch tactics with a possible knight sac. 11...Bxg5 Black takes. 12.Qxh5 We recapture with tempo and threaten mate. 12...Bxd2+? This is a mistake. Our opponent takes away our castling rights, but gives up their valuable dark squared bishop. 13.Kxd2 Our king is perfectly safe, because the center is relatively closed and we are the ones with the attack and the initiative anyway. 13...g6 Black blocks the queen's path. 14.Qh6 We keep pressure near the king. 14...f5 Black tries to close the kingside. 15.Bh4 Our bishop dominates the dark squares.
The free preview ends here — continue with all 8 lines in the interactive course, with instant feedback on every move you play.
Frequently asked questions
Why is the London System so popular?
It combines near-universal applicability with genuine soundness: one setup handles most Black defenses, the theory burden is tiny, and even world champions — Magnus Carlsen included — have used it as a practical weapon. You invest your study time in plans, not memorization.
Is the London System too passive to win with?
No — that reputation is outdated. The Ne5-f4 attacking plan, the e4 break and the queenside space grab all give White real winning attempts, and modern grandmaster practice (Gata Kamsky's career, Carlsen's rapid games) shows the London scoring at the highest level.
What is the best move order for the London System?
Both main move orders are respectable: the classical 2.Nf3 followed by 3.Bf4 — the order this course is built on — and the modern immediate 2.Bf4. The classical order keeps development flexible and reaches the same core setup while sidestepping some early ...c5 and ...Qb6 tries.
How do you play against the London System?
Attack the b2-pawn early with ...c5 and ...Qb6, mirror the setup with ...Bf5, or play the King's Indian setup with ...g6, ...d6, ...Nbd7 and ...Qe8 to prepare ...e5 and take the e5-square from White's knight. Do not wait for White's attack to arrive.
Is the London System good for beginners?
Yes. It is the most recommended first opening for White because the same setup works against everything, the plans are easy to remember, and the structure is hard to punish. Its limit is that it does not teach open, tactical chess, so beginners should also learn 1.e4 openings.
Do grandmasters play the London System?
Yes. Carlsen used it in the 2016 world championship, and Kamsky, Grischuk and Jobava have played it regularly. At the top level it is a way to reach a playable middlegame without a theory battle rather than a claim to an opening advantage.
Learn the London System with AI feedback
This page pairs the guide above with an interactive ChessMind AI course: a GM-authored repertoire you study move by move on a real board, then practice against a human-like chess AI opponent with instant feedback and spaced-repetition review, so the key positions actually stick. Start learning, jump straight into practice, or browse all opening courses.
New to a concept? Every term is defined in the chess terms glossary.