Pirc Defense
1.e4 d6
The Pirc Defense (1.e4 d6 2.d4 Nf6 3.Nc3 g6) is the King's Indian player's answer to 1.e4: concede the center, fianchetto the g7-bishop, and counterattack a position White must overextend to press. Flexible, dynamic, and rich in the sharp middlegames counterpunchers love.
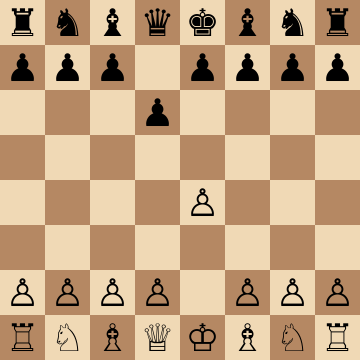
Mainline
1.e4 d6 2.d4 Nf6 3.Nc3 g6 4.Nf3 Bg7 5.Be2 O-O 6.O-O c6
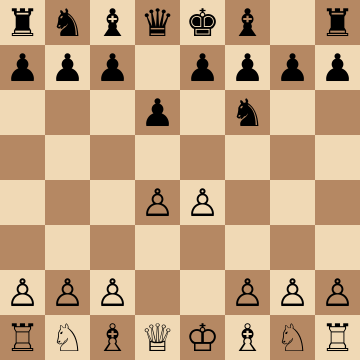
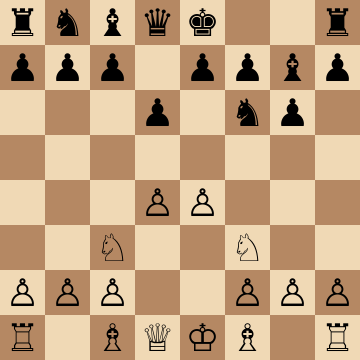
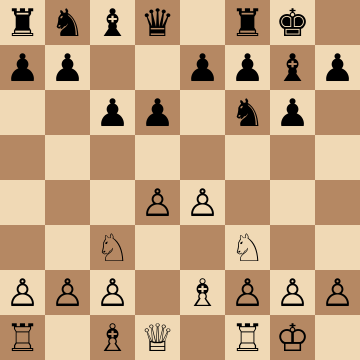
Classical Main: 5.Be2 O-O 6.O-O c6
1.e4 d6 2.d4 Nf6 3.Nc3 g6 4.Nf3 Bg7 5.Be2 O-O 6.O-O c6 7.a4 Nbd7 8.h3 e5 9.dxe5 dxe5
Against White's most solid setup, Black builds the flexible wall: ...c6 covers d5 and prepares ...b5, while ...Nbd7 and ...e5 stake the classical claim in the center. When White releases the tension with dxe5, the resulting symmetrical structure favors the better-placed pieces — and Black's g7 bishop plus the e5 strongpoint qualify. Maneuver with ...Qc7, ...Re8 and ...Nc5 or ...Nh5; patient play here suits the Pirc's counterpunching soul perfectly.
Austrian Attack: 5...c5 Main Line
1.e4 d6 2.d4 Nf6 3.Nc3 g6 4.f4 Bg7 5.Nf3 c5 6.dxc5 Qa5 7.Bd3 Qxc5 8.Qe2 O-O 9.Be3 Qa5 10.O-O Bg4
The Austrian's pawn storm demands an immediate counterstrike, and 5...c5! is it — hitting d4 before White finishes mobilizing. After 6.dxc5 Qa5 the queen pins the c3 knight and recaptures on c5 with tempo; White's space advantage never fully materializes. From here ...Bg4 and ...Nc6 target d4-squares White's f-pawn left behind. This is the concrete line that lets Pirc players welcome 4.f4 instead of fearing it.
Study the Beat The Pirc course
Austrian Attack: 5...O-O 6.Bd3 Na6
1.e4 d6 2.d4 Nf6 3.Nc3 g6 4.f4 Bg7 5.Nf3 O-O 6.Bd3 Na6 7.O-O c5 8.d5 Nc7
The modern alternative for players who prefer structure to forcing lines: castle first, then develop the knight to a6 where it supports ...c5 without blocking the c-pawn. After 7...c5 8.d5 the position takes on Benoni contours — the c7 knight prepares ...b5, the g7 bishop waits for the center to loosen, and White's ambitious f4 push becomes a target for ...e6 breaks. A complete system in itself, and much easier to handle than the razor-sharp 5...c5 lines.
150 Attack: 4.Be3 c6 and the ...b5 Race
1.e4 d6 2.d4 Nf6 3.Nc3 g6 4.Be3 c6 5.Qd2 b5 6.f3 Nbd7 7.g4 Nb6 8.h4 h5
The 150 Attack — Be3, Qd2, opposite-side castling and a pawn avalanche — is White's most dangerous club weapon against the Pirc. Black's answer starts before castling: 4...c6 and 5...b5 launch the counterattack immediately, and delaying ...O-O denies White a fixed target. When the g4-h4 storm comes, 8...h5! is the key brake, forcing concessions before any file opens. Time matters more than material in these races; the course drills exactly which tempi to spend where.
Byrne Variation: 4.Bg5 h6 and ...g5
1.e4 d6 2.d4 Nf6 3.Nc3 g6 4.Bg5 Bg7 5.Qd2 h6 6.Bh4 g5 7.Bg3 Nh5
Byrne's 4.Bg5 aims at the e7 pawn and a quick Qd2 with O-O-O — so Black asks the bishop a rude question. The sequence 5...h6, 6...g5 and 7...Nh5 wins the bishop pair by force, since retreating to g3 walks into the knight trade. Yes, the kingside pawns advance early, but with the center closed the loosening is theoretical while the two bishops are permanent. A perfect illustration of Pirc philosophy: let White commit first, then strike at what was left behind.
Premature 4.e5? Punished
1.e4 d6 2.d4 Nf6 3.Nc3 g6 4.e5 dxe5 5.dxe5 Qxd1+ 6.Kxd1 Ng4 7.Ke1 Nxe5
Impatient opponents push 4.e5? believing they are refuting the Pirc — teach them otherwise. The center dissolves with 4...dxe5, the queen trade 5...Qxd1+ strips White of castling rights, and 6...Ng4 forks toward the stranded e5 pawn, which falls after 7...Nxe5. Black emerges a clean pawn up in a queenless middlegame with the better structure. The pattern generalizes: every unprepared central advance in the Pirc leaves pawns behind their support, and ...dxe5 with ...Ng4 collects.
Key ideas
- Fianchetto and stay flexible: ...c6 with ...b5, or ...e5, or ...c5 — the strike fits White's setup.
- Invite overextension: every White pawn that crosses the fourth rank becomes a future target.
- Meet the Austrian Attack's aggression with precise counterplay — the critical test, fully covered.
- Carry your King's Indian instincts into 1.e4 games: same bishop, same spirit, same plans.
Typical plans and structures
Against classical setups (Be2, Nf3), Black plays ...c6 and ...b5 or the central ...e5, maneuvering behind a solid wall until the counterstrike lands. Against the Austrian Attack (f4), the game sharpens immediately and the course provides the concrete lines where Black's counterattack arrives in time. Piece play revolves around the g7-bishop and the e5/c5 squares; endgames often favor Black's healthier structure once White's space has been neutralized.
Who should play it
Counterattacking players — especially King's Indian devotees — who want a flexible, fighting defense to 1.e4 and accept sharp, risky middlegames as the price of winning chances.
Study the Pirc Defense move by move
The first 3 lines of the interactive course, exactly as a signed-out visitor can play them — each move with the coaching note shown on the board.
Line 1 — the main line
1.e4 Our opponent takes the center. 1...d6 We launch the Pirc defense! 2.d4 White completes their perfect center. 2...Nf6 We develop our knight attacking the pawn on e4. This is important because it basically forces White to play Nc3 blocking their own c pawn, so they won't be able to push c2 c4. 3.Nc3 Developing the knight and protecting the pawn. 3...g6 We prepare to fianchetto our bishop. 4.Nf3 Our opponent develops their knight instead of pushing their f pawn, this is a more positional approach. 4...Bg7 We fianchetto our bishop and prepare to castle next. 5.Be2 Developing the bishop. 5...O-O We castle short, this is practically the only choice in the Pirc. 6.O-O Our opponent castles short as well. This is expected after Nf3 has been played. 6...c6 We advance this pawn to keep a flexible structure, control the d5 square, and prepare to gain space on the queenside with b7 b5. 7.a4 Our opponent prevents our expansion plan by controlling b5 with pawn, bishop, and knight. 7...Nbd7 We develop our knight preparing ...e7 e5. 8.h3 Our opponent wants to develop the bishop to e3, but Ng4 would be unpleasant, so they first push this pawn to control that square. 8...Qc7 We develop our queen prepareing ...e7 e5 even further. 9.Be3 Developing the bishop as expected. 9...e5 We break in the center, challenging our opponent's control, in order to activate our pieces. 10.dxe5 Our opponent trades on e5 to prevent ...exd4 which would open the long diagonal for our bishop and e file for our rook. 10...Nxe5 We recapture with the knight, offering an exchange. We prefer this over ... dxe5 to avoid being too cramped. 11.Nxe5 Our opponent captures, forcing us to take back with a pawn (closing the file and diagonal again). 11...dxe5 We recapture. 12.Bc4 Activating the bishop along the a2 g8 diagonal and clearing the way for the queen to develop. 12...a5 We stop our opponent from squeezing us with a4 a5. 13.Qf3 Developing the queen and clearing d1 for a rook. 13...Re8 Even though the e file is closed, this is a standard move in these positions. We prepare ...Be6 to trade bishops without damaging our pawn structure. 14.Rfd1 Our opponent activates the rook along the d file. 14...Be6 We reach a flexible, well-coordinated setup and now plan to improve our pieces, for example bringing the dark squared bishop to the queenside with ... Bf8.
Line 2 — the main line
1.e4 Our opponent takes the center. 1...d6 We launch the Pirc defense! 2.d4 White completes their perfect center. 2...Nf6 We develop our knight attacking the pawn on e4. This is important because it basically forces White to play Nc3 blocking their own c pawn, so they won't be able to push c2 c4. 3.Nc3 Developing the knight and protecting the pawn. 3...g6 We prepare to fianchetto our bishop. 4.Nf3 Our opponent develops their knight instead of pushing their f pawn, this is a more positional approach. 4...Bg7 We fianchetto our bishop and prepare to castle next. 5.h3 Our opponent prepares Be3, first preventing our ...Ng4. 5...O-O We castle short as usual. 6.Be3 Developing the bishop to an optimal square. 6...c6 We strengthen our central control and prepare to expand on the queenside with ...b7 b5. 7.Qd2 Developing the queen. Although this move creates the possibility for a queenside castle, that's not the plan here, since White should have played f2 f3 for that plan to make more sense. 7...b5 Threatening ...b5 b4 to remove the defender of the e4 pawn. 8.Bd3 Protecting the e4 pawn. 8...Nbd7 We develop our knight preparing to break in the center with ...e7 e5. 9.O-O Castling short. 9...Bb7 We develop our bishop. 10.e5 Our opponent pushes in the center, driving our knight back, since jumping to d5 would lose the b5 pawn after the exchanges. 10...Ne8 We retreat, opening the diagonal for our fianchettoed bishop to join the knight and d6 pawn in pressuring e5. 11.exd6 Our opponent simplifies to reduce pressure on the center. 11...exd6 We take back with the pawn, regaining control of the e5 and c5 squares. 12.Rfe1 Our opponent wants to activate their rook along the only open file. 12...Nef6 We bring our knight back into play. 13.Bf4 Targeting our d6 pawn and opening the e file for their rook. 13...Nb6 Our pieces are well coordinated, and we have a comfortable game.
Line 3 — the main line
1.e4 Our opponent takes the center. 1...d6 We launch the Pirc defense! 2.d4 White completes their perfect center. 2...Nf6 We develop our knight attacking the pawn on e4. This is important because it basically forces White to play Nc3 blocking their own c pawn, so they won't be able to push c2 c4. 3.Nc3 Developing the knight and protecting the pawn. 3...g6 We prepare to fianchetto our bishop. 4.Nf3 Our opponent develops their knight instead of pushing their f pawn, this is a more positional approach. 4...Bg7 We fianchetto our bishop and prepare to castle next. 5.Bc4 The bishop develops to an active square, eyeing our f7 pawn. 5...O-O We castle short, protecting the f7 pawn with the rook, and prepare a trick. 6.O-O Our opponent castles short. 6...Nxe4! We temporarily sacrifice our knight, planning to recover the material with a typical ...d6 d5 fork. The point of this sequence is destroying White's powerful center. 7.Nxe4 Our opponent accepts our knight. Taking on f7 was not better. 7...d5 This is a standard fork we use to recover the material. 8.Bd3 Naturally, our opponent should keep the bishop pair because this is an open game. 8...dxe4 We recapture the piece. 9.Bxe4 Recapturing the pawn, we are back to equal material. 9...Nd7 We develop our knight and prepare ideas like ...c7 c5 to challenge White's center even further. 10.c3 Reinforcing the d4 pawn and countering our fianchettoed bishop. 10...c5 We strike with a pawn break to open lines and reactivate our bishop. 11.Be3 Our opponent brings out their bishop to protect the d4 pawn. 11...Qc7 We develop our queen and clear d8 for a rook. 12.Re1 Placing the rook on the only open file. 12...Nf6 We want to drive their bishop away so that we are able to play ... b7 b6 sooner or later. 13.Bd3 Our opponent pulls the bishop back. 13...Nd5 We have completely equalized, our opponent's center is not particularly strong, and we can complete our development soon, perhaps with ...b7 b6 and ... Bb7.
The free preview ends here — continue with all 15 lines in the interactive course, with instant feedback on every move you play.
Frequently asked questions
What is the difference between the Pirc and the Modern Defense?
The Pirc commits the knight to f6 early; the Modern delays it for extra flexibility. The Pirc's ...Nf6 fights for e4 immediately and defines the structures sooner — a trade of some flexibility for more direct piece play.
How dangerous is the Austrian Attack for the Pirc?
It is White's most testing plan — a massive pawn front with f4 — and unprepared Black players suffer. Prepared ones welcome it: the overextended center gives the counterattack real targets, and the course's coverage is built around exactly these lines.
Is the Pirc sound at higher levels?
Yes, as a fighting choice: it appears at grandmaster level as a winning attempt with Black, accepting theoretical risk for dynamic chances. White keeps a pull with best play, but the road there is narrow and the practical chances are rich.
Learn the Pirc Defense with AI feedback
This page pairs the guide above with an interactive ChessMind AI course: a GM-authored repertoire you study move by move on a real board, then practice against a human-like chess AI opponent with instant feedback and spaced-repetition review, so the key positions actually stick. Start learning, jump straight into practice, or browse all opening courses.
New to a concept? Every term is defined in the chess terms glossary.