Alekhine: Four Pawns Attack
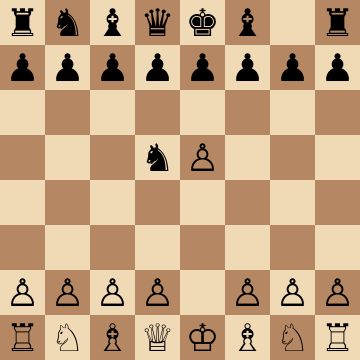
1.e4 Nf6 2.e5 Nd5 3.d4 d6 4.c4 Nb6 5.f4 dxe5
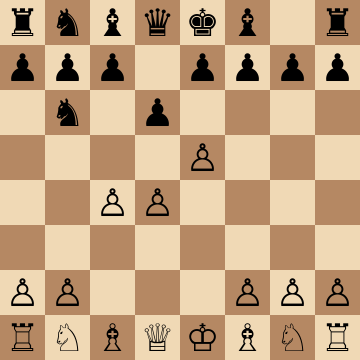
The Four Pawns Attack (1.e4 Nf6 2.e5 Nd5 3.d4 d6 4.c4 Nb6 5.f4) is the most principled answer to the Alekhine Defense: White accepts the invitation and builds the biggest center the rules allow. Played with understanding, that center is not a weakness but a rolling attacking force that cramps Black out of the game.
Mainline
1.e4 Nf6 2.e5 Nd5 3.d4 d6 4.c4 Nb6 5.f4 dxe5 6.fxe5 Nc6 7.Be3 Bf5 8.Nc3 e6 9.Nf3
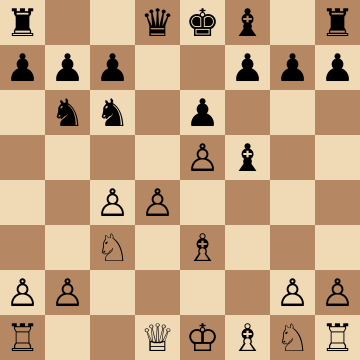
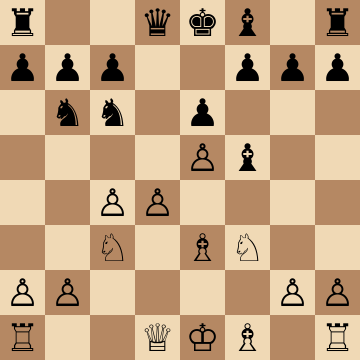
Main Line with 9...Be7 10.d5
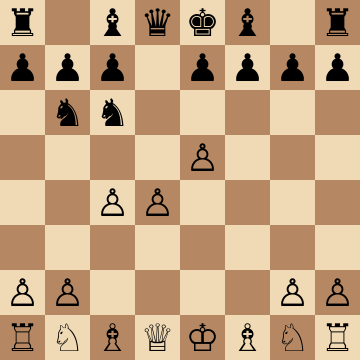
1.e4 Nf6 2.e5 Nd5 3.d4 d6 4.c4 Nb6 5.f4 dxe5 6.fxe5 Nc6 7.Be3 Bf5 8.Nc3 e6 9.Nf3 Be7 10.d5 exd5 11.cxd5 Nb4 12.Nd4 Bd7
The critical test of Black's setup: 10.d5 gains space with tempo and evicts the c6-knight. After 11...Nb4 White plays 12.Nd4, hitting the f5-bishop and preparing the thematic e5-e6 thrust that rips open Black's position before development finishes. White should know this sequence cold — it is where the Four Pawns Attack shows its teeth, converting the big center into a direct initiative.
Classical 9...Qd7 with ...O-O-O
1.e4 Nf6 2.e5 Nd5 3.d4 d6 4.c4 Nb6 5.f4 dxe5 6.fxe5 Nc6 7.Be3 Bf5 8.Nc3 e6 9.Nf3 Qd7 10.Be2 O-O-O 11.O-O Be7
Black tucks the king on the queenside and piles up against d4 with the queen and rook. White's recipe is patience: keep the center defended with Be2 and O-O, then start rolling the queenside pawns straight at Black's king with b4 and a4-a5, hitting the b6-knight. Because the center is stable, White attacks where Black lives while Black's pressure on d4 never quite lands.
Sharp 6...c5 Counterstrike
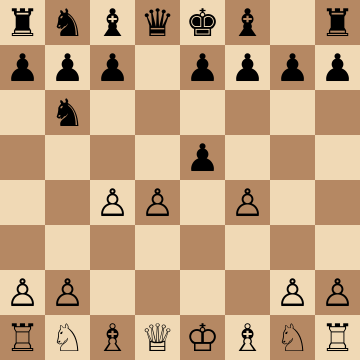
1.e4 Nf6 2.e5 Nd5 3.d4 d6 4.c4 Nb6 5.f4 dxe5 6.fxe5 c5 7.d5 e6 8.Nc3 exd5 9.cxd5 c4 10.Nf3
Instead of slow pressure, Black stabs at the center immediately with 6...c5. White should meet it head-on: 7.d5 keeps the pawn chain alive, and after 8...exd5 9.cxd5 c4 the passed d-pawn becomes the game's main character. Develop quickly with Nf3 and Bxc4 ideas, since Black has spent many tempi on pawn moves — concrete play favors the side with pieces out, and here that is White.
Fianchetto Defense with 6...g6
1.e4 Nf6 2.e5 Nd5 3.d4 d6 4.c4 Nb6 5.f4 dxe5 6.fxe5 g6 7.Nc3 Bg7 8.Be3 O-O 9.Nf3
A club favorite: Black fianchettoes and hopes the g7-bishop will chew on the e5-pawn. White simply completes development — Nc3, Be3, Nf3, Be2 — because d4 keeps e5 covered and the bishop bites on granite. The long-term plan is space: h3 and Be2, then a queenside clamp with c5 hitting the b6-knight at the right moment. Avoid loosening pawn grabs; the extra territory wins the middlegame by itself.
Positional Main Line with 11...f6
1.e4 Nf6 2.e5 Nd5 3.d4 d6 4.c4 Nb6 5.f4 dxe5 6.fxe5 Nc6 7.Be3 Bf5 8.Nc3 e6 9.Nf3 Be7 10.Be2 O-O 11.O-O f6 12.exf6 Bxf6
When White declines the early d5 push and just castles, Black's standard counter is 11...f6, chipping at e5. Taking with 12.exf6 Bxf6 leaves White a clean structural plus: more central space, a target on e6, and the d5 break always in the air. Play Qd2, Rad1 and pressure down the central files — a comfortable, low-risk way to a lasting edge if the razor-sharp lines are not to your taste.
Key ideas
- Seize maximum space with e5, d4, c4 and f4 — then develop behind the pawn wall with Be3, Nc3 and Nf3.
- Know the critical ...dxe5 and ...c5 counterstrikes cold, so Black's thematic play hits a prepared defense.
- Use the space advantage to attack: d4-d5 breaks and kingside pawn storms flow naturally from the structure.
- Turn a rare defense into a scoring opportunity instead of an unpleasant surprise.
Typical plans and structures
White completes development with Nf3, Be2 and O-O, keeping the center intact, then chooses between the d5 break — gaining more space and opening lines — and a direct kingside expansion. Black's counterplay revolves around pressure on d4 and e5 with ...Nc6, ...Bf5 and ...c5; the course shows how to meet each setup, when to push, and when to trade into a favorable structure. With the center stabilized, White's extra space usually decides the game.
Who should play it
Ambitious 1.e4 players who refuse to be provoked into passivity and want the sharpest, most testing line against the Alekhine.
Study the Alekhine: Four Pawns Attack move by move
The first 3 lines of the interactive course, exactly as a signed-out visitor can play them — each move with the coaching note shown on the board.
Line 1 — against an inaccuracy
1.e4 We claim the center. 1...Nf6 Our opponent develops the knight early, targeting our pawn and provoking it to advance. The Alekhine Defense! 2.e5 We push the pawn, counterattacking the knight. 2...Nd5 Our opponent centralizes the knight, sidestepping the threat. 3.d4 We put the d pawn in the center too, supporting e5. 3...d6 Our opponent aims to undermine our central control. 4.c4 We keep targeting their knight. 4...Nb6 Black pulls their knight back. 5.f4 Reinforcing e5 and taking more space in the center. 5...dxe5 Our opponent trades pawns in the center. 6.fxe5 We take back with the f pawn. 6...Bf5 Our opponent develops their light squared bishop. 7.Nc3 We bring out the knight. 7...Nc6 Black activates their knith with pressure on d4. 8.Be3 We defend the pawn with the bishop. 8...e6 Freeing the dark squared bishop. 9.Nf3 We develop our knight. 9...Qd7 Our opponent develops their queen and prepares to activate the rook. 10.Be2 We develop the bishop and prepare to castle. 10...Rd8 Our opponent brings the rook to the d file. 11.Qd2 We develop the queen. 11...Bg4 Putting pressure on the knight, a key defender of d4. 12.Rd1 We activate the rook, reinforcing d4 and pressing with more space against our opponent's restricted pieces.
Line 2 — against an inaccuracy
1.e4 We claim the center. 1...Nf6 Our opponent develops the knight early, targeting our pawn and provoking it to advance. The Alekhine Defense! 2.e5 We push the pawn, counterattacking the knight. 2...Nd5 Our opponent centralizes the knight, sidestepping the threat. 3.d4 We put the d pawn in the center too, supporting e5. 3...d6 Our opponent aims to undermine our central control. 4.c4 We keep targeting their knight. 4...Nb6 Black pulls their knight back. 5.f4 Reinforcing e5 and taking more space in the center. 5...dxe5 Our opponent trades pawns in the center. 6.fxe5 We take back with the f pawn. 6...Bf5 Our opponent develops their light squared bishop. 7.Nc3 We bring out the knight. 7...e6 Blocking our pawns and freeing the light squared bishop. 8.Be3 We develop our bishop. 8...Nc6 Our opponent activates their knight. 9.Nf3 We bring out our knight, reinforcing d4. 9...Qd7 Our opponent makes room to develop their rook. 10.Be2 We bring out the bishop, preparing to castle. 10...Rd8 Our opponent brings their rook into play. 11.O-O We castle, activating our rook along the f file. 11...Bg4 Our opponent puts pressure on the knight, weakening our defense of d4. 12.Ng5 We coordinate the knight and rook to target the f7 pawn, with great pressure.
Line 3 — the main line
1.e4 We claim the center. 1...Nf6 Our opponent develops the knight early, targeting our pawn and provoking it to advance. The Alekhine Defense! 2.e5 We push the pawn, counterattacking the knight. 2...Nd5 Our opponent centralizes the knight, sidestepping the threat. 3.d4 We put the d pawn in the center too, supporting e5. 3...d6 Our opponent aims to undermine our central control. 4.c4 We keep targeting their knight. 4...Nb6 Black pulls their knight back. 5.f4 Reinforcing e5 and taking more space in the center. 5...dxe5 Our opponent trades pawns in the center. 6.fxe5 We take back with the f pawn. 6...Bf5 Our opponent develops their light squared bishop. 7.Nc3 We bring out the knight. 7...e6 Blocking our pawns and freeing the light squared bishop. 8.Be3 We develop our bishop. 8...Be7 Our opponent develops the bishop, preparing to castle. 9.Nf3 We bring out the knight. 9...Nc6 Our opponent activates their knight as well. 10.d5 We advance in the center, putting pressure on their knight. 10...exd5 Our opponent captures on d5. 11.cxd5 We take back with the pawn. 11...Nb4 Our opponent repositions their knight, threatening a fork on c2 and counterattacking the pawn. 12.Nd4 We centralize the knight, targeting their bishop and neutralizing their threats.
The free preview ends here — continue with all 5 lines in the interactive course, with instant feedback on every move you play.
Frequently asked questions
Is the Four Pawns Attack refuted or risky?
Neither. It looks risky because the pawns advance early, but theory shows White keeps an advantage with accurate play. The real risk is playing it unprepared — which is exactly what this course fixes.
Why play the Four Pawns Attack instead of a quieter line?
Quieter systems let Alekhine players reach exactly the flexible middlegames they know well. The Four Pawns Attack asks the hardest question: Black must prove the big center is weak, and one inaccuracy leaves them simply crushed for space.
What is Black's most critical response?
The main line runs 5...dxe5 6.fxe5 Nc6 7.Be3 Bf5 8.Nc3 e6 9.Nf3, when Black presses against d4. The course gives you a complete repertoire through these critical positions, including the sharp gambit tries.
Learn the Alekhine: Four Pawns Attack with AI feedback
This page pairs the guide above with an interactive ChessMind AI course: a GM-authored repertoire you study move by move on a real board, then practice against a human-like chess AI opponent with instant feedback and spaced-repetition review, so the key positions actually stick. Start learning, jump straight into practice, or browse all opening courses.
New to a concept? Every term is defined in the chess terms glossary.