Caro-Kann Defense
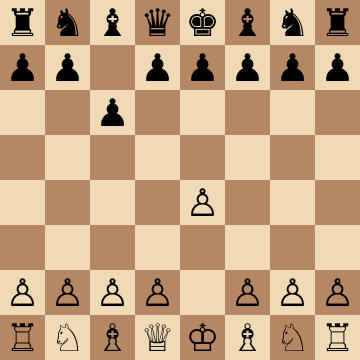
1.e4 c6
The Caro-Kann Defense (1.e4 c6) is one of the most reliable answers to 1.e4. It gives Black a sound pawn structure and a safe king, while keeping winning chances against overextended attackers. Named after Horatio Caro and Marcus Kann and trusted by world champions from Capablanca to Karpov, it rewards understanding over memorization.
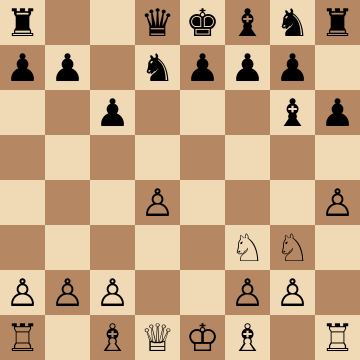
Mainline
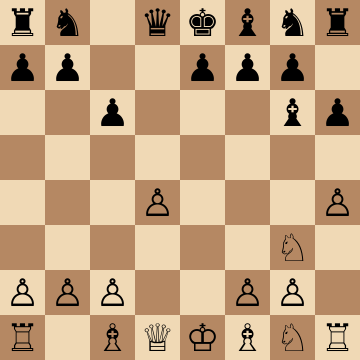
1.e4 c6 2.d4 d5 3.Nc3 dxe4 4.Nxe4 Bf5 5.Ng3 Bg6 6.h4 h6 7.Nf3 Nd7
Caro-Kann Advance Variation (3.e5)
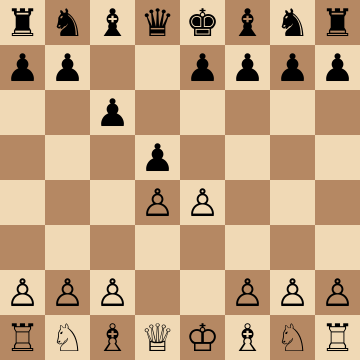
1.e4 c6 2.d4 d5 3.e5 Bf5
White's most popular try at every level: the pawn on e5 grabs space and locks the center. Black's point is 3...Bf5 — the light-squared bishop gets out BEFORE ...e6, dodging the French Defense's biggest problem. Typical plans are ...e6, ...c5 to hit the d4 base, and rerouting a knight via e7 to g6 or f5. White often answers with the modern Short System (Nf3, Be2, 0-0) and slow kingside expansion.
Advance, Tal Variation (4.h4)
1.e4 c6 2.d4 d5 3.e5 Bf5 4.h4
The aggressive follow-up to the Advance: White throws the h-pawn forward to harass the f5 bishop and claim kingside space. Black must know the precise reply — 4...h5 clamps the pawn, while careless play lets White trap the bishop with g4. Sharp, forcing, and exactly the kind of line to review before facing attacking players.
Caro-Kann Exchange Variation (3.exd5)
1.e4 c6 2.d4 d5 3.exd5 cxd5
White trades in the center and aims for a small, safe structural edge. The resulting Carlsbad-style structure is one of the best-mapped in chess: piece play on the half-open files, the classic minority attack, and long maneuvering games. Black equalizes with natural development — ...Nc6, ...Bg4 or ...Bf5, ...e6 — and gets real winning chances against passive play.
Panov-Botvinnik Attack (4.c4)
1.e4 c6 2.d4 d5 3.exd5 cxd5 4.c4
The most ambitious Exchange treatment: White accepts an isolated queen's pawn in return for active pieces and attacking chances. Play often transposes to structures known from the Queen's Gambit and Nimzo-Indian. Black's classic recipe: blockade d5 with a knight, trade minor pieces, and steer for an endgame where the isolated pawn becomes a weakness.
Caro-Kann Classical Variation (4...Bf5)
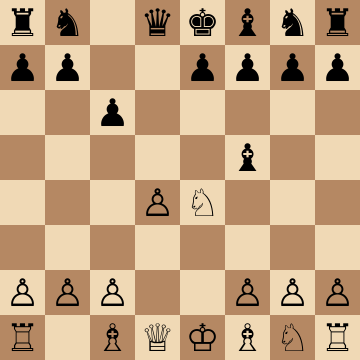
1.e4 c6 2.d4 d5 3.Nc3 dxe4 4.Nxe4 Bf5
The old main line and the backbone of our repertoire: Black trades in the center, develops the bishop actively, and builds the famously solid ...e6/...Nd7 wall. White usually gains kingside space with h4-h5 and castles long, leading to rich opposite-side play where Black's extra solidity keeps paying off deep into the endgame. This is the line the interactive course below teaches move by move.
Two Knights Variation (2.Nc3 and 3.Nf3)
1.e4 c6 2.Nc3 d5 3.Nf3
A tricky move order designed to sidestep Black's main-line preparation. The critical answer is 3...Bg4, pinning the knight before playing ...e6; the routine 3...dxe4 4.Nxe4 gives White an improved version of the main lines. Knowing this one detail keeps the whole system sound.
Caro-Kann Fantasy Variation (3.f3)
1.e4 c6 2.d4 d5 3.f3
White refuses to concede the center: 3.f3 props up e4 and prepares a big pawn front, at the cost of king safety and development. Play gets sharp quickly — Black can strike with 3...e6 and ...c5, or grab the pawn and hold on. An excellent surprise weapon for White and a must-know line for Caro-Kann players.
Study the Caro-Kann Fantasy Variation course
Hillbilly Attack (2.Bc4)
1.e4 c6 2.Bc4 d5 3.Bb3
An offbeat club-level try: the bishop eyes f7 and hopes for quick Qh5 tricks after a careless capture on e4. Black should simply keep developing — the bishop bites on the c6/d5 granite, and the early sortie loses time against accurate play. Worth one look so it never surprises you over the board.
Key ideas
- Fight for the center with an early ...d5 while keeping a healthy structure.
- A safe, resilient setup that blunts aggressive 1.e4 players.
- Long-term structural strengths that pay off in the endgame.
- A defense you can trust in must-not-lose situations.
Typical plans and structures
In the Classical main line Black develops the light-squared bishop to f5 before playing ...e6 — solving the problem piece that plagues the French Defense — then castles short behind an unbroken pawn shield. Typical middlegames revolve around the ...c5 break, minority-attack ideas, and trading into favorable endgames where Black's compact structure shines. Against the Advance (3.e5) and Exchange variations, the same healthy-structure philosophy applies with concrete, well-mapped plans.
How to reach the Caro-Kann Defense
After 1.e4 c6 2.d4 d5 White must decide what to do with the e4-pawn. 3.e5 is the Advance Variation, the most popular choice today; 3.Nc3 or 3.Nd2 followed by 3...dxe4 4.Nxe4 leads to the Classical Variation after 4...Bf5, or to the modern 4...Nd7 and 4...Nf6 lines; 3.exd5 cxd5 is the Exchange Variation, and 3.exd5 cxd5 4.c4 the Panov-Botvinnik Attack. White can also avoid 2.d4 with 2.Nc3 d5 3.Nf3, the Two Knights Variation, or gamble with 3.f3, the Fantasy Variation.
Pros and cons of the Caro-Kann Defense
Pros
- One of the most solid answers to 1.e4: no weaknesses, no early tactics against the king, and a healthy structure.
- The light-squared bishop develops outside the pawn chain, the classic problem of the French, before ...e6 shuts it in.
- Black often gets the better endgame thanks to the compact structure and the c-file.
- Far less theory than the Sicilian, and the plans repeat from line to line.
Cons
- Black concedes space and development: 1...c6 and 2...d5 are not developing moves.
- The Advance Variation gives White a lasting space advantage and attacking chances on the kingside.
- Winning chances for Black are lower than in the Sicilian; passive play leads to a slightly worse but long game.
- The Panov-Botvinnik Attack forces Black into isolated-pawn positions some Caro-Kann players dislike.
How to play against the Caro-Kann Defense
White's most testing choice is the Advance Variation 3.e5, particularly the Short System with Nf3, Be2 and O-O, which keeps a space advantage without early risk. Players who prefer open games and piece activity should choose the Panov-Botvinnik Attack, which drags the Caro-Kann player into isolated-pawn positions they may not enjoy. The Exchange Variation is the quiet option with a clear plan. In every line the same two ideas apply: do not let Black trade the light-squared bishops for free, and use the extra space or development before Black's ...c5 break equalizes. Against 3...Bf5 in the Advance, the pawn thrust g4 is the sharpest try, but only if you know the follow-ups.
Plans for both sides
White's plan
Keep the space advantage from d4 and e5 or the lead in development from the Panov, and attack the kingside where the h5-pawn or a knight on e5 can be a spearhead. Prevent the freeing ...c5 break or meet it with dxc5 at the right moment, and aim to win the d5- or d6-square for a piece.
Black's plan
Complete development with the bishop outside the pawn chain, then strike with ...c5 to undermine d4. Trade the light-squared bishops when possible, since White's bishop is the better one, and head for an endgame in which the solid structure pays off. Against the Advance, ...Qb6 and ...c5 attack the base of the chain; against the Panov, blockade d5 and trade pieces.
Who should play it
Players who want a solid, dependable defense to 1.e4 without walking into their opponent's sharpest preparation.
History of the Caro-Kann Defense
The opening is named after the English player Horatio Caro and the Austrian Marcus Kann, who analyzed it in the 1880s; Kann's win against Jacques Mieses in 1885 was an early demonstration. Capablanca and Nimzowitsch used it in the 1920s, Botvinnik developed the attacking Panov line against it and later adopted it himself, and Petrosian and Karpov turned it into a world-championship weapon of solidity. In the twenty-first century Anand, Carlsen and Ding have kept it at the top level, and the Advance Variation replaced the Classical as the main line after the 1990s.
Study the Caro-Kann Defense move by move
The first 3 lines of the interactive course, exactly as a signed-out visitor can play them — each move with the coaching note shown on the board.
Line 1 — the main line
1.e4 Our opponent takes the center. 1...c6 We launch the Carokann defense, and will fight for the center with ...d7 d5. 2.d4 Completing a perfect center with both pawns. 2...d5 We place a strong pawn in the center, and force our opponent to make a major decision: protect, advance or trade. 3.Nc3 Our opponent protects the pawn, inviting the capture. 3...dxe4 We trade on the center, giving up some central control, but this is not a problem, as we have plenty of resources to fight back. 4.Nxe4 Our opponent recaptures. 4...Nf6 We offer a knight trade, entering into a tricky line, less known than the usual ...Bf5, but just as good. 5.Nxf6+ Our opponent trades, doubling our pawns. 5...exf6 We recapture toward the flank. This might seem unusual, but it's the best move, and it helps us to develop more freely. 6.c3 Protecting the d4 pawn to play Bd3 next. 6...Bd6 We place our bishop on the most active diagonal. 7.Bd3 Our opponent develops to a good diagonal, eyeing our h7 pawn. 7...O-O We castle short, our king will be very safe here. 8.Qc2 Attacking our h7 pawn. 8...Re8+ We activate our rook with a check. 9.Ne2 Our opponent covers and develops. 9...h5 We move the pawn away from the attack while gaining some space on the kingside. 10.Be3 Developing the bishop, and preparing to castle long. 10...Nd7 We develop our knight, and we are heading to f8 next, securing the kingside. 11.O-O-O Our opponent castles long, but there's little chance of a kingside attack. 11...Nf8 We secure the kingside and prepare to develop our bishop next. 12.Kb1 Typical king move, anticipating a threat against the pawn on a2. 12...Be6 Developing the bishop into a good diagonal, pointing toward the queenside. 13.c4 Improving the control of the center, and restricting the bishop's influence on the queenside. 13...Rc8 We threaten a queenside break with ...b7 b5. 14.Nc3 Our opponent improves the knight and discourages our ...b7 b5 break. 14...Bb4 We prepare to eliminate the knight, to insist on our ...b7 b5 break. 15.a3?! The game was about equal, but inviting us to trade is not a great decision. 15...Bxc3 We go for it! It's OK to give up our bishop pair, as we'll have an excellent initiative. 16.Qxc3 Our opponent recaptures. 16...b5 We finally achieve our break, gaining a slight edge. We weaken our opponent's center (the d5 square), improve our bishop significantly, and create some risk for White's king.
Line 2 — against an inaccuracy
1.e4 Our opponent takes the center. 1...c6 We launch the Carokann defense, and will fight for the center with ...d7 d5. 2.d4 Completing a perfect center with both pawns. 2...d5 We place a strong pawn in the center, and force our opponent to make a major decision: protect, advance or trade. 3.Nc3 Our opponent protects the pawn, inviting the capture. 3...dxe4 We trade on the center, giving up some central control, but this is not a problem, as we have plenty of resources to fight back. 4.Nxe4 Our opponent recaptures. 4...Nf6 We offer a knight trade, entering into a tricky line, less known than the usual ...Bf5, but just as good. 5.Nxf6+ Our opponent trades, doubling our pawns. 5...exf6 We recapture toward the flank. This might seem unusual, but it's the best move, and it helps us to develop more freely. 6.c3 Protecting the d4 pawn to play Bd3 next. 6...Bd6 We place our bishop on the most active diagonal. 7.Bd3 Our opponent develops to a good diagonal, eyeing our h7 pawn. 7...O-O We castle short, our king will be very safe here. 8.Qc2 Attacking our h7 pawn. 8...Re8+ We activate our rook with a check. 9.Ne2 Our opponent covers and develops. 9...h5 We move the pawn away from the attack while gaining some space on the kingside. 10.Be3 Developing the bishop, and preparing to castle long. 10...Nd7 We develop our knight, and we are heading to f8 next, securing the kingside. 11.O-O-O Our opponent castles long, but there's little chance of a kingside attack. 11...Nf8 We secure the kingside and prepare to develop our bishop next. 12.Kb1 Typical king move, anticipating a threat against the pawn on a2. 12...Be6 Developing the bishop into a good diagonal, pointing toward the queenside. 13.h3 Our opponent misses the chance to play c3 c4. 13...b5! We secure control of the c4 square, and launch a queenside initiative. 14.g4 Our opponent wants to open lines on the kingside, we won't allow it. 14...h4! We are a little better, as our queenside play is more promising than White's kingside attempt.
Line 3 — the main line
1.e4 Our opponent takes the center. 1...c6 We launch the Carokann defense, and will fight for the center with ...d7 d5. 2.d4 Completing a perfect center with both pawns. 2...d5 We place a strong pawn in the center, and force our opponent to make a major decision: protect, advance or trade. 3.Nc3 Our opponent protects the pawn, inviting the capture. 3...dxe4 We trade on the center, giving up some central control, but this is not a problem, as we have plenty of resources to fight back. 4.Nxe4 Our opponent recaptures. 4...Nf6 We offer a knight trade, entering into a tricky line, less known than the usual ...Bf5, but just as good. 5.Nxf6+ Our opponent trades, doubling our pawns. 5...exf6 We recapture toward the flank. This might seem unusual, but it's the best move, and it helps us to develop more freely. 6.c3 Protecting the d4 pawn to play Bd3 next. 6...Bd6 We place our bishop on the most active diagonal. 7.Bd3 Our opponent develops to a good diagonal, eyeing our h7 pawn. 7...O-O We castle short, our king will be very safe here. 8.Qc2 Attacking our h7 pawn. 8...Re8+ We activate our rook with a check. 9.Ne2 Our opponent covers and develops. 9...h5 We move the pawn away from the attack while gaining some space on the kingside. 10.O-O Our opponent castles in the same flank as we did. 10...h4 We can still create some pressure against the king. This move also prevents a knight jump Ng3-Nf5. 11.h3 Our opponent prevents us from pushing further with ...h4 h3. 11...Nd7 We continue our development, the knight is coming to f8 as usual. 12.Be3 Our opponent completes development. 12...Nf8 We bring our knight to f8 as usual, and prepare to develop our bishop next. 13.Rad1 Centralizing the rook, preparing a potential d4 d5 break. 13...Be6 We develop our bishop to the usual square. 14.c4 Restricting our bishop's influence. 14...Rc8 We have a good position, as our opponent does not have any obvious threats, and we can consider a ...b7 b5 break.
The free preview ends here — continue with all 23 lines in the interactive course, with instant feedback on every move you play.
Frequently asked questions
Is the Caro-Kann better than the French Defense?
They share the ...d5 fight for the center, but the Caro-Kann develops the light-squared bishop outside the pawn chain before playing ...e6 — avoiding the French's biggest long-term problem. The trade-off is a small concession in speed, which solid players rarely miss.
Is the Caro-Kann good for beginners?
Yes — it is one of the best first defenses to 1.e4: the plans are logical, the king stays safe, and the structures teach healthy chess habits. It also never stops being useful; world champions from Capablanca to Carlsen have trusted it.
What is White's most dangerous try against the Caro-Kann?
The Advance Variation (3.e5) with modern kingside expansion is currently the most testing, alongside the sharp Fantasy Variation (3.f3). This course gives you dependable setups against both, plus the Classical and Exchange lines.
Is the Caro-Kann for White or Black?
It is a defense for Black against 1.e4, introduced by 1...c6. White chooses the variation — Advance, Exchange, Classical, Panov or Fantasy — and Black's setups against each are covered in the sections above.
Who invented the Caro-Kann Defense?
It is named after Horatio Caro and Marcus Kann, who analyzed 1.e4 c6 in the 1880s. World champions from Capablanca and Botvinnik to Karpov later made it a main-line weapon at the highest level.
Which Caro-Kann variation should a beginner learn first?
Start with the Classical setup — ...dxe4 and ...Bf5 — because its plans repeat across many lines: solve the light-squared bishop, build the ...e6 wall, castle short, and play for the ...c5 break. Then learn the Advance Variation, since 3.e5 is what you will face most often.
Is the Caro-Kann better than the Sicilian Defense?
They pursue different goals. The Sicilian fights for the initiative from move one at the price of theory and risk; the Caro-Kann trades some sharpness for a sound structure and a safe king. If you want fewer forced lines and more positions you understand, the Caro-Kann is the more practical choice.
What is the idea of the Caro-Kann Defense?
Black supports the ...d5 advance with the c-pawn instead of the e-pawn, so the light-squared bishop can develop to f5 or g4 before ...e6 closes it in. Black gets a French-like solidity without the French's bad bishop.
How do you play against the Caro-Kann?
The Advance Variation 3.e5 is the most popular and most testing, the Panov-Botvinnik Attack 3.exd5 cxd5 4.c4 leads to open, active play, and the Exchange Variation gives a quiet game with a clear plan. In each, use your space or development before Black's ...c5 break.
Learn the Caro-Kann Defense with AI feedback
This page pairs the guide above with an interactive ChessMind AI course: a GM-authored repertoire you study move by move on a real board, then practice against a human-like chess AI opponent with instant feedback and spaced-repetition review, so the key positions actually stick. Start learning, jump straight into practice, or browse all opening courses.
New to a concept? Every term is defined in the chess terms glossary.