Alien Gambit
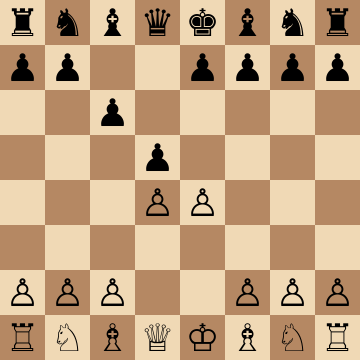
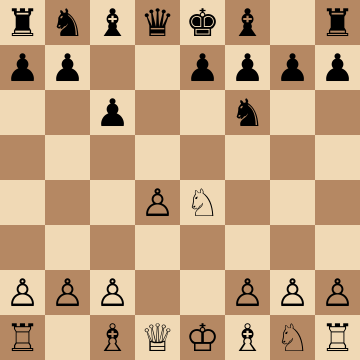
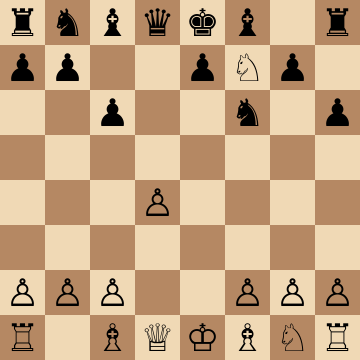
1.e4 c6 2.d4 d5 3.Nc3 dxe4 4.Nxe4 Nf6 5.Ng5 h6 6.Nxf7
The Alien Gambit (1.e4 c6 2.d4 d5 3.Nd2 dxe4 4.Nxe4 Nf6 5.Ng5 h6 6.Nxf7!?) sacrifices a full knight on f7 against the Caro-Kann. Popularized online by Witty Alien, it rips away Black's king cover and drags careful, solid players into exactly the kind of chaos they picked the Caro-Kann to avoid.
Mainline
1.e4 c6 2.d4 d5 3.Nc3 dxe4 4.Nxe4 Nf6 5.Ng5 h6 6.Nxf7
Alien Gambit: Main Line with 8.Nxe6
1.e4 c6 2.d4 d5 3.Nd2 dxe4 4.Nxe4 Nd7 5.Ng5 Ngf6 6.Bd3 e6 7.N1f3 h6 8.Nxe6
The whole point of the system. White sacrifices the knight on e6 to rip open the black king before it can castle, and the compensation is not vague: the king sits on e8 with the f-file opening, the d3-bishop already aimed at h7 and every White piece joining with tempo. Black has to defend accurately from move eight or lose quickly.
Alien Gambit: 5...Ndf6 Alternative
1.e4 c6 2.d4 d5 3.Nd2 dxe4 4.Nxe4 Nd7 5.Ng5 Ndf6 6.Bd3 h6 7.N5f3
Black develops the other knight to avoid the sacrifice entirely, and White simply retreats with a comfortable position. This is the sensible answer, and knowing that White is not obliged to force matters is what makes the whole line playable rather than a one-trick gamble.
Alien Gambit: 4...Nf6 Exchange Line
1.e4 c6 2.d4 d5 3.Nd2 dxe4 4.Nxe4 Nf6 5.Nxf6+ exf6 6.Bc4 Bd6 7.Qe2
Black trades knights immediately and accepts doubled f-pawns for fast development and open lines. White plays against the structure: Bc4 and Qe2 aim at f7 and e-file, and the long-term target is the weakened kingside. Solid for Black, but the pawn structure is a permanent asset to work against.
Alien Gambit: 4...Bf5 Classical Answer
1.e4 c6 2.d4 d5 3.Nd2 dxe4 4.Nxe4 Bf5 5.Ng3 Bg6 6.h4 h6 7.Nf3
The main-line Caro-Kann treatment, and the reason most opponents never face the gambit at all. White chases the bishop with h4-h5 and gains space on the kingside; the resulting positions are the classical Caro-Kann battleground, so a White repertoire built on 3.Nd2 has to be ready for ordinary chess too.
Study the Caro-Kann Defense course
Alien Gambit: 3...Nf6 Move Order
1.e4 c6 2.d4 d5 3.Nd2 Nf6 4.e5 Nfd7 5.f4 c5 6.c3
Black avoids the capture on e4 and invites an Advance-style structure instead. White grabs space with e5 and f4, and the game becomes a French-flavoured fight over d4 and c5 where Black's light-squared bishop is, unusually for the Caro-Kann, still stuck at home.
Alien Gambit: Declined with 3...e6
1.e4 c6 2.d4 d5 3.Nd2 e6 4.Ngf3 Nf6 5.e5 Nfd7 6.Bd3
Black transposes into a French, accepting the bad bishop to avoid all the tactics. White gets the standard Advance French centre and the familiar plans with c3, O-O and the kingside build-up. Recognising this transposition instantly, and knowing which French plan applies, saves an enormous amount of thinking time.
Key ideas
- Sacrifice on f7 to strip the king: Black loses castling rights and must defend over the board.
- Follow up with Bd3, Qe2 and O-O ideas, aiming pieces at the exposed light squares around Black's king.
- Objectively speculative, practically venomous — one natural-looking defensive move often loses on the spot.
- A perfect blitz and rapid weapon: Caro-Kann players study main lines, not piece sacrifices on move six.
Typical plans and structures
After 6...Kxf7, White builds the attack with Bd3 aiming at g6, Qe2 or Qf3 ideas, and rapid castling to bring a rook to the e- or f-file. Black's king stays stuck in the center or walks to g8 by hand, and every tempo matters: the course maps the defensive tries — ...e6 setups, returning material, or grabbing more pawns — and shows the attacking patterns that punish each one. Play it with respect: this is a practical weapon, not a theoretical main line.
Who should play it
Attacking players and streamers-at-heart who want a fun, dangerous surprise against the Caro-Kann and accept practical risk for huge winning chances.
Study the Alien Gambit move by move
The first 3 lines of the interactive course, exactly as a signed-out visitor can play them — each move with the coaching note shown on the board.
Line 1 — punishing a blunder
1.e4 We take the center. 1...c6 Our opponent goes for the Carokann Defense! 2.d4 We continue to claim the center. 2...d5 Black does the same, now we need to make a decision how to go about this. 3.Nc3 We develop our knight, protecting the pawn on e4. The alternative 3.Nd2 is equally good. 3...dxe4 Trading in the center. 4.Nxe4 We recapture the pawn, and have a good control of the center so far. 4...Nf6 The knight develops, offering a trade and hoping we will walk into a standard Carokann line. 5.Ng5!? We have a completely different plan! This move tells our opponent we are willing to sacrifice our knight on f7 if they decide to expel us with ...h6. 5...h6 Accepting the challenge, our opponent kicks out the knight. 6.Nxf7!! We launch the ALIEN GAMBIT, a line from out of this world. The point of this gambit is to completely eliminate the safety of our opponent's king, and to exploit the weakened light squares until we can deliver mate. 6...Kxf7 Our opponent takes our knight but leaves their king in a precariously exposed square. 7.Nf3 We develop our knight and prepare a jump to e5. We intentionally delay developing our bishop to keep flexibility between Bc4 and Bd3. 7...Bf5 Developing the bishop is natural, and it helps Black to cover some key squares like g6. 8.Ne5+ Our knight jumps to the center with a check. We force our opponent to decide which way their king is going. 8...Kg8 Going to the kingside, hoping to find safety either on g8 or h7, although both squares are still vulnerable. 9.Bc4+ Now that we know the bishop is on f5, it makes sense for us to develop our bishop to c4 with a check. 9...e6? Blocking our check, but turning the pawn into a clear target we can likely pursue right away. 10.g4 This is a very common idea in the Alien gambit, we drive away the bishop in order to capture the e6 pawn next. 10...b5 Counterattacking our bishop, to see where we're going before deciding what to do about their own bishop on f5. 11.Bb3 Our bishop retreats while keeping an eye on the e6 pawn, which we plan to take next. 11...Be4 The bishop goes into a safer square, while attacking the rook and planning to reroute into d5 to neutralize our bishop. 12.Bxe6+ We have to take the pawn now, otherwise ...Bd5 will make it impossible to eliminate the pawn. 12...Kh7 The king goes out of the check, but the h7 square it not that safe either. 13.g5!! This is quite a brilliant move which combines two tactical motifs, a pawn checkmate on g6, and the desire to have a knight jump to Nf7-Ng5 (for which we need to eliminate Black's h6 pawn). 13...Bxh1?? Our opponent naively takes our rook, but allows a beautiful checkmate next move. 14.g6# It's not every day we get to checkmate with a pawn, much less after only 14 moves.
Line 2 — punishing a blunder
1.e4 We take the center. 1...c6 Our opponent goes for the Carokann Defense! 2.d4 We continue to claim the center. 2...d5 Black does the same, now we need to make a decision how to go about this. 3.Nc3 We develop our knight, protecting the pawn on e4. The alternative 3.Nd2 is equally good. 3...dxe4 Trading in the center. 4.Nxe4 We recapture the pawn, and have a good control of the center so far. 4...Nf6 The knight develops, offering a trade and hoping we will walk into a standard Carokann line. 5.Ng5!? We have a completely different plan! This move tells our opponent we are willing to sacrifice our knight on f7 if they decide to expel us with ...h6. 5...h6 Accepting the challenge, our opponent kicks out the knight. 6.Nxf7!! We launch the ALIEN GAMBIT, a line from out of this world. The point of this gambit is to completely eliminate the safety of our opponent's king, and to exploit the weakened light squares until we can deliver mate. 6...Kxf7 Our opponent takes our knight but leaves their king in a precariously exposed square. 7.Nf3 We develop our knight and prepare a jump to e5. We intentionally delay developing our bishop to keep flexibility between Bc4 and Bd3. 7...Bf5 Developing the bishop is natural, and it helps Black to cover some key squares like g6. 8.Ne5+ Our knight jumps to the center with a check. We force our opponent to decide which way their king is going. 8...Kg8 Going to the kingside, hoping to find safety either on g8 or h7, although both squares are still vulnerable. 9.Bc4+ Now that we know the bishop is on f5, it makes sense for us to develop our bishop to c4 with a check. 9...e6? Blocking our check, but turning the pawn into a clear target we can likely pursue right away. 10.g4 This is a very common idea in the Alien gambit, we drive away the bishop in order to capture the e6 pawn next. 10...b5 Counterattacking our bishop, to see where we're going before deciding what to do about their own bishop on f5. 11.Bb3 Our bishop retreats while keeping an eye on the e6 pawn, which we plan to take next. 11...Be4 The bishop goes into a safer square, while attacking the rook and planning to reroute into d5 to neutralize our bishop. 12.Bxe6+ We have to take the pawn now, otherwise ...Bd5 will make it impossible to eliminate the pawn. 12...Kh7 The king goes out of the check, but the h7 square it not that safe either. 13.g5!! This is quite a brilliant move which combines two tactical motifs, a pawn checkmate on g6, and the desire to have a knight jump to Nf7-Ng5 (for which we need to eliminate Black's h6 pawn). 13...hxg5? This tempting move loses on the spot. 14.Nf7 This is a key knight jump, we fork the queen and rook, but even more importantly, prepare Nxg5+ forcing the king into the middle of the board. 14...Qe7 The queen gets out of the threat and adds a bit of pressure against our bishop. 15.Nxg5+ We take on g5, giving a check and protecting our bishop on e6, while creating pressure against the king. This is much better than taking the rook on h8 and leaving the knight to be captured. 15...Kg6 There's nothing better to avoid going into the c1 h6 diagonal. 16.Rg1 We are just winning here, thanks to the various discovered checks and other threats against Black's king.
Line 3 — punishing a blunder
1.e4 We take the center. 1...c6 Our opponent goes for the Carokann Defense! 2.d4 We continue to claim the center. 2...d5 Black does the same, now we need to make a decision how to go about this. 3.Nc3 We develop our knight, protecting the pawn on e4. The alternative 3.Nd2 is equally good. 3...dxe4 Trading in the center. 4.Nxe4 We recapture the pawn, and have a good control of the center so far. 4...Nf6 The knight develops, offering a trade and hoping we will walk into a standard Carokann line. 5.Ng5!? We have a completely different plan! This move tells our opponent we are willing to sacrifice our knight on f7 if they decide to expel us with ...h6. 5...h6 Accepting the challenge, our opponent kicks out the knight. 6.Nxf7!! We launch the ALIEN GAMBIT, a line from out of this world. The point of this gambit is to completely eliminate the safety of our opponent's king, and to exploit the weakened light squares until we can deliver mate. 6...Kxf7 Our opponent takes our knight but leaves their king in a precariously exposed square. 7.Nf3 We develop our knight and prepare a jump to e5. We intentionally delay developing our bishop to keep flexibility between Bc4 and Bd3. 7...Bf5 Developing the bishop is natural, and it helps Black to cover some key squares like g6. 8.Ne5+ Our knight jumps to the center with a check. We force our opponent to decide which way their king is going. 8...Kg8 Going to the kingside, hoping to find safety either on g8 or h7, although both squares are still vulnerable. 9.Bc4+ Now that we know the bishop is on f5, it makes sense for us to develop our bishop to c4 with a check. 9...e6? Blocking our check, but turning the pawn into a clear target we can likely pursue right away. 10.g4 This is a very common idea in the Alien gambit, we drive away the bishop in order to capture the e6 pawn next. 10...Be4 Attacking our rook. 11.Bxe6+ We take the pawn on e6 with a check, now we have two pawns for the piece, it's no longer that simple. 11...Kh7 The only move, the king goes away. 12.f3! We threaten the bishop, inviting it to leave its current diagonal. 12...Bd5?? A major blunder, leaves the b1 h7 diagonal completely unprotected. 13.Qd3+ This check forces Black to give up a piece and go into a lost position.
The free preview ends here — continue with all 14 lines in the interactive course, with instant feedback on every move you play.
Frequently asked questions
Is the Alien Gambit sound?
Objectively no — engines prefer Black with precise defense. But over the board the defense is extremely hard to find: Black's king is exposed for the whole game, and the gambit scores spectacularly in practical play, especially at faster time controls.
Where does the name Alien Gambit come from?
The knight sacrifice was popularized by the content creator Witty Alien, whose videos made it an internet sensation — later boosted by other creators covering the line. The name stuck to the whole 5.Ng5 and 6.Nxf7 idea.
What if Black declines with something other than 5...h6?
Moves like 5...e6 or 5...g6 avoid the immediate sacrifice but concede other weaknesses — for instance dark-square holes or a shut-in bishop. The course covers the declined setups so you always know where your attack comes from.
Learn the Alien Gambit with AI feedback
This page pairs the guide above with an interactive ChessMind AI course: a GM-authored repertoire you study move by move on a real board, then practice against a human-like chess AI opponent with instant feedback and spaced-repetition review, so the key positions actually stick. Start learning, jump straight into practice, or browse all opening courses.
New to a concept? Every term is defined in the chess terms glossary.